
 Login



A product photo shows a sofa, a lamp and a rug, but it cannot tell visitors which one costs what. A floor plan shows rooms, but not their size or what they look like. Visitors leave the image to look for answers somewhere else on the page.
Image hotspots put those answers on the image itself. This tutorial shows you how to add atomic image hotspots in Elementor 4 with the Image Hotspot element from Animation Addons, without Elementor Pro. You will place markers, choose a tooltip, lightbox or link for each point, animate the markers, set up a guided tour and make it work on phones.
To add atomic image hotspots in Elementor, install Animation Addons Pro, open a page with the Atomic Editor on and drag Image Hotspot onto the canvas. Choose your image, add points in Hotspots and drag each marker into place. Set each point to Tooltip, Lightbox or Link, pick a Trigger and Marker Animation, then test on a phone and publish.
What Is an Image Hotspot?
An image hotspot is a marker placed on a specific spot of a picture. When a visitor hovers or clicks the marker, it shows more detail about that spot: a short label, a product card, a room photo or a link.
Hotspots fit when:
- One image holds several things a visitor may ask about, such as products in a room.
- A plan or map needs labels that would clutter the picture if they were all visible.
- A screenshot or diagram needs a short walk-through, one point at a time.
What Is the Atomic Image Hotspot Element?
The Image Hotspot is an Elementor 4 Atomic Element from Animation Addons that places interactive markers over an image. Each marker opens a tooltip, a lightbox or a link, and an optional guided tour opens every point in turn. It runs on Elementor Free with Animation Addons Pro.
| Key fact | Detail |
| Plan | Animation Addons Pro |
| Element type | Native Elementor 4 Atomic Element, built from child elements |
| Works with | Elementor Free and Elementor Pro, with the Atomic Editor on |
| Child elements | Image, Hotspot Point, Hotspot Marker, Hotspot Content, Hotspot Lightbox |
| Action per point | Tooltip, Lightbox or Link |
| Trigger | Hover, Click or None (tooltips always visible) |
| Marker animations | Beat, Pulse, Ripple, Ring, Glow, Bounce or None, for all markers or one marker |
| Guided tour | Enable Tour, Delay per Hotspot (ms), Pause on Hover/Interaction, Loop, Auto-open Tooltips |
| Positioning | Horizontal (%) and Vertical (%), or drag markers on the canvas |
| Version | Animation Addons for Elementor 4.3, updated October 2026 |
Why Hotspots Take Extra Work in Elementor 4
Two things slow most people down:
- Elementor 4 has no atomic hotspot of its own. Elementor Pro’s Hotspot widget is a classic v3 widget, so it needs an Elementor Pro license and does not use Classes and Variables.
- Many “Elementor V4 compatible” hotspot addons are classic widgets. They run inside Elementor 4, but they are not Atomic Elements.
The Animation Addons Image Hotspot is a native Atomic Element, styled with Classes and Variables.
Want to see it before you install anything? Open the Animation Addons live demo.
What You Need Before You Start
| Requirement | Why |
| WordPress with Elementor (Free or Pro) | The Image Hotspot does not need Elementor Pro |
| Atomic Editor turned on | Image Hotspot is an Atomic Element |
| Animation Addons for Elementor (free) | The base plugin |
| Animation Addons Pro | Image Hotspot is a Pro element |
| An image | A product photo, room photo, floor plan, map, screenshot or diagram |
| The content for each point | Labels, product details, room photos or links |
New to the Atomic Editor? Read the complete guide to Elementor V4 Atomic elements first.
How the Image Hotspot Is Built
The Image Hotspot is a composite element. In the Navigator, it holds an Image and one Hotspot Point per marker, and each point holds its own parts.
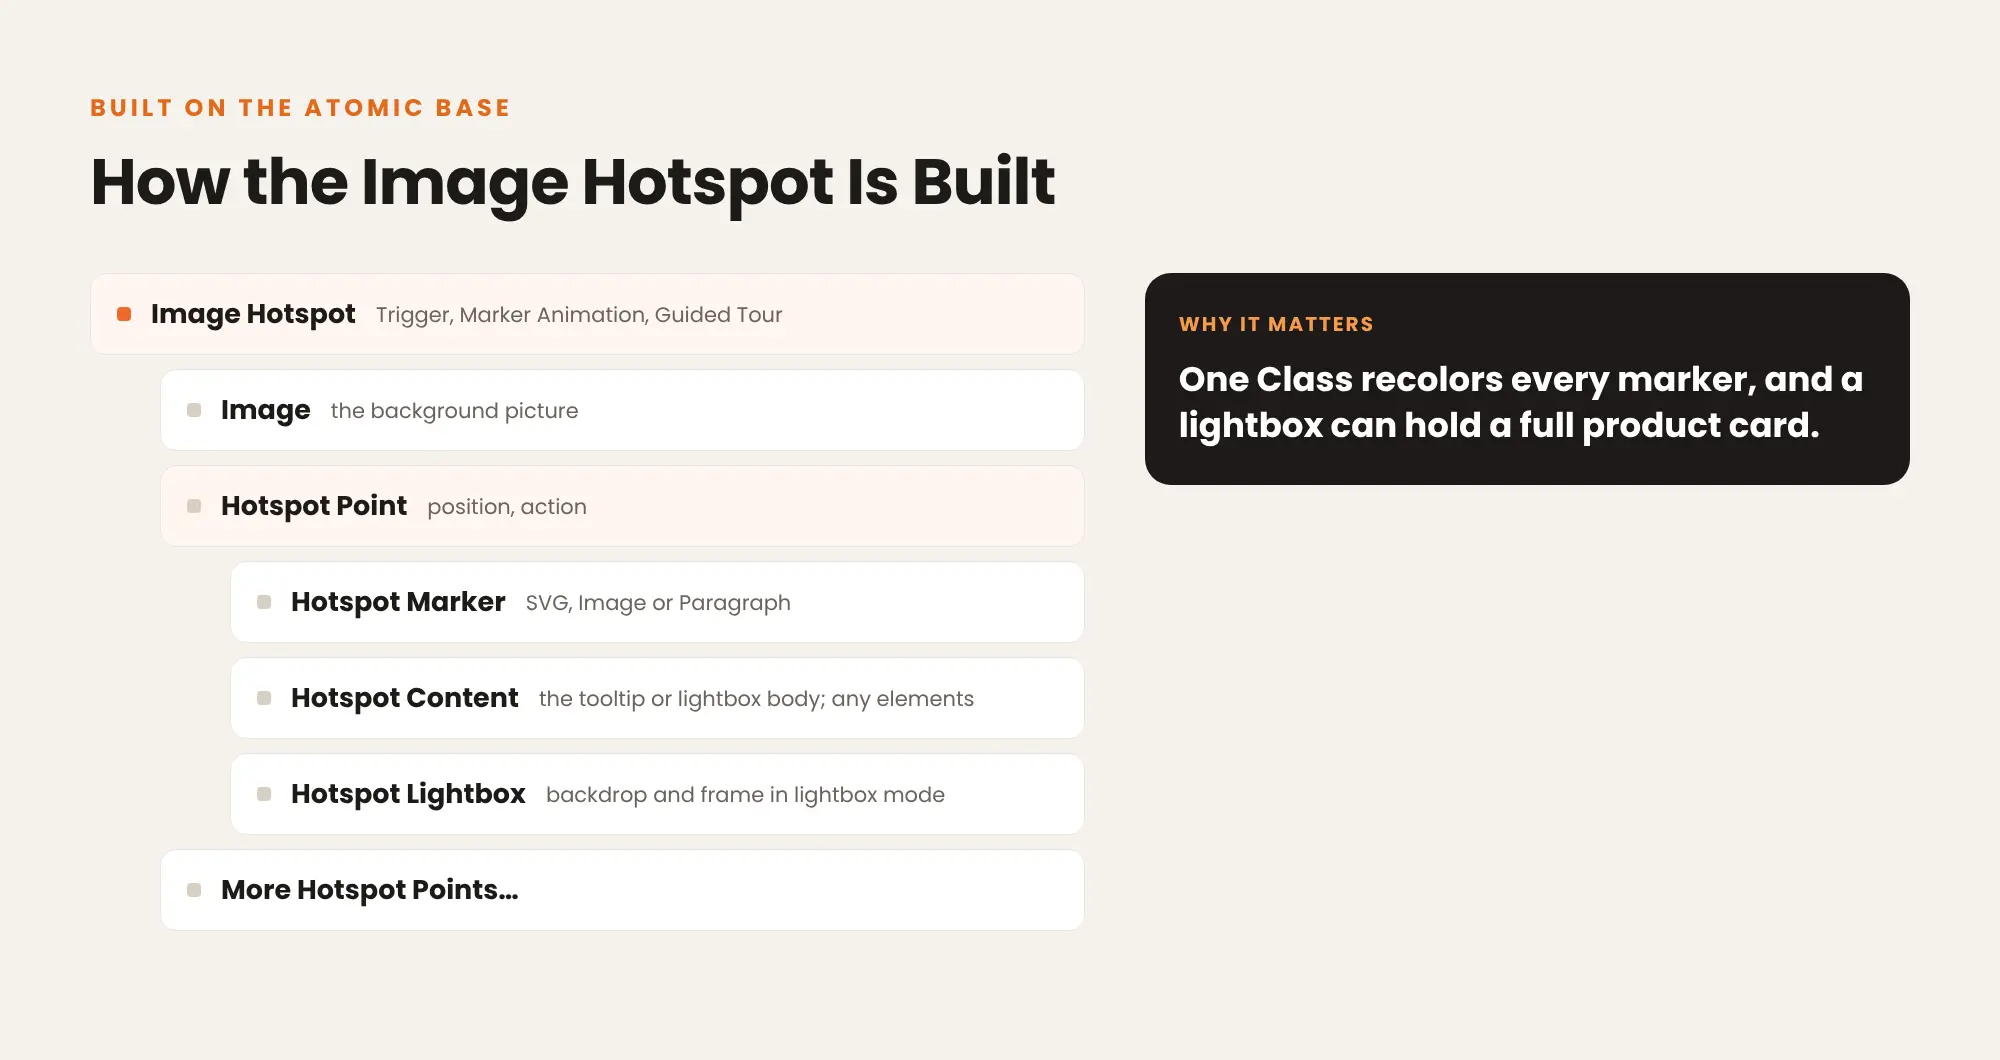
| Part | What it does |
| Image Hotspot | The parent: Trigger, Marker Animation and Guided Tour |
| Image | The background picture |
| Hotspot Point | The position of one marker and its action |
| Hotspot Marker | The marker itself. It starts empty: drop in an SVG, an Image or a Paragraph |
| Hotspot Content | The tooltip or lightbox body. It is an open container that holds any elements |
| Hotspot Lightbox | The backdrop and frame in lightbox mode |
Because every part is an atomic element, one Class can recolor every marker, and a lightbox can hold a full product card. See Classes and Variables explained if you are new to them.
How to Add Atomic Image Hotspots in Elementor: Step by Step
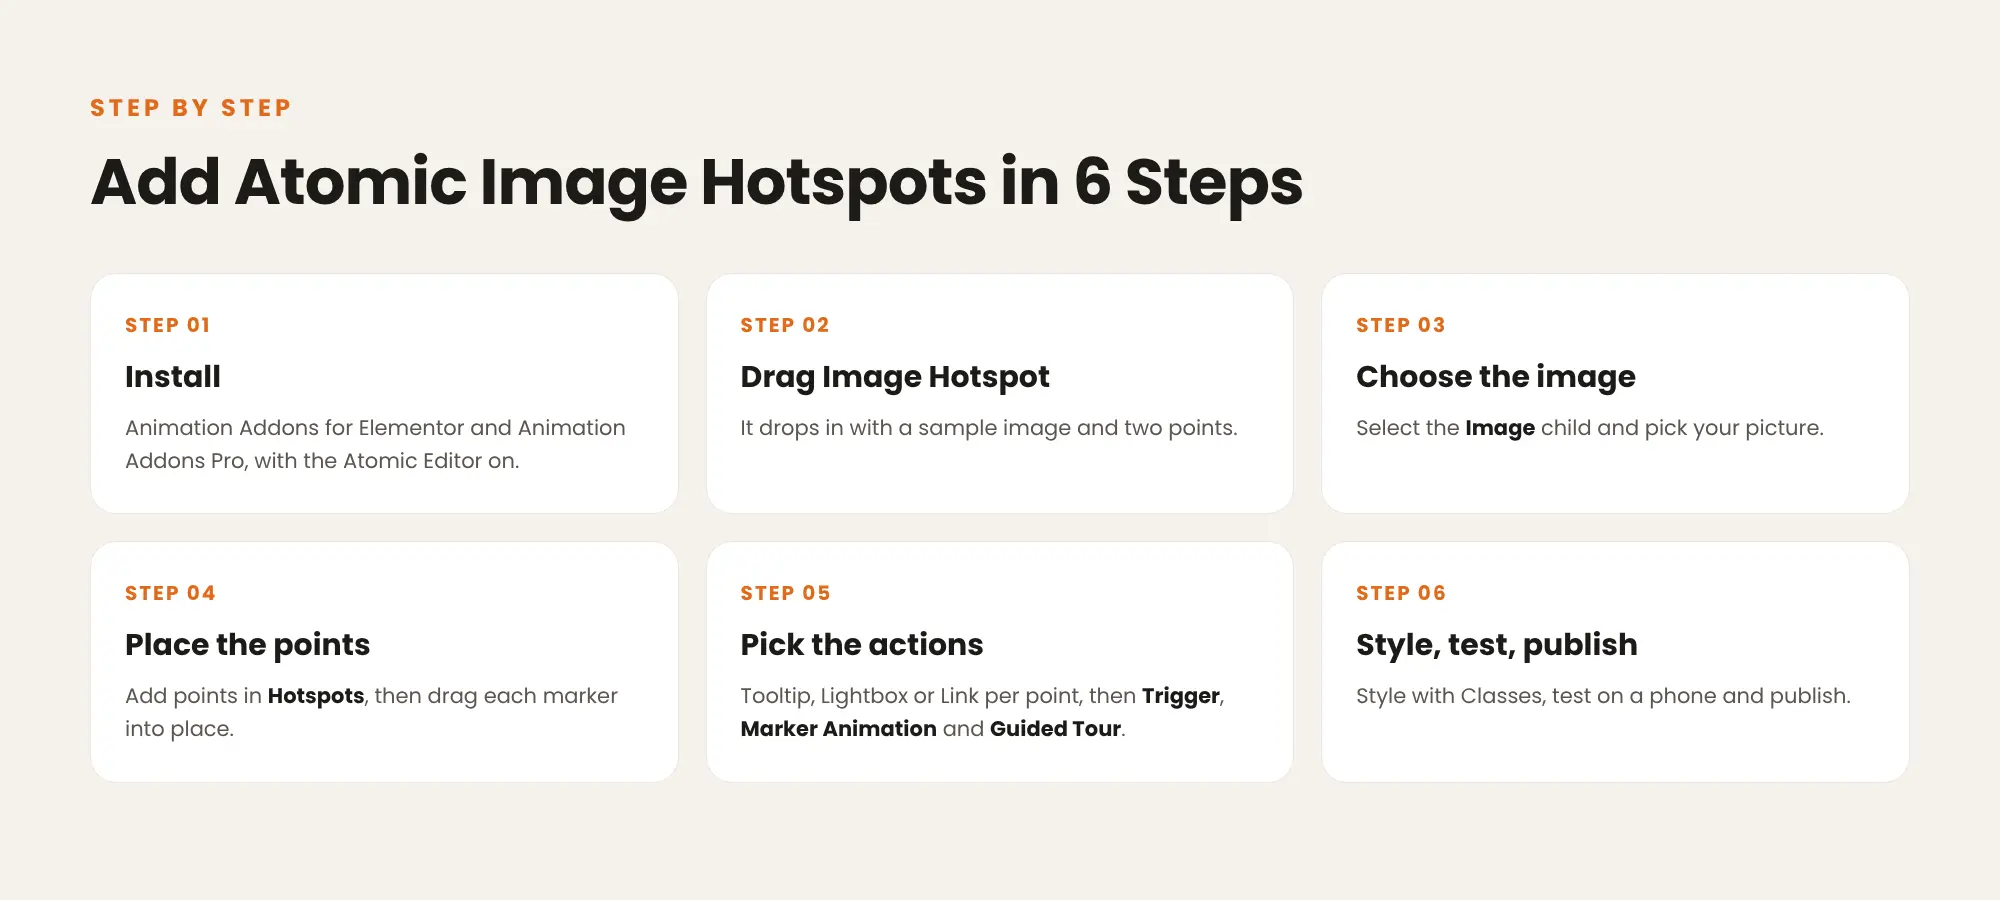
Step 1: Install the plugins and turn on the Atomic Editor
Install Animation Addons for Elementor from WordPress.org, then install and activate Animation Addons Pro with your license key. Open your page in Elementor with the Atomic Editor on.
Step 2: Drag Image Hotspot onto the canvas
Find Image Hotspot in the elements panel and drag it onto the canvas.
It drops in with a sample image and two points, so you can see how it works right away.
Step 3: Choose your image
Select the Image child element and choose your picture from the Media Library.
Step 4: Add points and place the markers
In Hotspots, add or remove points. Then place each marker in one of two ways:
- Drag it on the canvas to the spot you want.
- Type its position in Horizontal (%) and Vertical (%).
Positions are a percentage of the image, so markers stay on the same spot when the image resizes.
Step 5: Pick an action for each point and fill its content
For each point, set On Click/Hover to Tooltip, Lightbox or Link, then edit its Hotspot Content. On the parent element, set Trigger and Marker Animation, and turn on Guided Tour if you want one. The next sections explain each option.
Step 6: Style with Classes, test on a phone and publish
Style the markers and content boxes with Classes, so one edit updates every point. Test the page on a phone, then publish.
Three Actions Each Point Can Take
Every Hotspot Point has its own On Click/Hover setting, so one image can mix actions.
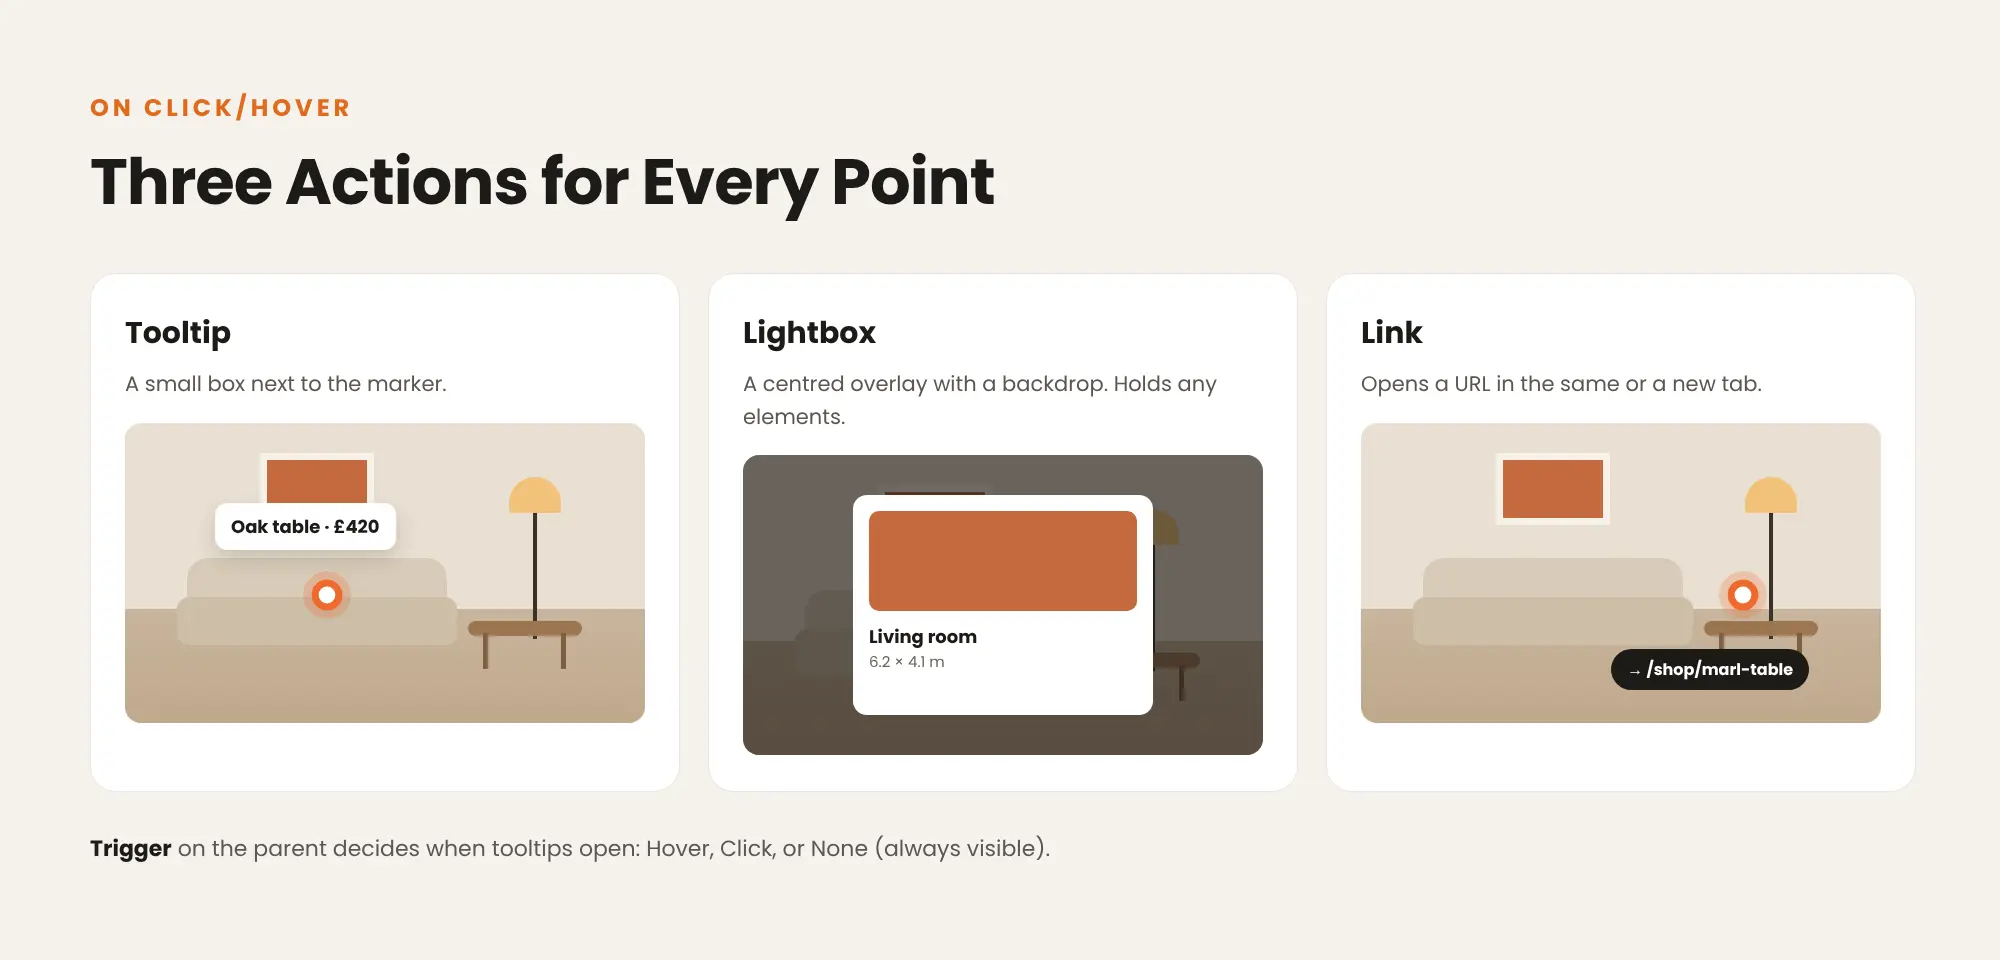
| Action | What the visitor sees | Use it for |
| Tooltip | A small box next to the marker with the Hotspot Content | Short labels, prices, product names |
| Lightbox | A centred overlay with a backdrop, holding the Hotspot Content | Room photos, product cards, video, nested maps |
| Link | Opens a URL in the same tab or a new tab | Sending visitors to a product or section |
Visitors close a lightbox with Escape or a click on the backdrop. Hotspot Content can hold headings, images, buttons, a Video element, or even another Image Hotspot for drill-down maps.
Then choose when tooltips open with the parent Trigger:
- Hover: tooltips open when the pointer moves over a marker.
- Click: tooltips open on a click or tap. This is the safer choice for pages with many phone visitors.
- None: all tooltips stay visible, which turns the image into a labelled diagram.
Animate the Markers
Marker Animation draws the eye to points a visitor might miss. Six animations are available:
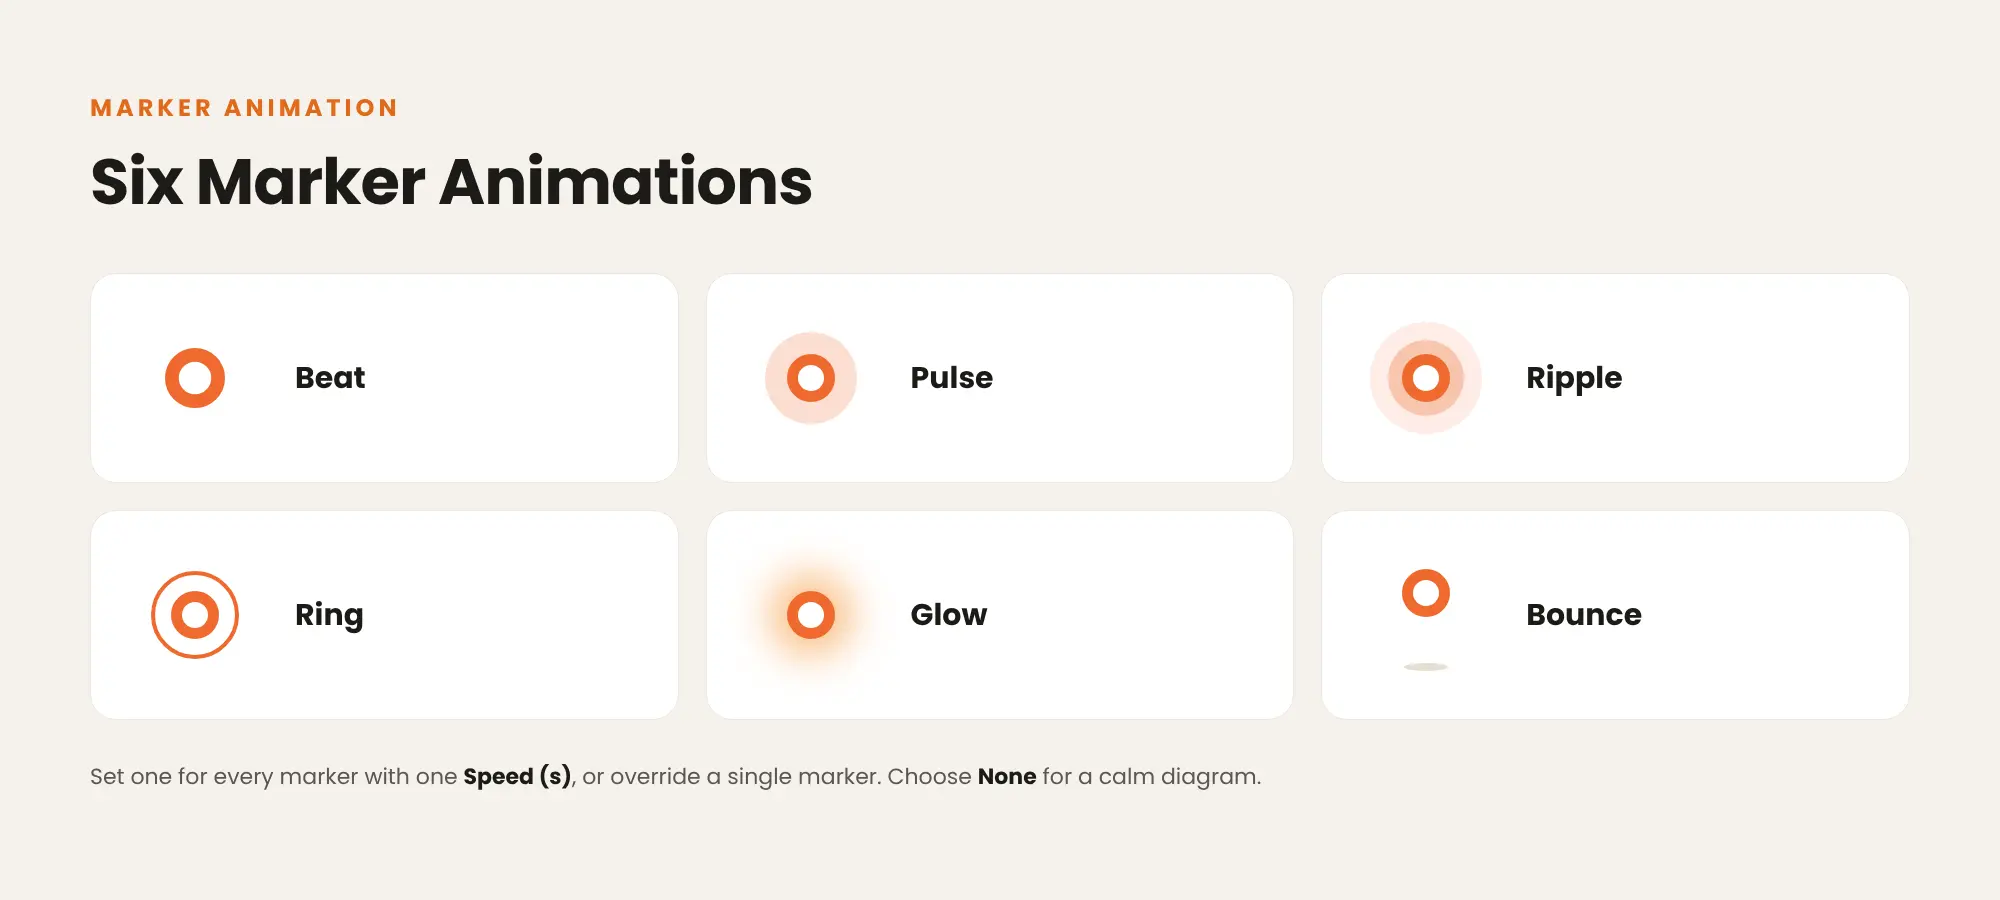
- Beat
- Pulse
- Ripple
- Ring
- Glow
- Bounce
Set one animation for every marker with one Speed (s), or give a single marker its own Animation to make it stand out. Choose None for a calm diagram.
Number your markers automatically. The Hotspot Marker starts empty. Drop a Paragraph into it and give that Paragraph the hotspot-number class, and the markers number themselves in order.
Set Up a Guided Tour
A guided tour opens each point in turn, so visitors see every detail without hunting for markers. Turn it on in the parent element:
| Setting | What it does |
| Enable Tour | Opens each point in turn |
| Delay per Hotspot (ms) | How long each point stays open, for example 3000 for three seconds |
| Pause on Hover/Interaction | Stops the tour once the visitor clicks |
| Loop | Starts again after the last point |
| Auto-open Tooltips | Opens each tooltip as the tour reaches its point |
The tour also pauses on hover or keyboard focus, so it never moves away from a point a visitor is reading.
Six Ways to Use the Image Hotspot
These six builds are the demos on the Image Hotspot product page. Each uses the Image Hotspot plus native Elementor 4 elements.
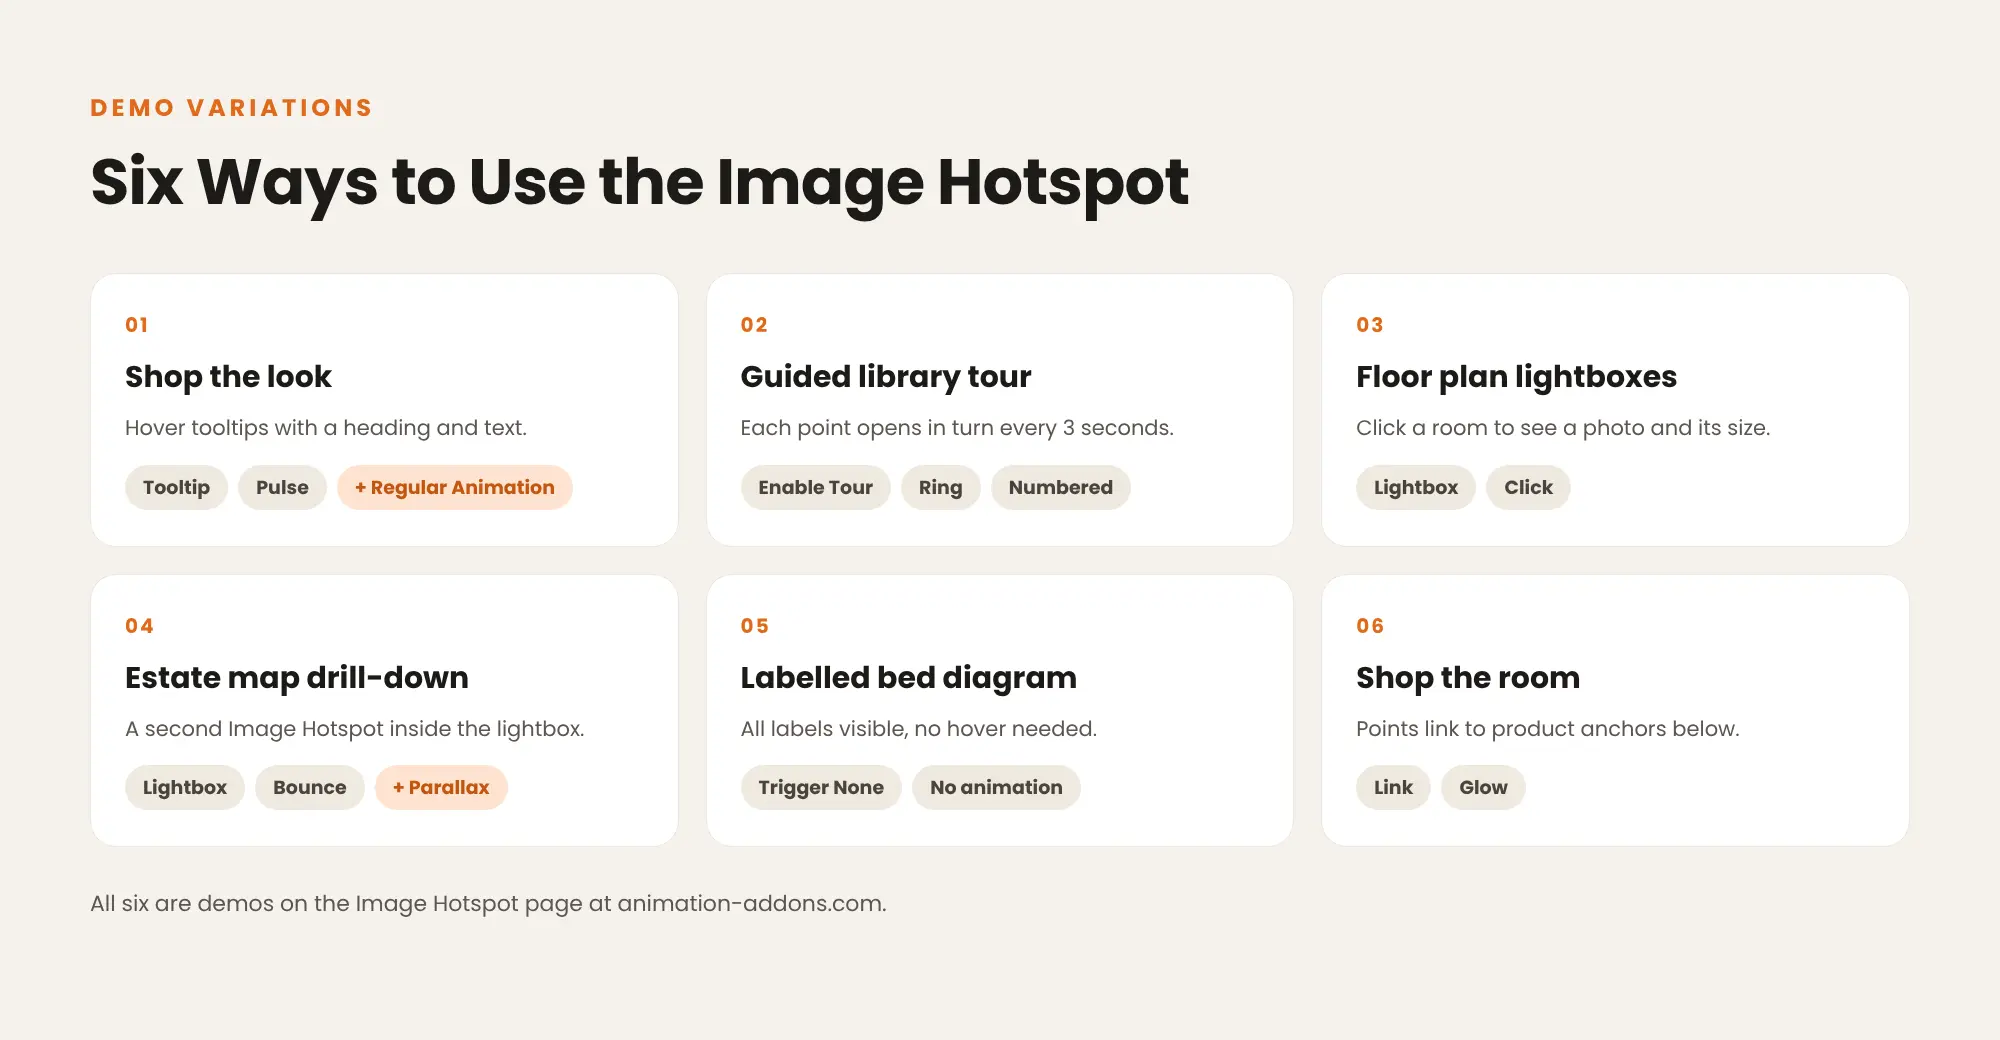
| Use case | Settings |
| Shop the look | Trigger Hover, each point Tooltip, Marker Animation Pulse, with a Heading and a Paragraph in each Hotspot Content. The fade-in on scroll uses the Regular Animation extension (Pro). |
| Guided library tour | Enable Tour, Delay per Hotspot (ms) 3000, Pause on Hover/Interaction, Loop and Auto-open Tooltips on. Numbered markers with the hotspot-number class and Marker Animation Ring. |
| Floor plan lightboxes | The plan as the image, Trigger Click and each point Lightbox, with an Image, a Heading and a Paragraph in each Hotspot Content. |
| Estate map drill-down | Points set to Lightbox, with a second Image Hotspot inside Hotspot Content. Marker Animation Bounce. The slow drift on scroll uses the Parallax extension (Pro). |
| Labelled bed diagram | Trigger None and Marker Animation None. Each Hotspot Content is moved from its own Style panel so the labels never overlap. |
| Shop the room | Points set to Link, with Link URL pointing at each product anchor, and Marker Animation Glow. The products below the image are ordinary links. |
Product and SaaS teams use it to explain features on one screenshot, real estate sites to annotate floor plans, and venues and festivals to build clickable maps.
Make Hotspots Work on Phones
Touch screens have no real hover, so a point set to Hover can seem dead on a phone. For pages with many phone visitors:
- Set Trigger to Click, so a tap opens each tooltip.
- Or set Trigger to None, so tooltips stay open.
- Check tooltips near the edge of the image, and make sure they fit on a small screen.
Markers use percentage positions, so they stay on the same spot of the image at every screen size.
Hotspots, SEO and Accessibility
Link points are not SEO links. Link points navigate with JavaScript, not a real <a> tag, so search engines do not follow them and Add Nofollow has no effect. For shoppable images, list the products as normal links beside the image and use the hotspots for the visual. Tooltip and lightbox text is part of the page HTML.
Keyboard and screen reader support:
- Every point is focusable and opens with Enter or Space.
- Tooltips carry a tooltip role and lightboxes a dialog role.
- Escape closes a lightbox.
- Looping marker animations stop for visitors who prefer reduced motion.
Performance: the Image Hotspot loads one small script and stylesheet, only on pages that use it. Marker animations are CSS, with no GSAP or other animation library, and opening a point fetches nothing extra. For more, read how to optimize animation for page speed.
Best Practices for Image Hotspots
- Keep the number of points small. A crowded image is hard to read on a phone.
- Keep tooltips short. Move longer content, photos and buttons into a lightbox.
- Use Click on mobile-heavy pages and Hover only where the hotspots add extra detail.
- Number the markers when order matters, such as a tour or a process.
- Use one Class for all markers, so one edit restyles every point.
- Pair animations with care. One animated marker style per image is easier on the eye than several.
Want more interaction on your images? See how to create an image accordion and how to add image animation in WordPress.
Troubleshooting Common Problems
| Problem | Cause | Fix |
| Image Hotspot is not in the elements panel | Animation Addons Pro is not active, or the Atomic Editor is off | Activate Animation Addons Pro and open the page with the Atomic Editor on |
| Tooltips do nothing on a phone | Trigger is set to Hover | Set Trigger to Click, or None to keep tooltips open |
| A tooltip is cut off at the edge | The marker sits close to the edge of the image | Move the marker inward or shorten the tooltip, then check on a phone |
| Markers look empty | The Hotspot Marker starts empty | Drop an SVG, an Image or a Paragraph into each marker |
| Labels overlap when Trigger is None | Every tooltip shows at once | Move each Hotspot Content from its own Style panel |
| Hotspot links do not show up in search | Link points use JavaScript, not an <a> tag | List the same products or pages as normal links next to the image |
Elementor Pro Hotspot vs Atomic Image Hotspot
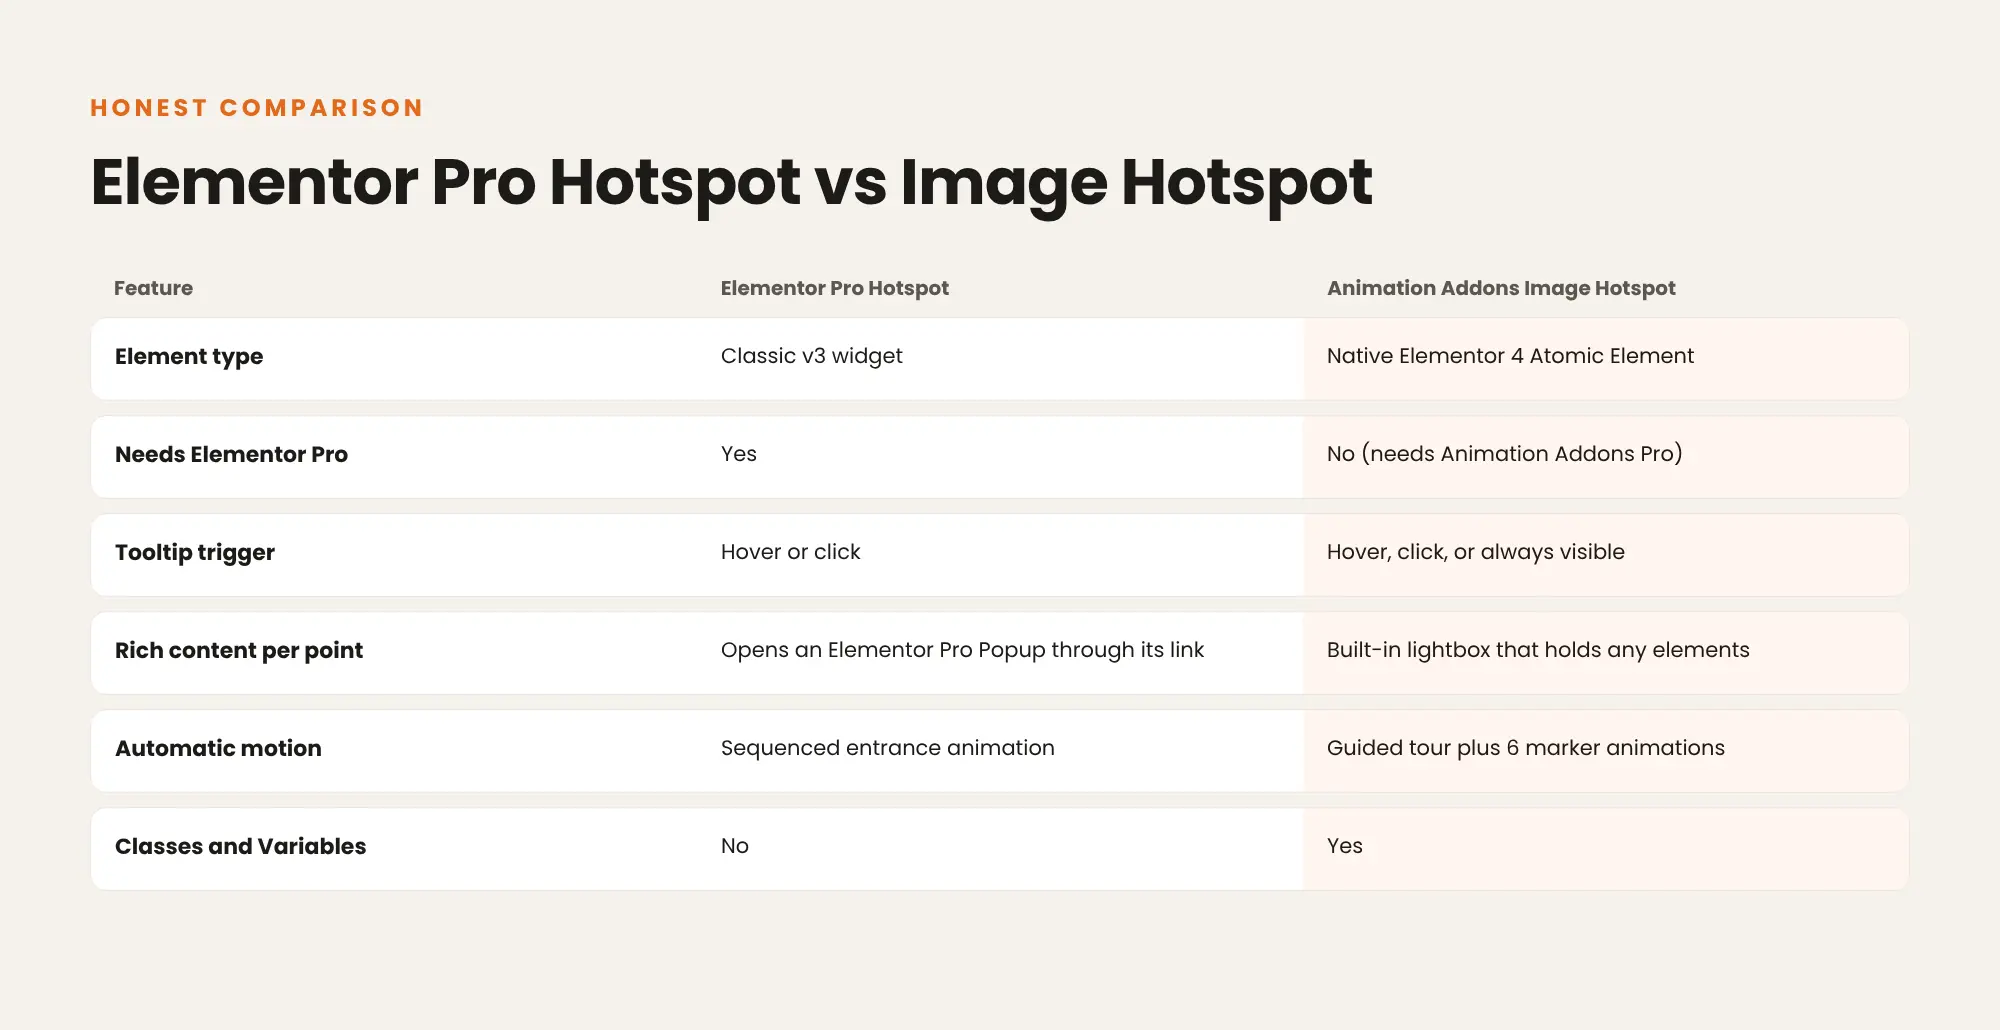
| Feature | Elementor Pro Hotspot | Animation Addons Image Hotspot |
| Element type | Classic v3 widget | Native Elementor 4 Atomic Element |
| Needs Elementor Pro | Yes | No (needs Animation Addons Pro) |
| Tooltip trigger | Hover or click | Hover, click, or always visible |
| Rich content per point | Opens an Elementor Pro Popup through its link | Built-in lightbox that holds any elements, including another hotspot image |
| Automatic motion | Sequenced entrance animation | Guided tour that opens each point in turn, plus 6 marker animations |
| Styled with Classes and Variables | No | Yes |
Where Elementor Pro wins: its Hotspot widget covers the basics well, with a label, icon and link per point and percentage positioning. If you already pay for Elementor Pro and need simple labelled points, it is a good fit.
Where the Atomic Image Hotspot wins: it is a native Elementor 4 element, it does not need Elementor Pro, it holds any content in a built-in lightbox, and it adds a guided tour and six marker animations. Need something free? The Image Compare element adds interaction to a pair of images at no cost.
For everything else Elementor 4 includes for free, see Elementor 4 Free vs Pro.
Which Plan Includes the Image Hotspot?
Every Animation Addons Pro plan includes the Image Hotspot, because Pro plans do not lock features by plan. Only the number of sites and the billing term change. Plans start at $49 a year. Until 5 December 2026, Pro is up to 50% off, from $24.50 for the first year, and every plan comes with a 15-day money-back guarantee. See Animation Addons pricing explained for every plan.
Turn Any Image Into a Guided Explanation
Tooltips, lightboxes, links and a guided tour, built from real Elementor 4 atomic elements, plus every other Pro element and GSAP extension. Works with Elementor Free.
Final Thoughts
Atomic image hotspots turn one picture into a guided explanation. The setup takes six steps: install the plugins, drag Image Hotspot onto the canvas, choose the image, place the points, pick an action for each one, then style, test and publish.
Use tooltips for short labels and lightboxes for anything longer. Set Trigger to Click on pages with many phone visitors, keep the number of points small, and list important links as normal text next to the image. Once one image works, reuse its marker Class on every hotspot across the site.
FAQs
How do I add hotspots to an image in Elementor 4?
Drag the Image Hotspot onto the page with Animation Addons Pro active and choose an image. Add points in Hotspots, then drag each marker into place or type its Horizontal and Vertical percentage.
Do I need Elementor Pro for image hotspots?
No, the Image Hotspot runs on Elementor Free with the Atomic Editor turned on. It needs Animation Addons for Elementor and Animation Addons Pro.
Is there an atomic hotspot widget in Elementor 4?
Elementor 4 has no atomic hotspot of its own, and Elementor Pro’s Hotspot is a classic v3 widget. The Animation Addons Image Hotspot is built as a native Elementor 4 Atomic Element.
How do I make a hotspot open a lightbox?
Set the point’s On Click/Hover option to Lightbox. Its Hotspot Content opens in a centred overlay with a backdrop, and visitors close it with Escape or a click on the backdrop.
Why are my hotspots not working on mobile?
Touch screens have no real hover, so points set to Hover can seem dead on a phone. Set Trigger to Click, or None to keep tooltips open.
Can hotspots play a guided tour?
Yes, Enable Tour opens each point in turn at your Delay per Hotspot (ms). Pause on Hover/Interaction stops the tour once a visitor clicks.
Which marker animations are available?
Beat, Pulse, Ripple, Ring, Glow and Bounce, or None. You can set one for every marker or override a single marker.
Are hotspot links good for SEO?
No, Link points navigate with JavaScript, so search engines do not follow them and Add Nofollow has no effect. List important products or pages as normal links next to the image.
Can I build a floor plan with hotspots?
Yes, use the plan as the image and add one point per room set to Lightbox. Put a room photo, a heading and a paragraph in each Hotspot Content, and set Trigger to Click.
Will image hotspots slow my page down?
The Image Hotspot loads one small script and stylesheet, only on pages that use it. Marker animations are CSS, and tooltip and lightbox content is already in the page HTML.


Leave a Reply