
 Login
Login


Yes, you can animate a WordPress website without writing complex code. From subtle fade-ins and hover effects to scroll-triggered interactions and animated text, the right motion can make your website more engaging while guiding visitors toward important content.
The easiest approach depends on what you want to achieve: Elementor works well for basic motion effects, animation plugins for wordpress offer advanced no-code controls, and GSAP gives you greater flexibility for custom interactions.
In this guide, you’ll learn how to animate a website in WordPress, which sections are worth animating, the different animation types you can use, and step-by-step ways to add them. You’ll also discover how to keep animations fast, responsive, and accessible across desktop and mobile devices.
You can animate a WordPress website in two main ways: use a page builder such as Elementor, install a no-code animation plugin such as Animation Addons, or add custom animations with GSAP.
For simple effects to advanced interactions, Animation Addons provides visual controls for text, scroll, hover, parallax, and other effects, while GSAP offers greater control for custom animations.
Whichever method you choose, keep animations subtle, responsive, fast-loading, and focused on improving the user experience rather than distracting visitors.
Key Takeaways
- Use Elementor or CSS for simple effects, an animation plugin for advanced no-code controls, and GSAP for highly customized interactions.
- Focus on hero sections, headings, CTAs, feature cards, images instead of animating everything.
- Fade, slide, hover, zoom, text reveal, scroll-triggered, parallax, and flip animations can serve different purposes.
- Animation should guide attention, communicate information, or improve interaction, not simply add decoration.
- Keep animations short and lightweight, and test your website across desktop and mobile.
- Avoid motion that interferes with reading or interaction, and consider reduced-motion preferences.
- Preview animations on different screen sizes and make sure the content remains usable.
Which Parts of a WordPress Website Should You Animate?
Not every element on a WordPress website needs animation. The most effective approach is to add motion where it helps visitors notice important information, understand the page structure, or take action.
Focus on key sections such as the hero, CTA, features, images, testimonials, and statistics, and keep the movement subtle enough that it never gets in the way of reading or navigation.
Hero
Your hero section is usually the first thing visitors see, making it one of the best places to introduce purposeful animation. Use a text reveal, fade, slide, or subtle image animation to bring attention to the headline, supporting copy, or primary CTA without delaying access to the main content.
Best for: Headlines, hero images, CTAs, and supporting visuals
Tip: Keep the animation short and lightweight so visitors can understand the page immediately.
CTA
A call-to-action should stand out, but it shouldn’t constantly move or distract visitors. A subtle hover, scale, color, or micro-interaction can provide visual feedback and make buttons feel more responsive when users are ready to click.
Best for: Buttons, links, signup forms, and conversion sections
Tip: Use animation to reinforce the action rather than forcing attention with continuous motion.
Features
Feature sections often contain multiple cards or benefits competing for attention. Adding staggered fade, slide, or scroll animations can reveal each feature progressively and help visitors scan the information in a logical order.
Best for: Feature cards, service lists, product benefits, and icons
Tip: Keep the sequence quick and consistent so visitors don’t have to wait for content to appear.
Images
Animated images can make product screenshots, illustrations, portfolios, and visual content more engaging. Use effects such as fade, zoom, slide, parallax, or hover movement when the animation adds context or draws attention to an important visual.
Best for: Product images, portfolio projects, illustrations, and screenshots
Tip: Optimize image files before adding animation, especially for large hero images and mobile devices.
Testimonials
Testimonials are useful for building trust, but a static block of text can sometimes feel visually repetitive. A subtle fade, slide, or carousel transition can introduce customer quotes one at a time while keeping the section easy to read.
Best for: Customer quotes, reviews, ratings, and client photos
Tip: Don’t hide important testimonials behind overly fast or automatic animations; visitors should have enough time to read them comfortably.
Stats
Animated statistics can make numbers more visually engaging by revealing them as visitors reach the section. A count-up animation can work particularly well for metrics such as customers served, projects completed, downloads, or years of experience.
Best for: Numbers, percentages, milestones, and performance metrics
Tip: Use animation to emphasize meaningful numbers, and make sure the actual values remain accessible even if the animation doesn’t run.
The key principle: Animate elements that benefit from motion—not every element on the page. When animation helps visitors understand what matters, what to do next, or where to look, it becomes a useful part of the user experience rather than unnecessary decoration.
9 Types of WordPress Animations You Can Use
WordPress animations can do more than make a website look dynamic, they can guide attention, improve visual storytelling, and make interactions feel more natural. The best animation depends on the content, user action, and effect you want to create.
Here are eight useful animation types you can add to a WordPress website.
Fade Animation
Fade animation gradually changes an element from transparent to visible, creating a subtle and smooth entrance. It works especially well when you want content to appear without distracting visitors.
- Best for: Text, images, sections, cards, and content blocks
- Trigger: Page load, scroll, or user interaction
- Use when: You want a clean, subtle way to reveal content or introduce elements without strong movement.
Slide Animation
Slide animation moves an element into view from a particular direction, such as left, right, top, or bottom. It adds a sense of movement while helping establish a clear visual flow.
- Best for: Headings, images, content sections, cards, and feature blocks
- Trigger: Page load, scroll, or interaction
- Use when: You want to guide visitors toward important content or create a more dynamic page layout.
Text Reveal Animation
Text reveal animation displays text progressively instead of showing the entire message at once. It can reveal characters, words, or lines to create a more engaging introduction.
- Best for: Hero headings, taglines, key messages, and section headings
- Trigger: Page load or scroll
- Use when: You want to make an important message stand out, particularly in hero sections and landing pages.
Hover Animation
Hover animation changes an element when a visitor moves their cursor over it. The change can involve movement, scale, color, opacity, or other visual effects, providing immediate feedback.
- Best for: Buttons, links, cards, images, icons, and navigation elements
- Trigger: Mouse hover
- Use when: You want to make interactive elements feel more responsive and clearly communicate that they can be clicked or explored.
Scroll Animation
Scroll animation starts an effect when an element enters or moves through the visitor’s viewport. Content can fade, slide, scale, or transform as the user scrolls down the page.
- Best for: Feature sections, product showcases, testimonials, statistics, and storytelling layouts
- Trigger: User scroll
- Use when: You want to reveal content progressively and create a more engaging page journey without requiring additional clicks.
Parallax Animation
Parallax animation creates a sense of depth by moving background and foreground elements at different speeds as the visitor scrolls. This can make a flat page feel more layered and immersive
- Best for: Hero sections, backgrounds, image sections, and storytelling pages
- Trigger: User scroll
- Use when: You want to add depth and visual interest to large sections without overwhelming the main content.
Flip Animation
Flip animation rotates an element to reveal another side, creating a card-like transition. It can be used to hide secondary information until a visitor interacts with the element.
- Best for: Information cards, service cards, team profiles, feature blocks, and interactive content
- Trigger: Hover, click, or scroll
- Use when: You want to present additional information without taking up extra space on the page.
Lottie Animations
Lottie animations are lightweight, scalable animations that can be used to display detailed illustrations and interface visuals. They are especially useful when you want more expressive motion than a basic CSS effect can provide
- Best for: Illustrations, icons, onboarding sections, product features, and empty states
- Trigger: Page load, scroll, hover, click, or other interactions
- Use when: You want to add a polished visual illustration or explain a product or feature through motion.
SVG Animations
SVG animation adds movement to scalable vector graphics, allowing individual shapes, paths, icons, or other vector elements to animate. Because SVGs remain sharp at different screen sizes, they work well for responsive designs.
- Best for: Icons, logos, illustrations, diagrams, and decorative graphics
- Trigger: Page load, hover, scroll, or interaction
- Use when: You need crisp, scalable graphics with lightweight motion that can adapt across different screen sizes.
Best WordPress Animations by Website Type
| Website type | Recommended animations |
|---|---|
| Business | Fade, slide, hover |
| SaaS | Scroll, text reveal, parallax |
| Portfolio | GSAP, horizontal scroll, image reveal |
| Agency | Scroll storytelling, cursor effects |
| E-commerce | Hover, product reveal, micro-interactions |
| Blog | Subtle fade and reading-progress effects |
| Landing page | Hero reveal, CTA hover, scroll animation |
How to Add Animations in WordPress: 2 Simple Methods
Now that you know what to animate and which styles to use, let’s look at the two easiest ways to bring animations into WordPress:
- No code Plugin (Animation Addons).
- Using the GSAP Library.
Let’s start with the No-Code Plugin (Animation Addons).
What You Need Before You Start
Quick checklist before you animate:
- WordPress updated.
- Elementor installed.
- Animation Addons (Plugin) activated.
All set? Great, you’re ready to dive into animations!
Method 1. No code Plugin (Animation Addons)
Animation Addons is a no-code animation toolkit for Elementor that provides advanced motion effects, templates, widgets, and animation controls from within the WordPress editor.
First, let’s take a look at one way, which is the ‘Starter Template’.
Starter Template
Starter Template is the easiest way to create an animated website in WordPress. You do not need any coding, website development skills, or special knowledge. All you have to do is:
Install and activate ‘Animation Addons’.
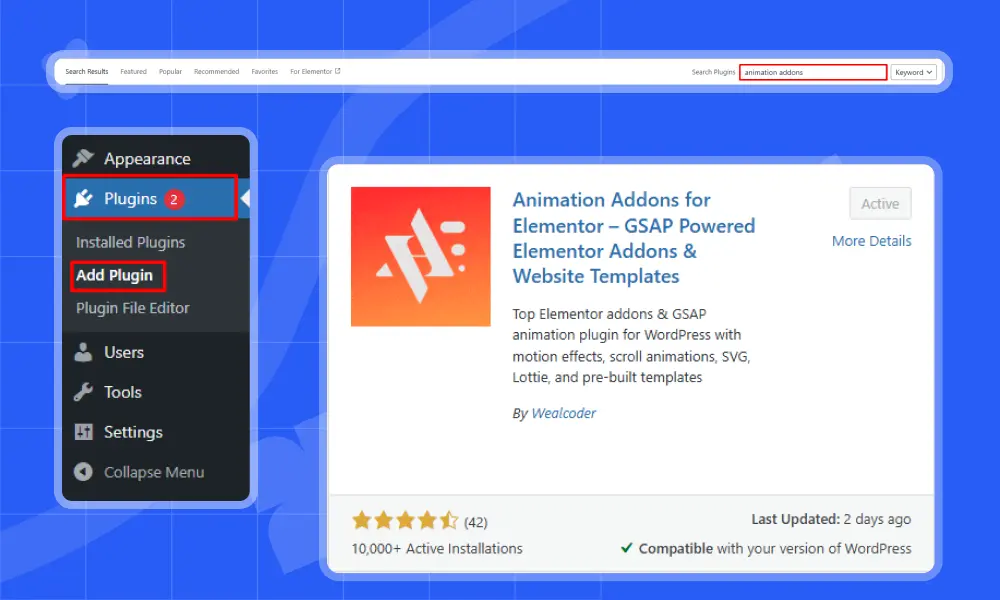
Next, go to the ‘Animation Addons’ and click on ‘Starter Template’ from the Animation Addons dashboard.
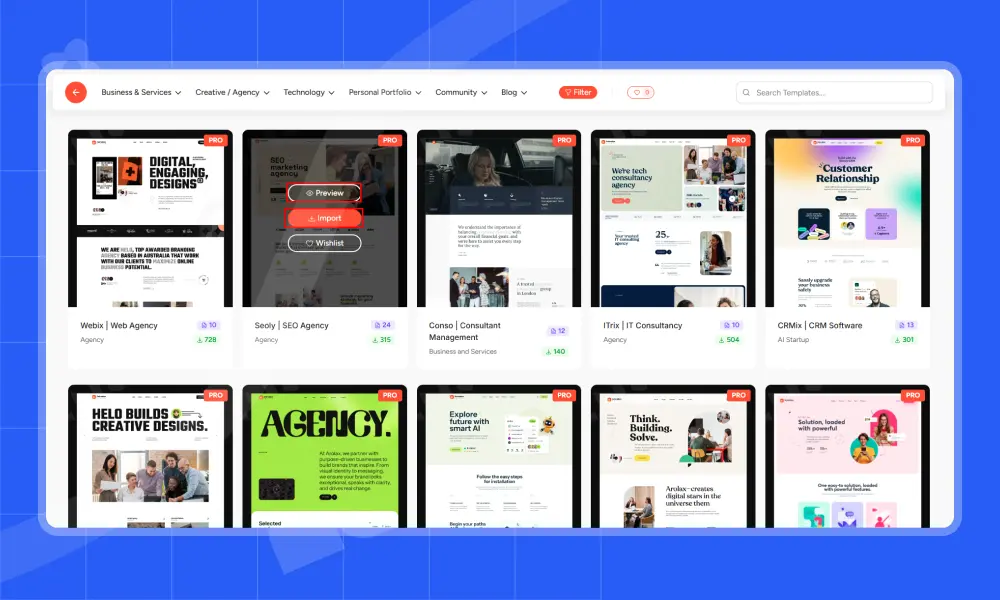
Click on the ‘Starter Template’ to access 200+ ready-made websites. Each site comes with animations for your niche, so you don’t need to create them separately.
You’ll also see categories, a search bar, and filters to help you find your niche easily. Hover your mouse over any template to see the ‘Preview’ and ‘Import’ options. Click ‘Preview’ to check the site, and if you like it, click ‘Import.
Great! You have successfully created an animated website in just a few minutes. Let’s take another method to create an animated website.
(For a step-by-step walkthrough on adding animations to existing websites, see our detailed guide here.)
Live Copy & Paste
Live Copy is also the easiest way to create an animated website in seconds. In the same manner, go to the Starter Template and hover over a template. Then, click Preview.
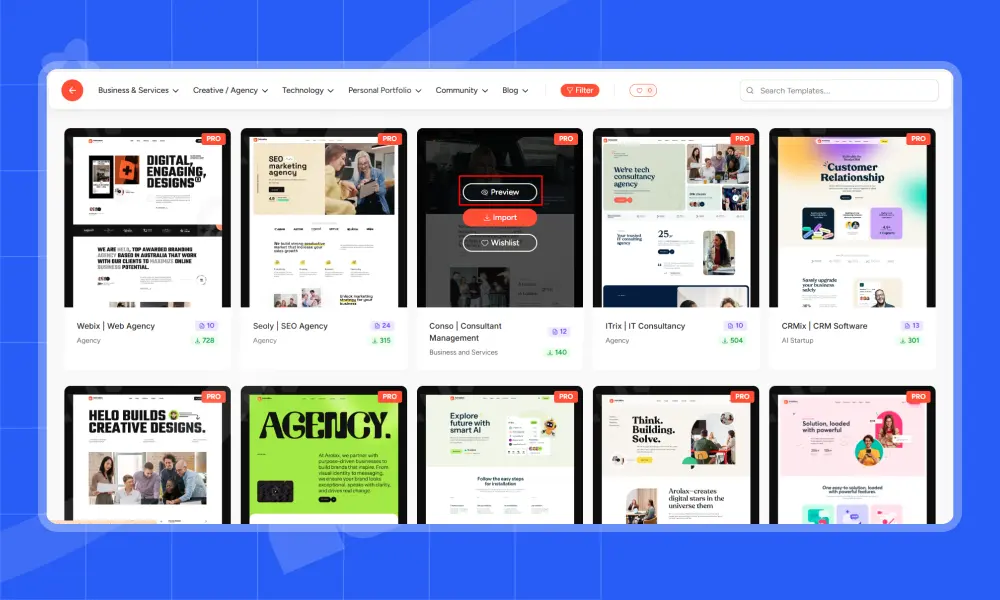
Then, on the right panel, you will see the Live Copy and Paste buttons. Click Live Copy.
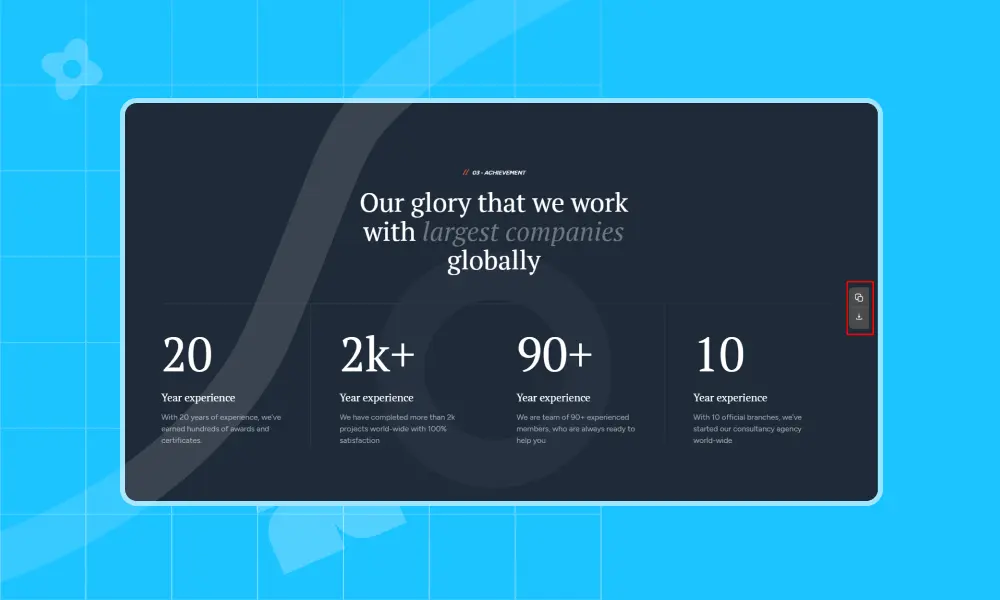
Finally, after clicking the Live Copy option, go back to the Elementor editor. Click Paste in Animation Addons, and you’re done.

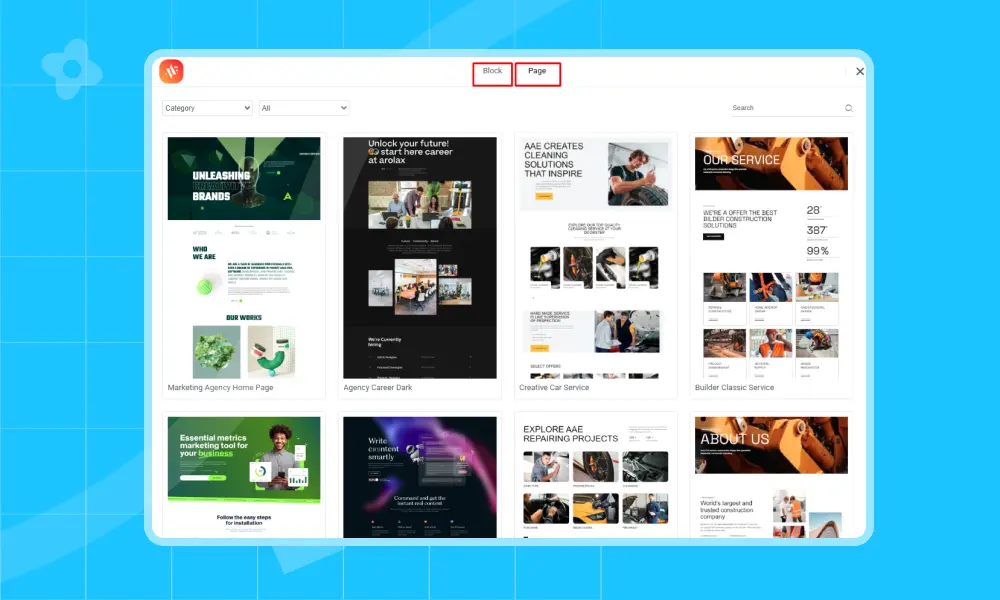
Moreover, it has 10K+ Sections & 2000+ Pages available. It’s also the best option if you don’t want to animate the entire site.
10K+ Sections & 2000+ Pages
To use Sections & Pages, first create a page in Elementor. Then, open that page and click on the Animation Addons icon.
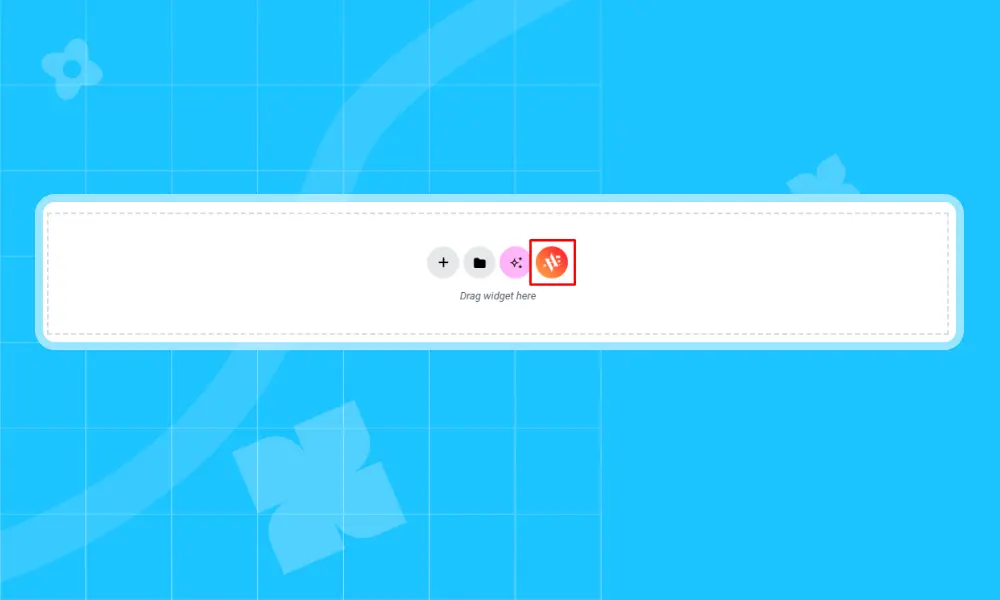
By selecting a block section, you get a ready-made animation for a specific element or group of elements. Choosing a full page gives you a complete, ready-made page for any niche. The choice is yours.
Now, let’s explore more options this plugin offers through widgets and extensions.
Widget & Extension
It offers 100+ Elementor widgets and 25+ Elementor extensions. By using its widgets, you can separately animate text, images, icons, interactive buttons, custom shapes, lines, and so much more.
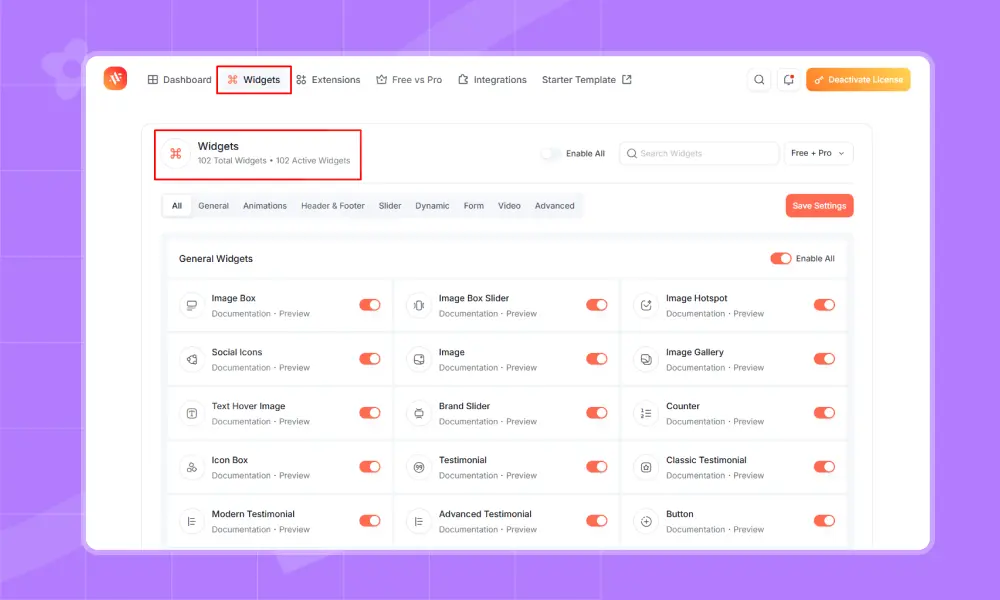
After that, you can use the extensions to add cool motion and interactive effects. These include scroll animation, mouse moves, parallax, 3D flips, timelines, hover effects, click actions, and more.
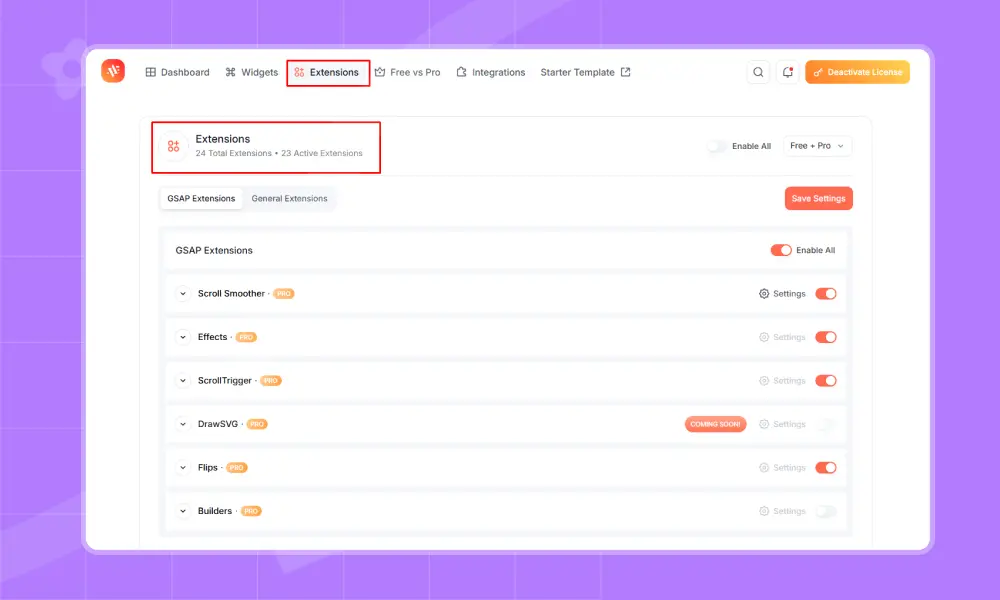
Overall, you can add eye-catching motion effects with widgets and extensions. But for this example, I’ll show you a step-by-step guide for the text animation extension.
Text Animation Extension
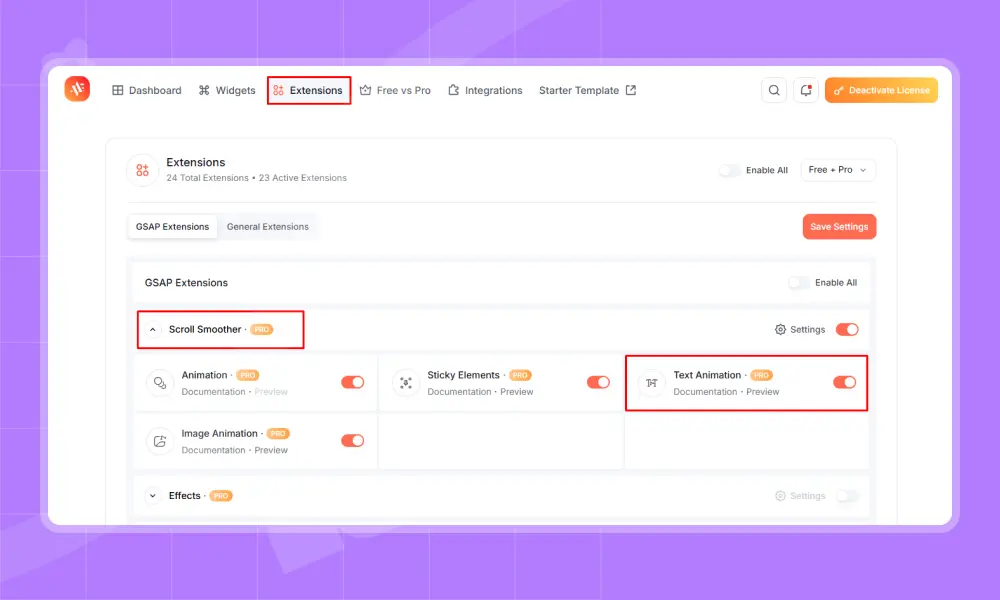
First and foremost, install and activate ‘Animation Addons’. Next, click on ‘Animation Addons’ and open the Extensions tab. Then, under Scroll Smoother, turn on ‘Text Animation.’
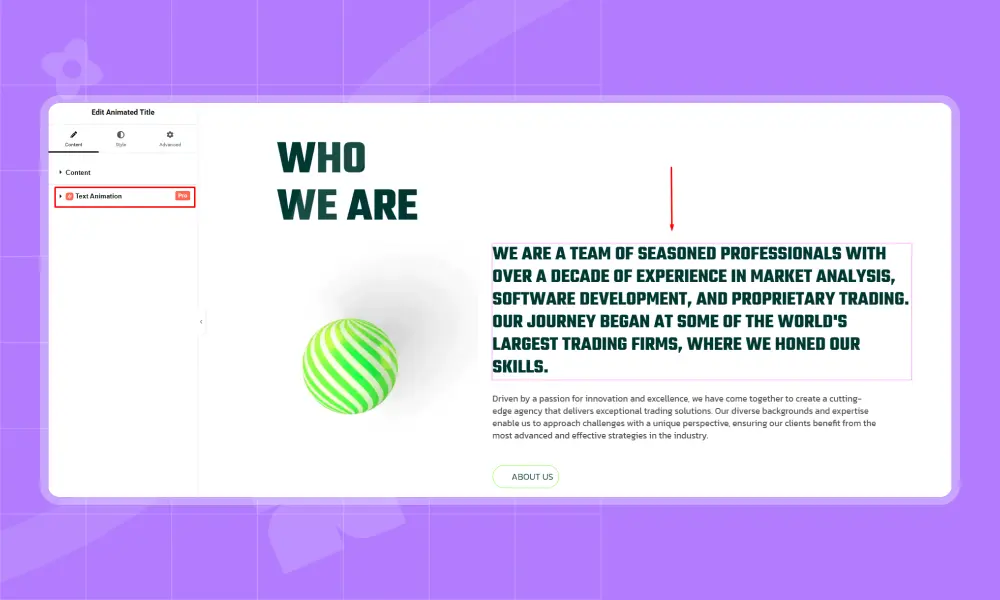
I assume you have already created a page in Elementor. Next, pick the text you want to animate. “Text Animation” will show up on the left. Click it to start.
Afterward, you can add animation to your text using different options like Character, Word, Text Move, Text Reveal, Text Scale, Text Invert, and 3D Spin. In this example, I chose Text Reveal, but you can pick any effect you like.
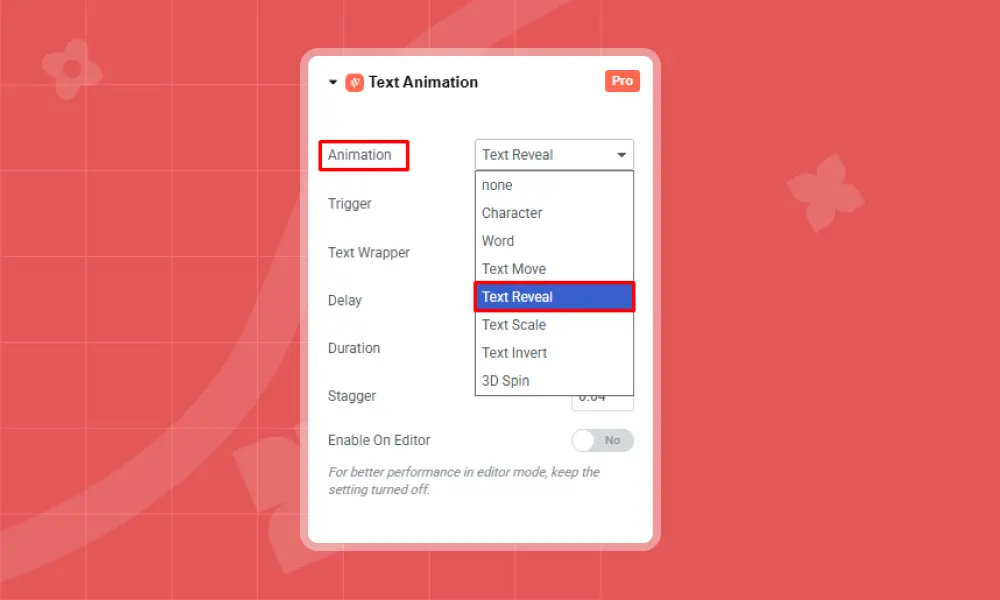
Then, you will see the Trigger option. It includes effects like On Scroll, On Page Load, Play with Scroll, On Hover, and On Click. This lets you decide when the text animation should start. In this example, I chose On Scroll, but you can pick any trigger you like.
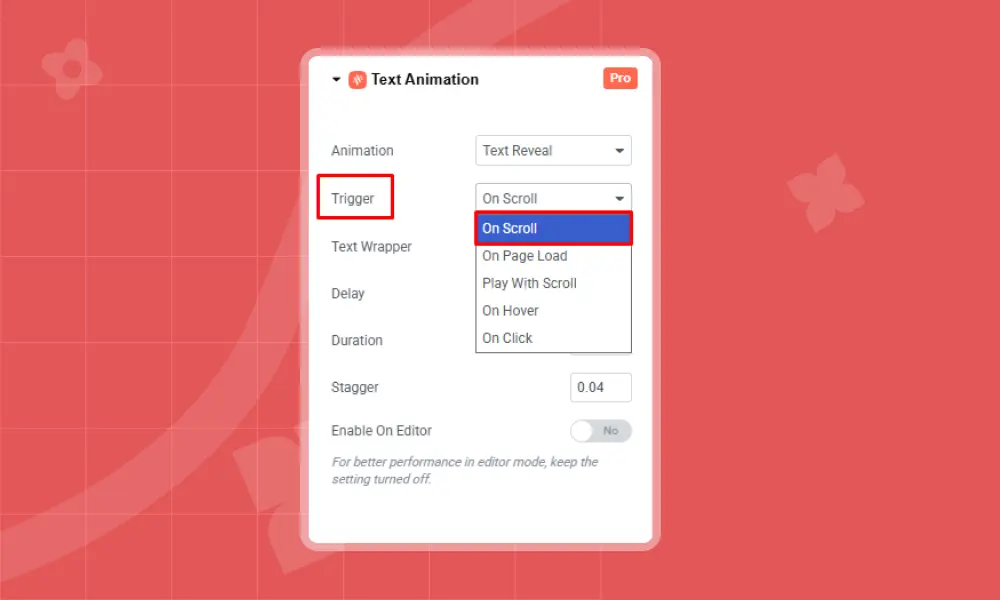
Text Wrapper gives you two options. Default wraps the text for you, so it can animate by letter, word, or the whole block. Custom lets you add your own wrapper for more control. In this example, I chose Default, but you can pick either one.

Now, you can customize the rest of the settings as you like. For example, I set Delay to 0.3, Duration to 4, and Stagger to 0.2. I left keep Enable Editor turned off.

Finally, click on ‘Publish’ to preview the animation.
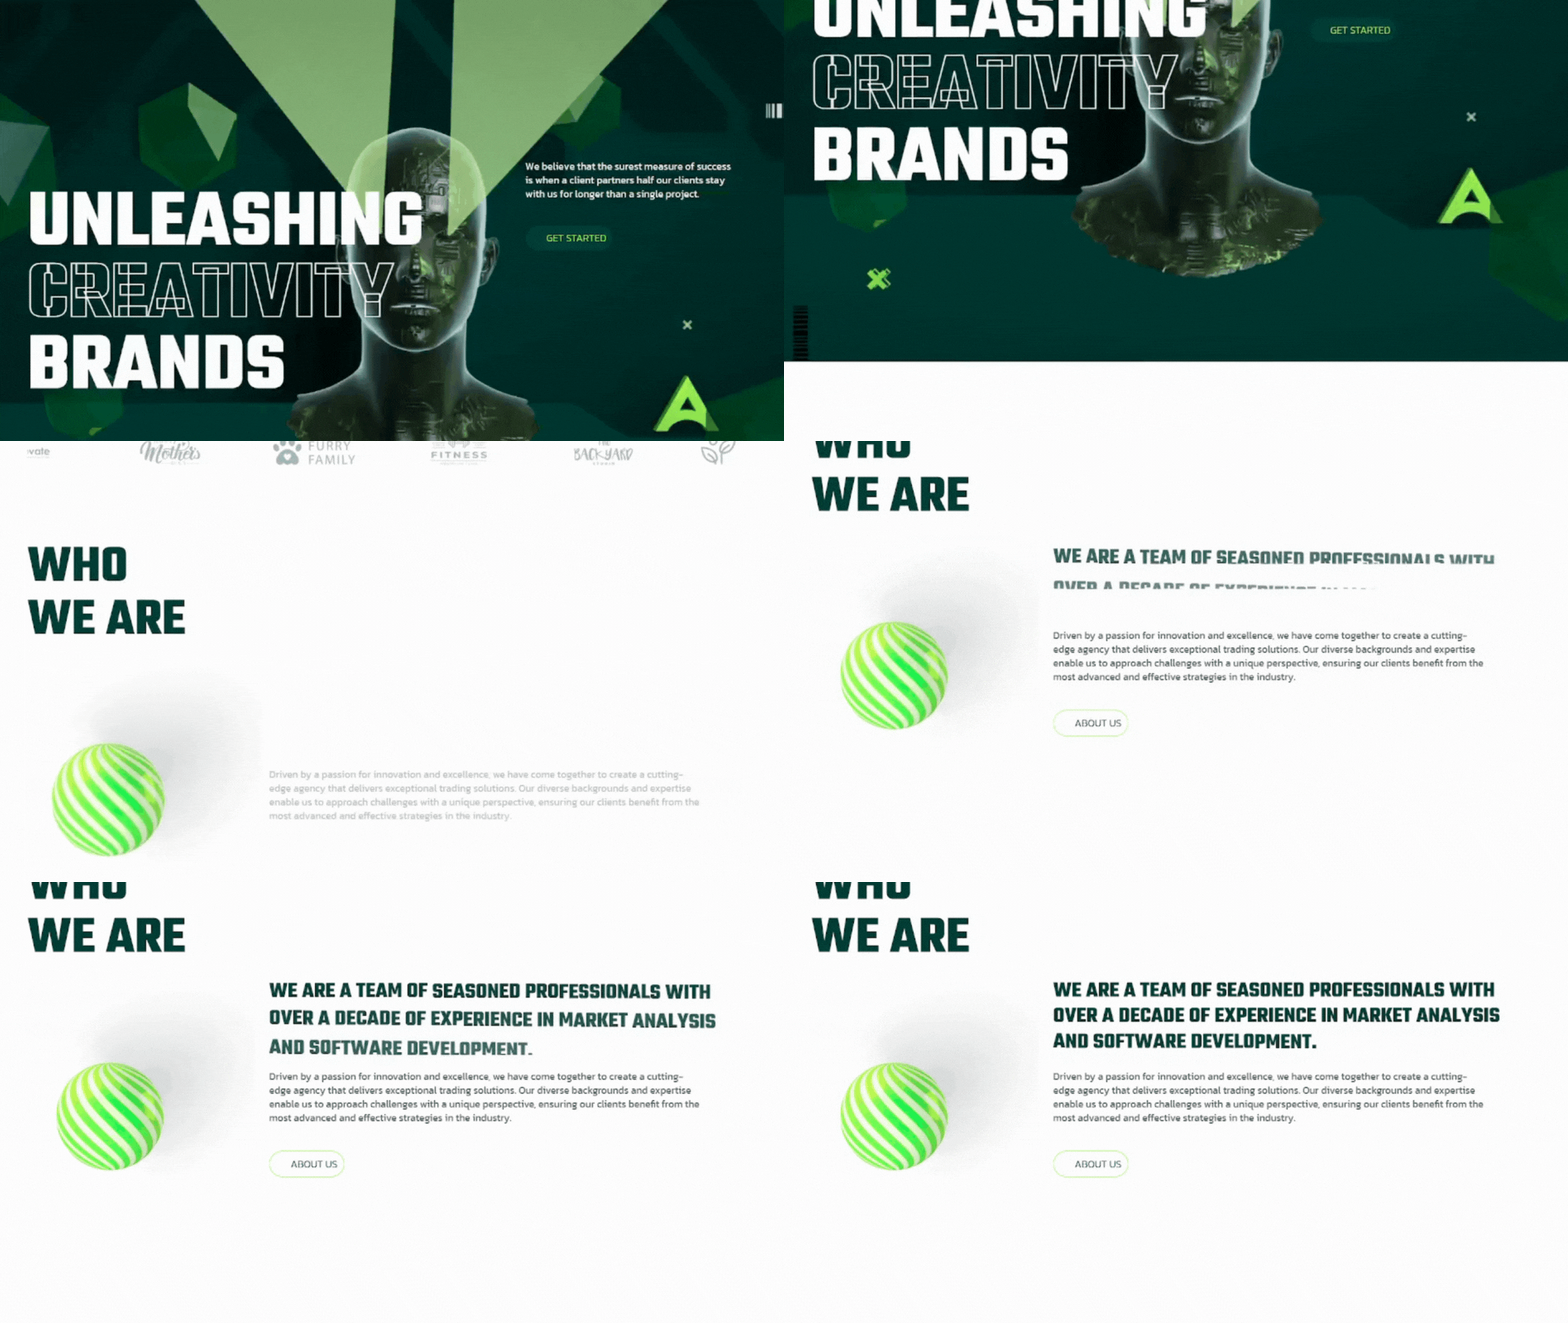
Here is the Final Output of Text Reveal:
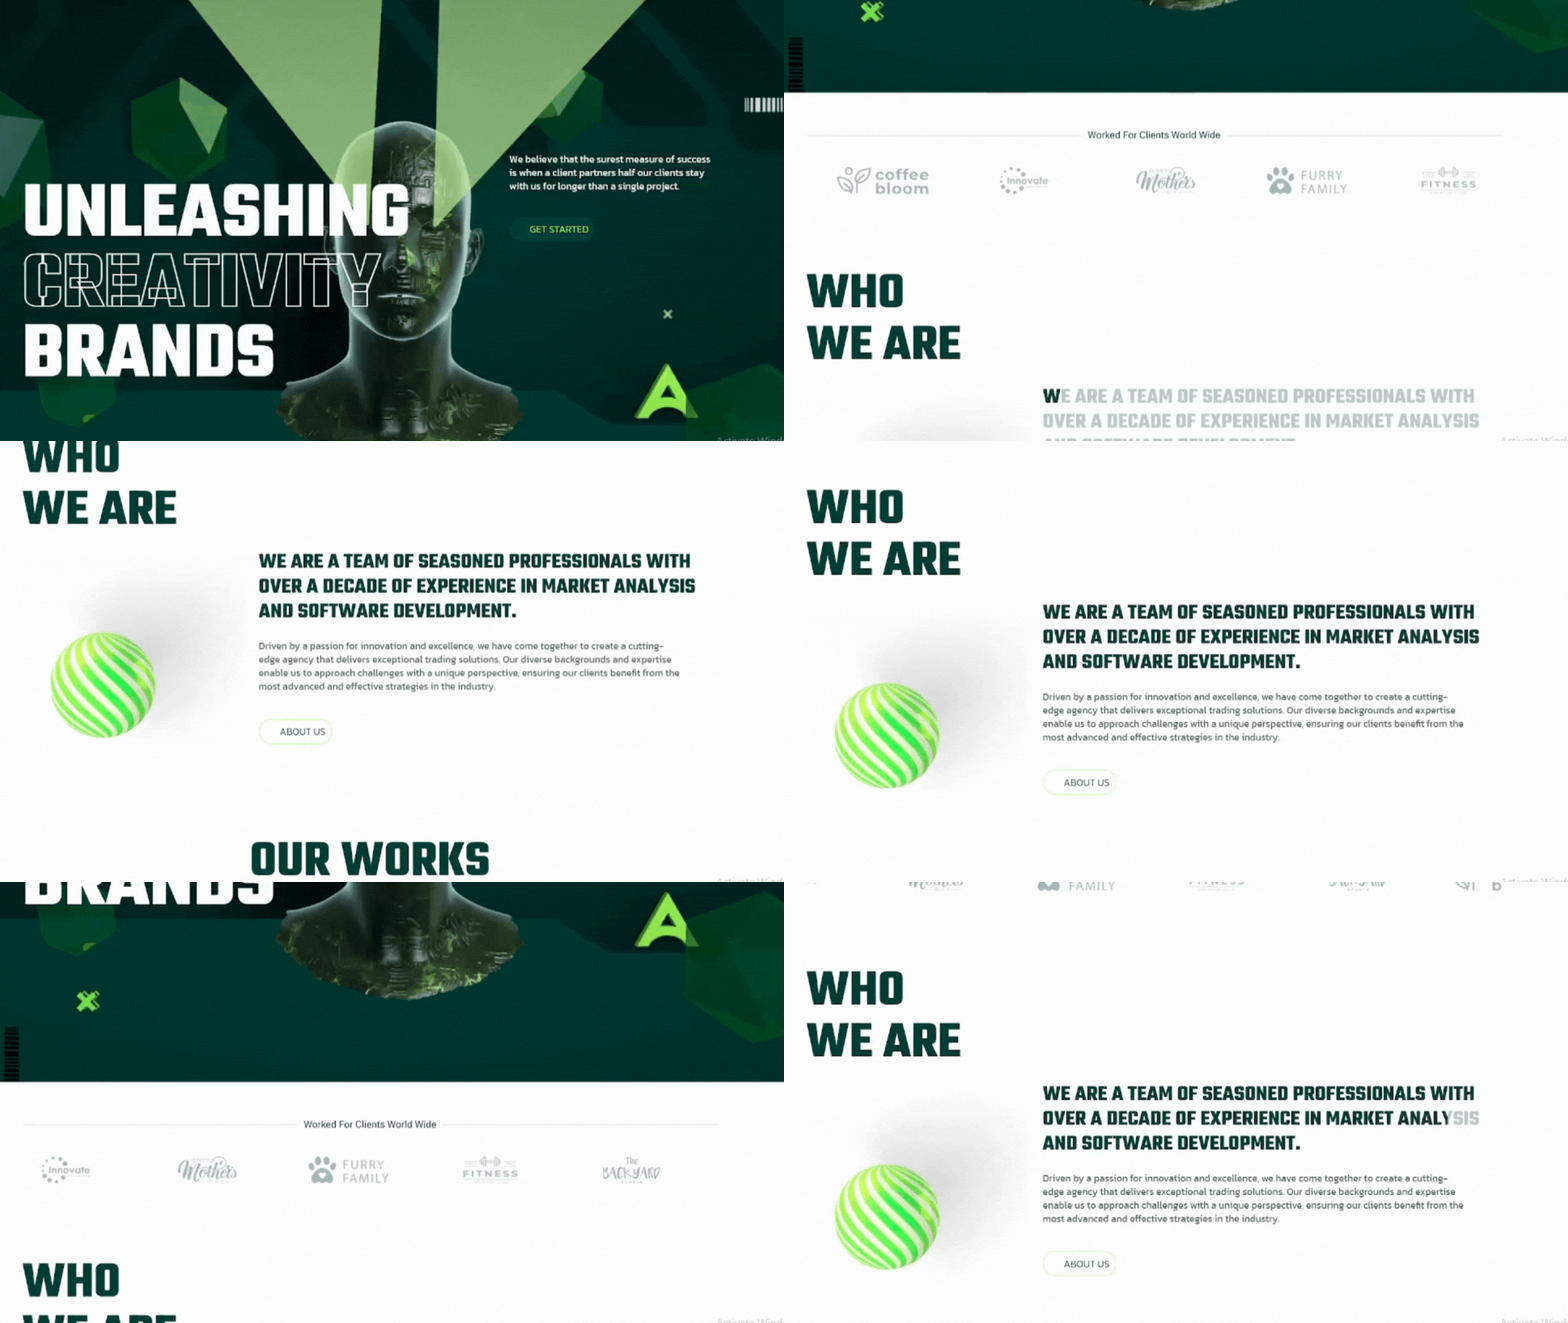
Additionally, if you choose ‘Text Invert’ from Animation, the output will be:
Want to try advanced WordPress animations without writing JavaScript?
With Animation Addons, you can create GSAP-powered animations directly in Elementor without relying on custom JavaScript. Explore its animation features, widgets, extensions, and templates to build more interactive websites faster.
Explore with Animation AddonsMethod 2: Using the GSAP Library
GSAP (GreenSock Animation Platform) is a powerful JavaScript library for creating smooth, high-performance animations. If you are comfortable adding code to your site, you can animate almost any element on your WordPress pages.
Step 1: Add GSAP to Your WordPress Site
The safest way is to add GSAP using your theme’s functions.php. This ensures your animations won’t disappear if the theme updates.
Go to your WordPress dashboard → Appearance → Theme File Editor → functions.php
Add this code at the bottom:
					function enqueue_gsap_scripts() {

    wp_enqueue_script('gsap', 'https://cdn.jsdelivr.net/npm/[email protected]/dist/gsap.min.js', array(), '3.13.0', true);
    wp_enqueue_script('scrolltrigger', 'https://cdn.jsdelivr.net/npm/[email protected]/dist/ScrollTrigger.min.js', array('gsap'), '3.13.0', true);
}

add_action('wp_enqueue_scripts', 'enqueue_gsap_scripts');
What this does:
- Loads the GSAP library and the ScrollTrigger plugin safely.
- Makes sure it’s added to your site footer so it won’t block page loading.
Tip: You can also use a plugin like “Simple Custom CSS & JS” to add scripts if you don’t want to touch functions.php.
Step 2: Pick an Element to Animate
You need to tell GSAP what to animate. For example, if you want to animate your homepage heading:
<h1 id="hero-title">Welcome to My Website</h1>
Here, the heading has an ID called hero-title. You can also use a class if you want to animate multiple elements at once.
Step 3: Write Your First Animation
Add this code in a custom JS file or a plugin that allows adding JS:
					gsap.from("#hero-title", {

     duration: 1.5,      // Animation lasts 1.5 seconds
     y: -50,             // Starts 50px above the original position
     opacity: 0,         // Starts invisible
     ease: "power2.out"  // Smooth, natural movement

});
What happens:
- Your heading starts above the page and is invisible.
- Then it drops into place while fading in smoothly.
Step 4: Add Scroll Animations (Optional)
You can make elements appear as the user scrolls. This uses GSAP’s ScrollTrigger plugin.
Example: animate a feature box when it scrolls into view:
					gsap.from(".feature-box", {

    scrollTrigger: {

        trigger: ".feature-box", // the element that triggers the animation
        start: "top 80%"         // animation starts when element is 80% from top

    },

    duration: 1,   // 1 second animation
    y: 50,         // starts 50px below
    opacity: 0,    // starts invisible
    ease: "power2.out"

});
Each feature box will fade in and move up as the visitor scrolls down.
Step 5: Test Your Animations
Check your website on desktop and mobile, make sure everything moves smoothly.
How to Optimize WordPress Animations for Performance
Animations can make a WordPress website feel smoother and more interactive, but too much motion can work against you. Heavy animations, large media files, and unnecessary JavaScript can increase processing work.
The goal isn’t to remove animation altogether. It’s to use lightweight, purposeful motion that enhances the user experience without getting in the way of loading, reading, or interacting with your website.
Animate Transform and Opacity
When possible, animate transform and opacity instead of properties that frequently trigger layout changes, such as width, height, margin, top, or left. Transform and opacity animations can often be handled more efficiently by the browser, helping animations remain smoother.
For example, moving an element with transform: translate() is generally preferable to repeatedly changing its left position. The same principle applies to simple fade effects using opacity.
Tip: For most entrance, hover, and scroll animations, start with opacity + transform before reaching for more expensive effects.
Avoid Animating Everything
More animation doesn’t automatically mean better engagement. If every heading, image, button, and section moves as visitors scroll, the page can quickly become distracting and require more processing power.
Instead, give animation a purpose. Use it to:
- Draw attention to an important CTA
- Introduce a hero heading
- Reveal content as it enters the viewport
- Provide feedback after an interaction
- Support visual storytelling
A few well-timed animations usually create a stronger experience than dozens of competing effects. MDN similarly recommends removing unnecessary animations because larger and more numerous animations can increase processing requirements.
Optimize Images
Large images can become a performance problem before animation even enters the picture. This is especially important when an animated section contains hero images, background graphics, GIFs, or other media.
Before adding motion:
- Compress large images
- Use modern image formats where appropriate
- Serve responsive image sizes
- Avoid unnecessarily large GIFs
- Reserve space for images to prevent layout shifts
- Don’t animate a huge image when a smaller optimized asset will work
For animated visuals, remember that file size matters too. Large GIFs and videos can take longer to download, while code-based animations can consume CPU resources during playback.
Reduce Heavy JavaScript
JavaScript-powered animations can be useful for advanced interactions, but loading unnecessary animation libraries or running too much animation logic can increase main-thread work and affect responsiveness.
Use JavaScript only when you need it. For simple effects such as fades, transitions, and basic hover states, CSS can often do the job efficiently. For more complex sequences, use a well-optimized animation library and load it only where it’s actually needed.
WordPress tip: Don’t enable every animation feature across your entire website if only one page needs it. Keep animation scripts and effects as targeted as possible.
Disable Complex Animations on Mobile
An animation that looks impressive on a desktop monitor may feel excessive on a smaller screen or a less powerful mobile device. Mobile users may also be dealing with slower networks, limited processing power, or battery constraints.
Consider reducing or disabling:
- Heavy parallax effects
- Large background animations
- Continuous motion
- Complex cursor effects
- Multiple simultaneous scroll animations
- Large animated media
Instead, use simple fades, short transforms, or static alternatives where appropriate. Mobile performance deserves particular attention because real-world device and network conditions can differ significantly from desktop testing.
Respect prefers-reduced-motion
Not every visitor wants or can comfortably use motion-heavy interfaces. The CSS prefers-reduced-motion media feature detects when a user has enabled an operating-system preference to minimize non-essential motion.
Where appropriate, reduce or remove animations when the preference is enabled. For example, a dramatic zoom or parallax effect could become a simple fade instead.
This isn’t just a performance consideration, it makes your WordPress website more inclusive and gives visitors greater control over their experience.
Test Core Web Vitals
After adding animations, don’t rely only on how the page feels on your own computer. Test how real users experience it.
Google recommends monitoring three Core Web Vitals:
- LCP (Largest Contentful Paint): Measures how quickly the main content becomes visible. Aim for 2.5 seconds or less.
- INP (Interaction to Next Paint): Measures how responsive the page is to user interactions. Aim for 200 milliseconds or less.
- CLS (Cumulative Layout Shift): Measures unexpected movement of visible content. Aim for a score of 0.1 or less.
Animations can particularly affect INP when they create excessive JavaScript work and CLS when elements change position or size unexpectedly. Images and other dynamic content should also have reserved space to help prevent layout shifts.
- Use Google Search Console, PageSpeed Insights, and Lighthouse to identify performance issues and test both mobile and desktop experiences. Google recommends good Core Web Vitals as part of providing a strong page experience, although passing the metrics alone does not guarantee higher rankings.
Best Practices for Animated Websites
Animations can make your website more engaging and easier to follow. But too much movement can be distracting. Here are five simple tips to make your animations smooth, clear, and helpful for visitors.
Focus on Key Sections
Not every section of your website needs animation. Focus on adding motion to high-impact areas such as your homepage, buttons, statistics, or testimonials. Use movement to draw attention to important content and help visitors find key information.
Keep Animation Durations Short
Animations that last too long can slow down your site and distract visitors. Keep them fast and smooth so users stay engaged. Brief animations grab attention without getting in the way of reading or browsing.
Smooth the Movement
Animations that move straight without changing speed can look awkward. Add slight speed changes to make them feel more natural. This creates a smoother flow and makes your website look more polished.
Test Across Devices
Animations can behave differently on phones, tablets, and computers. Always check how they look on all devices. Make sure motion feels smooth everywhere so every visitor can have a consistent experience.
Limit the Number of Animations
Too many animations can distract visitors. Focus on a few important areas. Simple, well-placed motion looks professional and makes your website easier to navigate and understand.
Wrap Up
Making an animated website in WordPress is easier than you think. Animations do more than make your site look good. They help visitors see what is important and make your site feel professional.
With a tool like Animation Addons, adding animations is simple. You can animate one section, a few blocks, or even a whole page with just a few clicks. Try different animation styles, speeds, and triggers to see what works best for your site. Start experimenting with Animation Addons today and see how small movements can make a big difference on your site.
FAQs
Yes, you can animate a WordPress website without coding by using page builders like Elementor or no-code animation plugins. These tools let you add effects such as fades, slides, hover effects, text reveals, and scroll animations through visual settings.
WordPress itself does not provide a comprehensive built-in animation system for creating advanced website effects. However, you can add animations through your theme, CSS, page builder features, plugins, or JavaScript libraries such as GSAP.
Yes, you can add scroll animations using Elementor, animation plugins, CSS, or JavaScript libraries such as GSAP ScrollTrigger. Common effects include elements fading, sliding, scaling, or revealing as visitors scroll through the page.
Yes, GSAP can be integrated with WordPress to create advanced animations and interactive effects. It is particularly useful for custom timelines, scroll-driven animations, complex sequences, and interactions that go beyond standard page-builder controls.
Yes, Elementor provides built-in motion effects that allow you to add animations without writing code. For more advanced effects and greater control, you can extend Elementor with an animation plugin or custom GSAP code.
Yes, WordPress animations can be mobile-friendly when they are lightweight, responsive, and properly configured for smaller screens. Avoid excessive motion and complex effects on mobile, and always test animations on different devices before publishing.
You can disable or simplify animations on mobile through your page builder’s responsive settings, animation plugin controls, CSS media queries, or JavaScript. For accessibility, you can also use prefers-reduced-motion to provide a reduced-motion experience for visitors who request it.
Animations can affect Core Web Vitals when they introduce excessive JavaScript work, delay interactions, or cause unexpected layout movement. Optimize animations and media, avoid unnecessary effects, and monitor LCP, INP, and CLS using tools such as PageSpeed Insights and Google Search Console.
You can add CSS animations through your theme’s stylesheet, a child theme, a custom CSS area, or a suitable WordPress customization tool. CSS works well for lightweight effects such as fades, transitions, hover states, and simple movement without requiring a JavaScript animation library.
Leave a Reply