


 Login
Login

If your business depends on appointments, a website should do more than tell visitors what you offer. It should help them find a suitable service, choose an available time, provide their details, and confirm the appointment without having to call or message you.
WordPress makes this surprisingly straightforward. You can build the website itself with Elementor, add an appointment booking system to handle scheduling, and connect the two through a dedicated booking page.
The goal isn’t simply to put a booking form on a page. A useful appointment website needs to connect your services, staff availability, schedules, payments, notifications, and customer accounts into one consistent workflow.
To build an animated appointment booking website in WordPress: set up WordPress with Elementor, then install the Rox Appointment Booking plugin to manage services, staff, schedules, payments, and confirmations.
After that, you can install Animation Addons to add GSAP-powered motion and start from an animated booking template.
Rox handles how it books. Animation Addons handles how the site feels.
What an appointment booking website needs
Before choosing tools, it’s worth defining the target. A functional booking site has six components:
- A catalogue of bookable services, each with a duration and a price.
- Accurate availability, working hours, breaks, holidays, and logic that prevents double-booking.
- A booking flow that completes on a phone. Choose a service, choose a time, enter details, confirm.
- Payment options: card up front, a partial deposit, or payment on arrival.
- Confirmation emails that reliably arrive to the customer, the business, and the staff member.
- A back office to view the day ahead, reschedule, and issue refunds.
A solution that covers all six leaves, not just design and copy to handle. A solution that misses one creates a manual process that never goes away.
Deciding on the booking system for a WordPress site
For your WordPress site, you have three options: a hosted SaaS scheduler, a custom-built appointment system, and a WordPress booking plugin.
Three approaches are realistic, and each suits a different situation.
| Hosted SaaS scheduler | Custom build | WordPress booking plugin | |
| Time to launch | Fastest | Slowest | Fast |
| Cost model | Recurring, often per user | Depends on the development method | Yearly renewal or one-time payment. |
| Data ownership | Vendor’s database | Site owner’s database | Site owner’s database |
| Design control | Limited to vendor settings | Full | Full |
| Maintenance burden | Vendor handles it | Site owner handles it | Plugin developer handles it |
| Best suited to | Testing an idea quickly | Genuinely unusual scheduling logic | Most service businesses |
Hosted schedulers embed quickly and require no upkeep, but the booking flow lives in a third-party system, customer records sit outside the site, and customization ends where the vendor’s settings page ends.
A custom build is only justified when the scheduling logic is unusual, resources overlap, dependencies are complex, or industry-specific compliance requirements apply. Otherwise, it duplicates software that already exists.
For most service businesses, a WordPress plugin is the practical middle ground. Bookings, calendars, and customer records stay in the site’s own database, design and email templates remain fully editable, and pricing is typically one-time or annual rather than per seat.
So for this guide, we will use a WordPress plugin for appointment booking.
Step 1: Set up the WordPress foundation
If you already have WordPress sites running, you can skip directly to Step 2.
Domain and hosting – Any reputable shared or managed WordPress host will comfortably run a booking site for a small business. Two requirements matter more than advertised speed: PHP 8.0 or newer and a free SSL certificate.
SSL is mandatory, not optional – Card payments require HTTPS. Most hosts include a free Let’s Encrypt certificate, and it should be enabled before anything else is configured.
Install WordPress – Nearly every host offers a one-click installer. WordPress 6.0 or newer is the practical baseline.
Choose a lightweight theme – Heavy multipurpose themes add page weight without adding booking functionality. A well-built block theme, or a lean option such as Astra, GeneratePress, or Kadence, is a better fit. The booking plugin supplies the booking interface, so the theme doesn’t need to.
Install the supporting plugins – Caching, SEO, backups, and critically SMTP. WordPress sends mail through PHP’s mail function by default, which is unreliable and often filtered as spam. Booking confirmations that don’t arrive undermine the entire system. An SMTP plugin connected to a proper sending service solves this, and it should be tested before launch.
Step 2: Install a WordPress Appointment Booking Plugin
Since we are going with a WordPress plugin for appointment booking, we have to choose one in the first place. Here are the criteria for a WordPress Appointment Booking Plugin:
- Availability logic that reflects reality per-staff schedules, breaks, holidays, and control over which booking statuses hold a time slot
- A booking flow that works on mobile, verified by testing rather than assumed
- Payment gateways available in the relevant country
- Editable email templates with per-message controls
- A genuinely usable free version, so the flow can be validated before any spend
- Documentation and support that are available and up to date.
Based on this checklist, we will use the Rox Appointment Booking plugin to create your appointment booking website.
To install the plugin, go to Plugins → Add New and search for Rox Appointment Booking from your WordPress dashboard. Then install and activate the plugin.
If you have a premium version of the plugin, you can directly upload the Pro plugin from Plugins → Add New → Upload, and activate the license after installation.
After activation, Rox adds its own section to the WordPress admin area. It also automatically creates a Rox Appointment Dashboard page containing the customer dashboard shortcode. This gives customers a dedicated place to manage their bookings once they have an account.
Step 3: Organize Your Services with Categories
Before everything else, you must add the services you provide to your appointment booking system. Because before customers can book anything, you need to define what they can actually book.
With Rox Appointment Booking, you can organize services through categories, which makes the booking experience easier to navigate when a business offers several types of appointments.
Go to Rox Appointment → Services and create categories that make sense for your business. To create a category, you have to add a Category Title, Description, Thumbnail image, and internal notes. The slug is automatically created based on the title. Then click on “Add New Category”.
Once the categories are ready, create your individual services. Each service can have a name, duration, price, description, thumbnail, category, and assigned staff members.
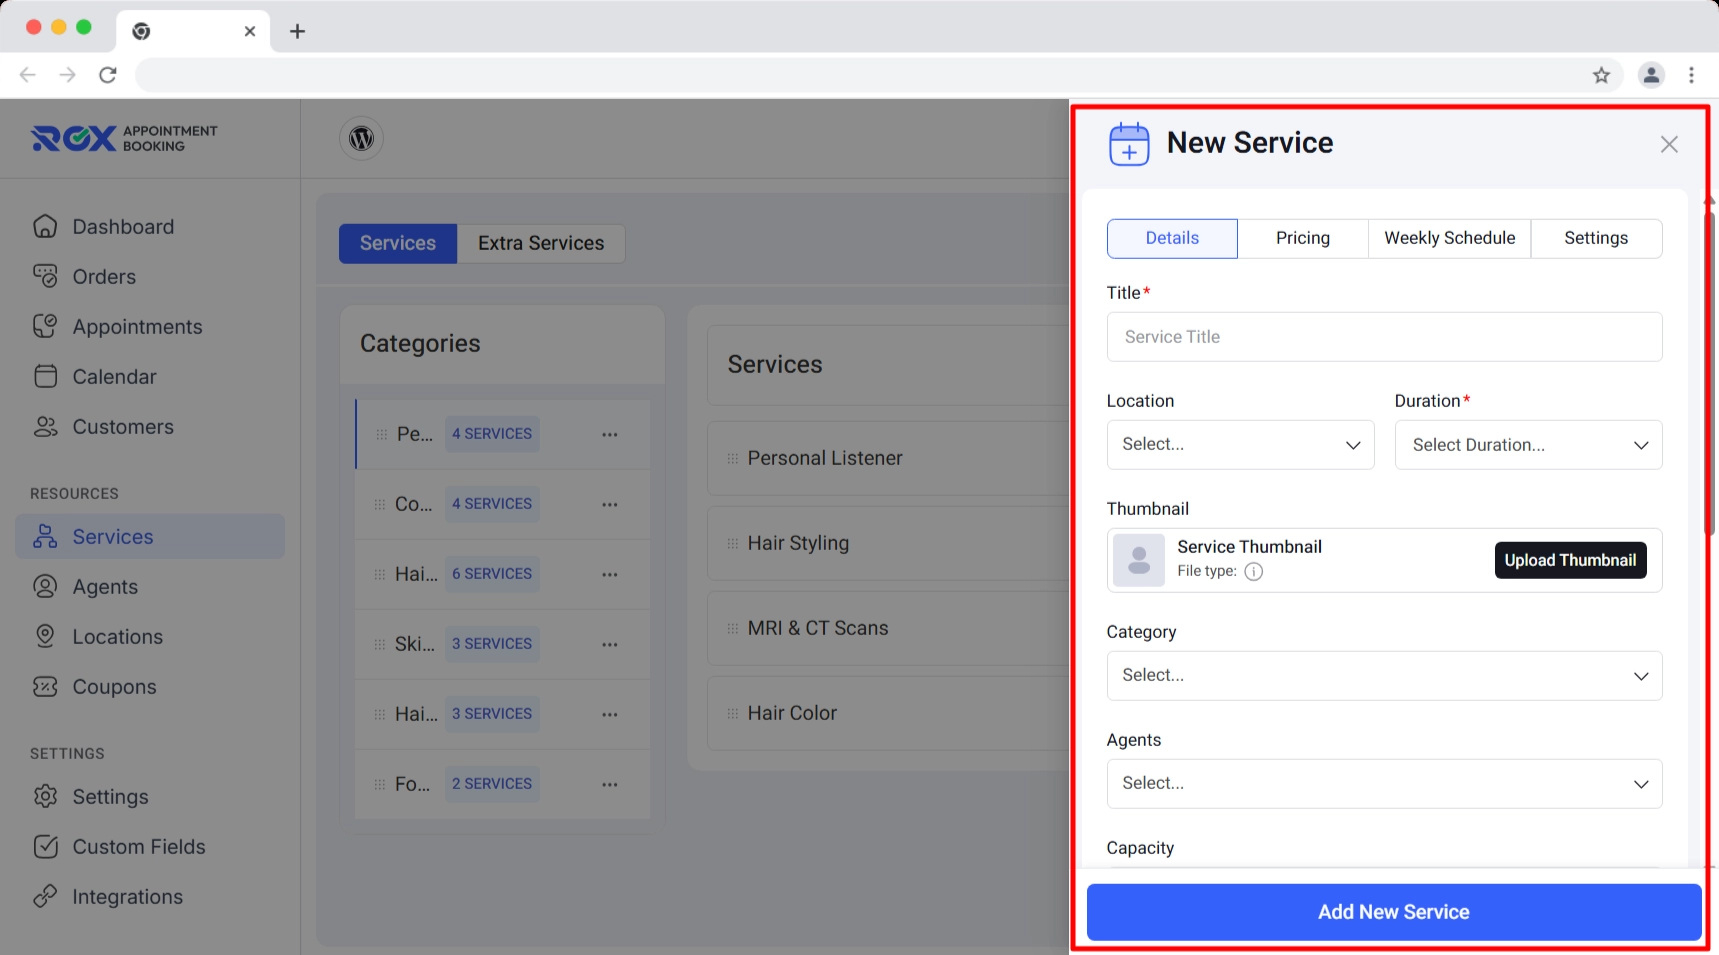
This is also where the booking system starts becoming more than a simple contact form. The duration you enter for a service affects the available appointment slots, while the assigned agent determines which staff members can provide it.
For example, if a consultation takes 60 minutes, the system can offer one-hour appointment slots rather than treating every booking as an arbitrary point in the day.
Step 4: Configure Your Working Hours
Your booking system also needs to know when appointments can take place.
Go to Rox Appointment → Settings → Work Schedule → Working Hours and configure your regular business hours. You can set different opening and closing times for each day and mark particular days as unavailable. Breaks can also be added, such as a lunch period during which no appointments should be offered.
For example, a clinic might operate from 9 AM to 5 PM Monday through Friday, with a one-hour lunch break. Saturday could have shorter hours, while Sunday could remain closed.
You can also use Holidays & Day-Off to block specific dates when the business will be closed.
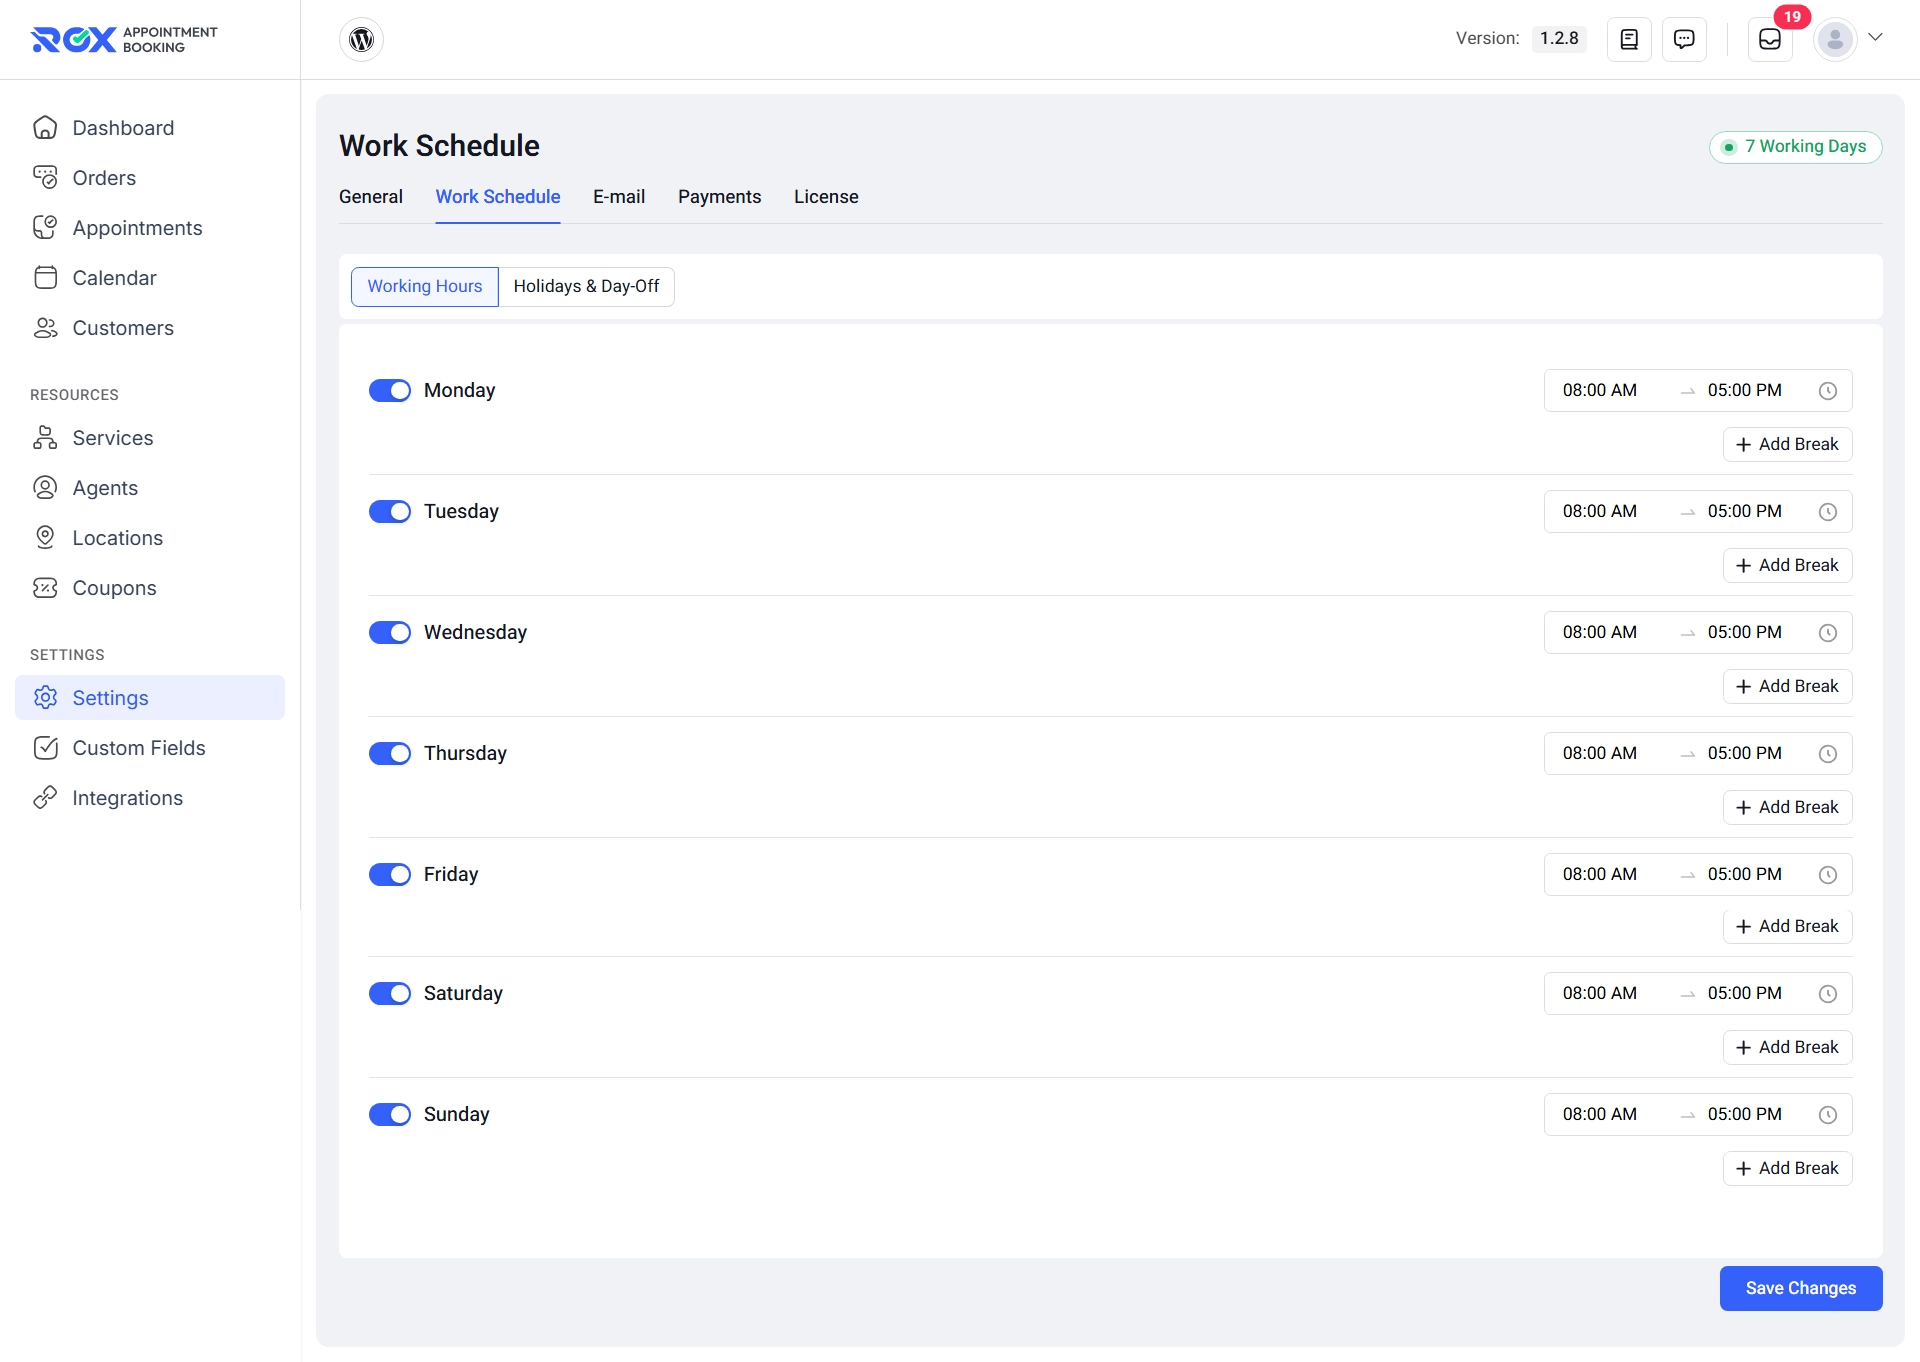
Rox uses these schedules when generating available slots. Existing bookings, holidays, schedules, and capacity are considered when determining whether a particular time can be offered to another customer.
Step 5: Add Your Staff Members (Agents)
If your business has staff members providing different services, add them under Rox Appointment → Agents.
An agent profile can include their name, profession, contact information, profile picture, services, biography, experience, certifications, and social profiles. You can then connect each agent with the services they provide.
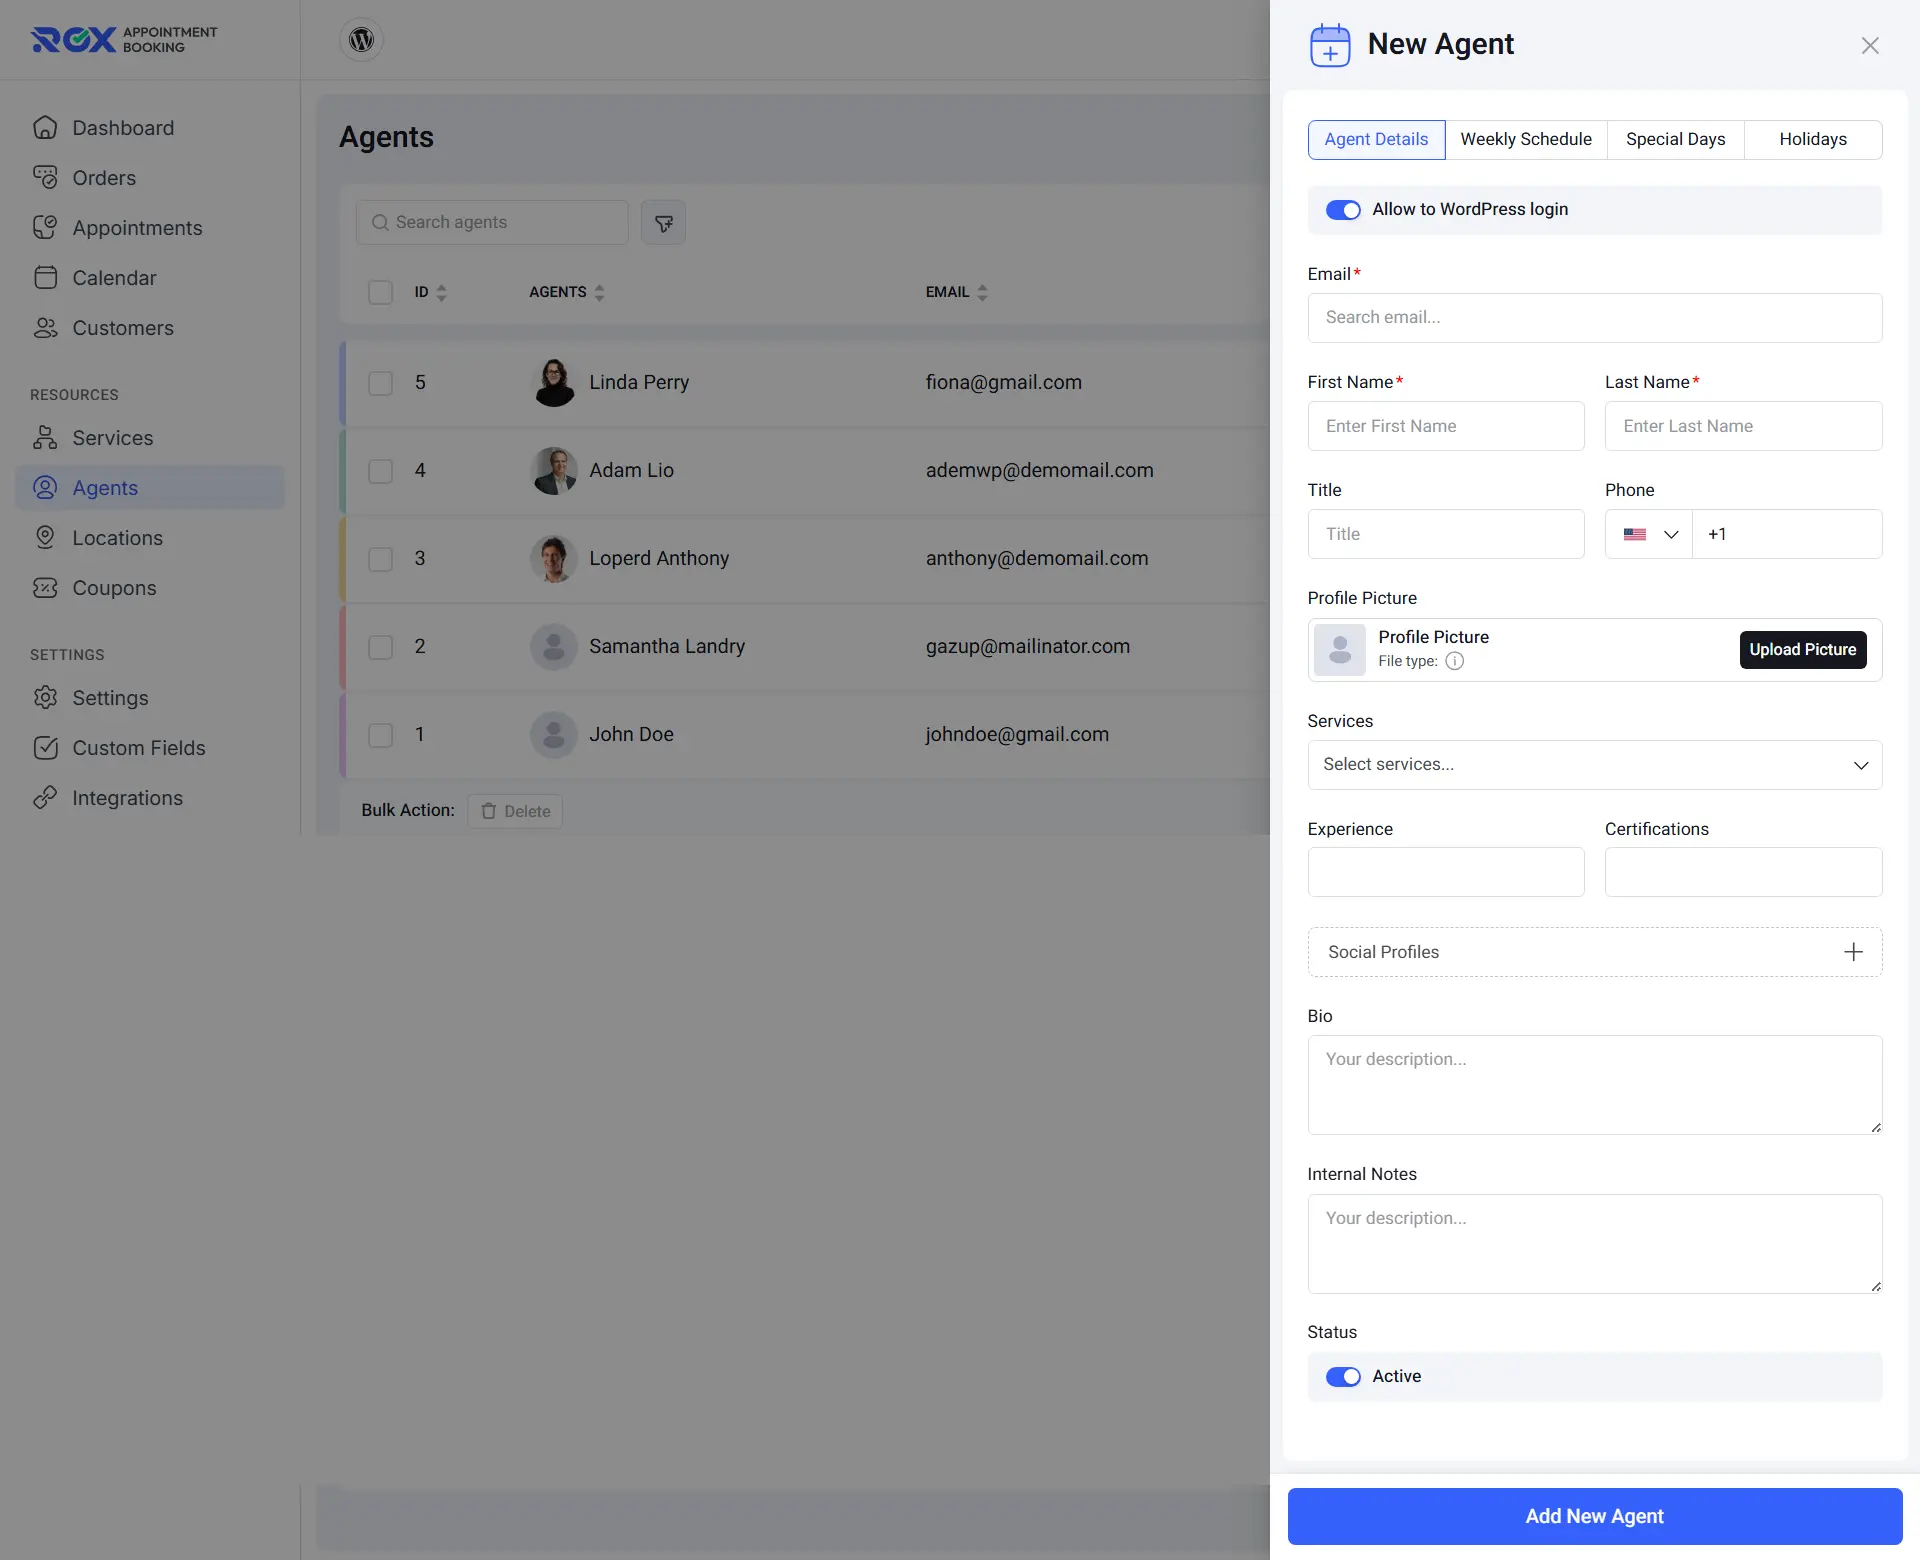
This creates a useful relationship between your services and your team. A customer choosing a service can see the staff members available for that service instead of being presented with a completely unrelated list of people.
The free version supports one agent. Businesses with multiple staff members can use Rox Appointment Booking Pro for unlimited agents.
Step 6: Configure Your Business and Booking Rules
Once the basic schedule is ready, open Rox Appointment → Settings → General.
Here you can add your company information, including the business name, address, website, phone number, email address, and logo. These details can also be used in customer-facing booking information and emails.
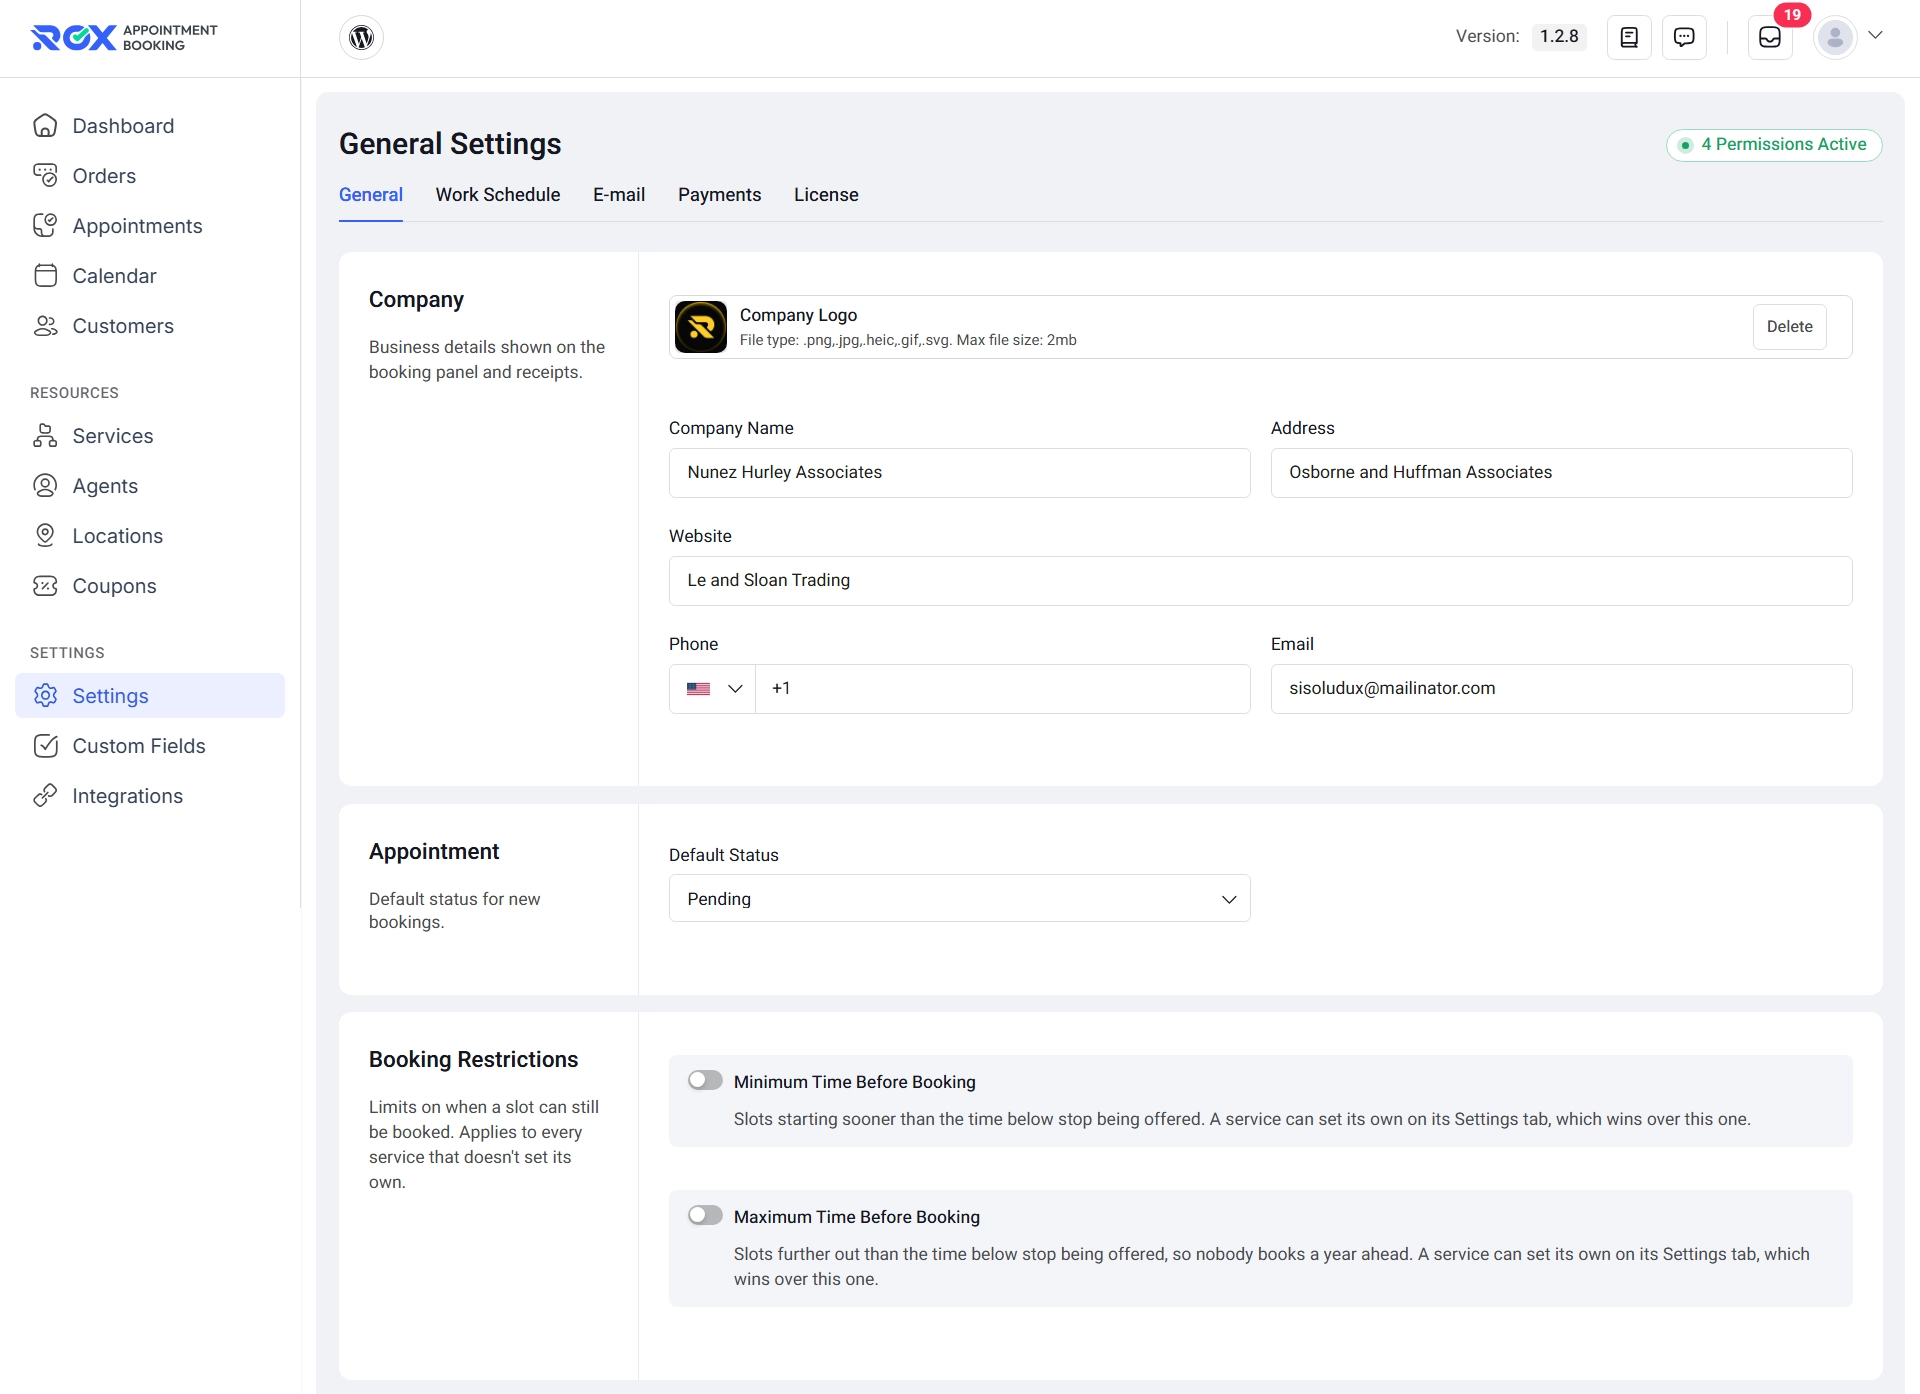
The same area lets you decide how new appointments should be handled. You can set the default status for new bookings and specify which appointment statuses should continue blocking a time slot.
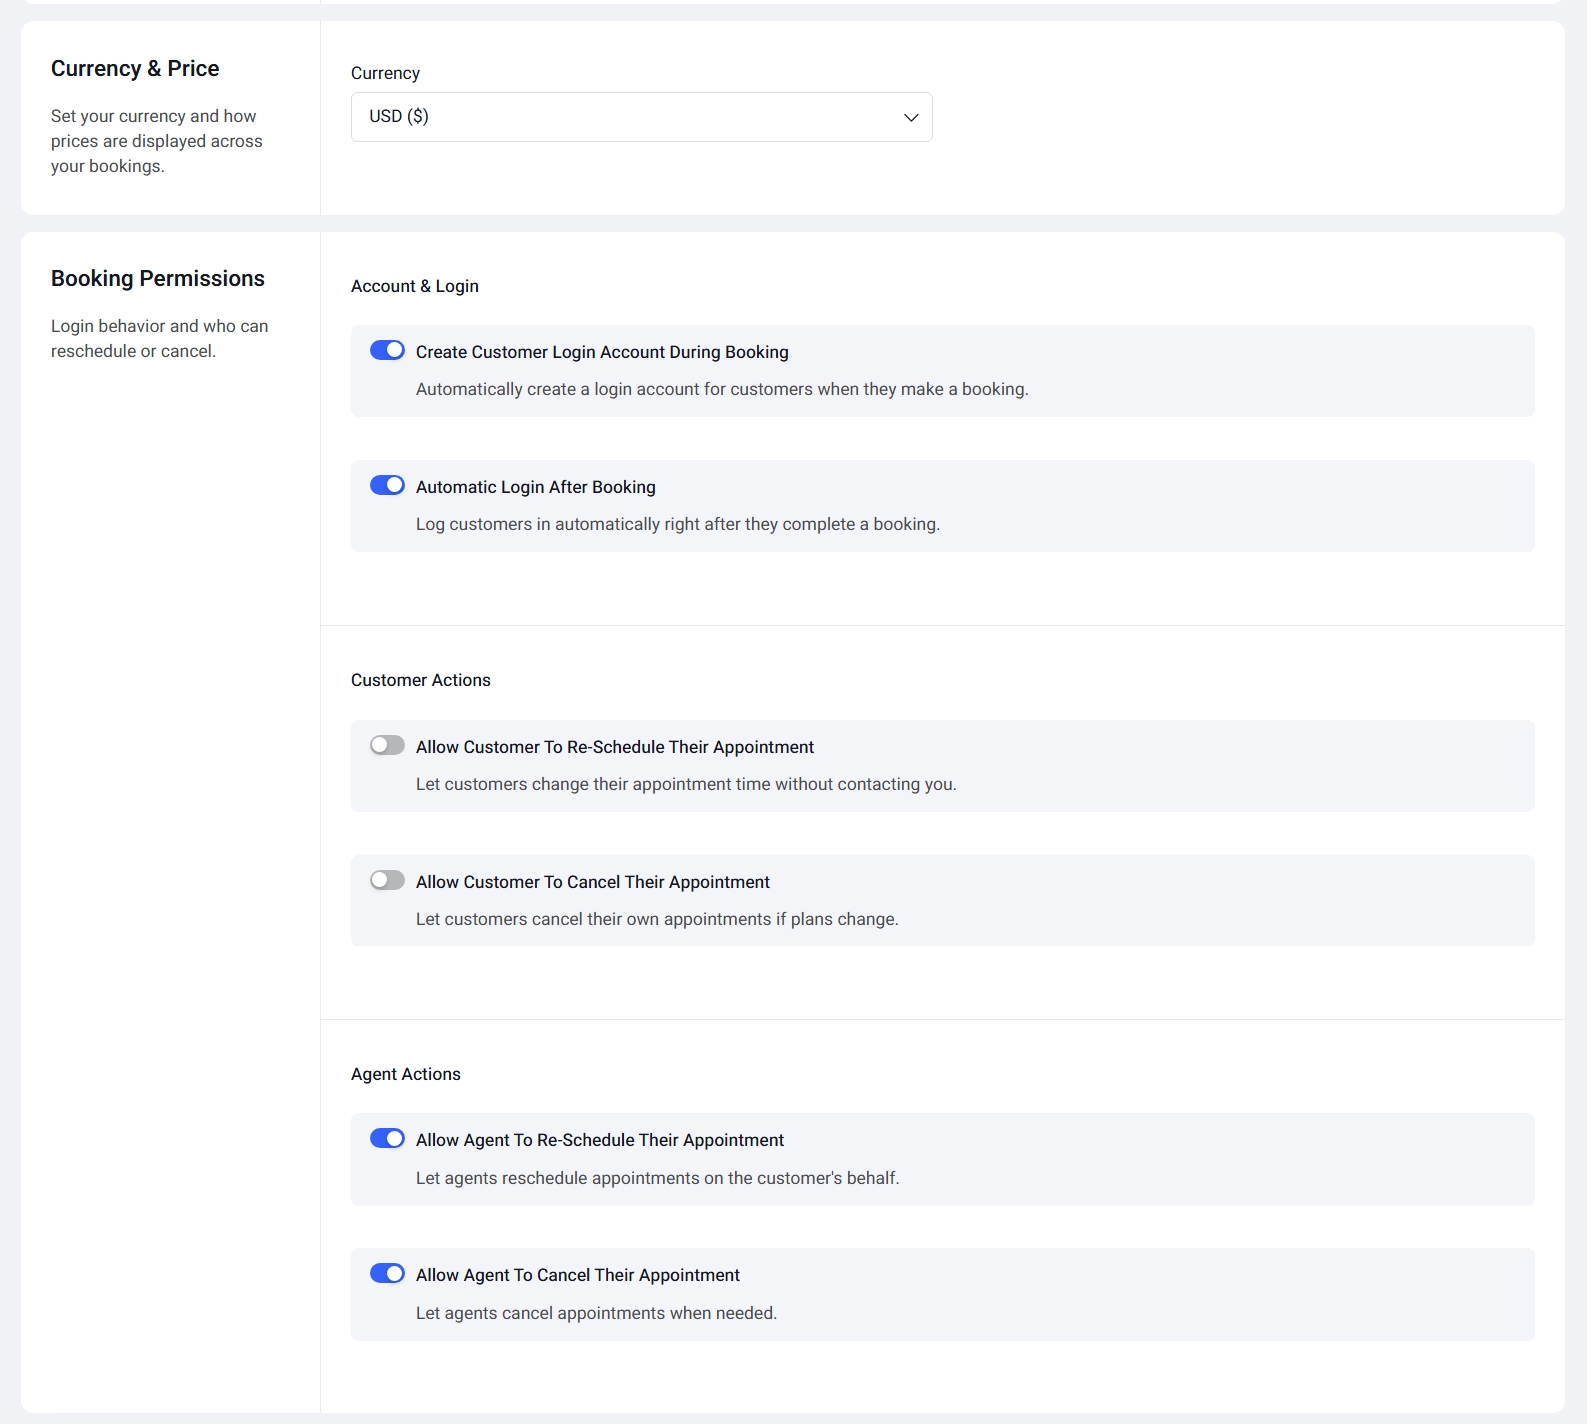
There are also booking permission controls. For example, you can allow customers to reschedule or cancel their appointments through their account, or keep those actions under your own control.
This is worth configuring before launch because your booking rules should match how your business actually operates. A service business that requires a cancellation notice, for instance, may want customers to have fewer self-service options than a casual coaching service.
Step 7: Set Up Your Payment Method
If you want customers to pay when they make an appointment, configure a payment method under Rox Appointment → Settings → Payments.
- Stripe: Enter the publishable and secret keys from the Stripe dashboard and click Connect. Keys are validated against Stripe immediately, so an incorrect key is rejected at setup rather than failing silently at checkout. Currency is set under Settings → General.
- Pay Later: Customers reserve a slot and pay in person. The order remains unpaid until marked paid from the Orders page.
- PayPal (Pro): Renders PayPal’s own buttons inside the booking panel, with no redirect away from the page. Adding a webhook ID syncs refunds and reversals made inside PayPal back to the booking order.
- WooCommerce checkout (Pro): Sends bookings through the existing WooCommerce checkout, reusing every gateway already configured there. Useful for sites already selling products.
- Deposits (Pro): Enabled per service, letting customers pay a percentage or fixed amount up front with the balance due later. The confirmation screen and order record both show deposit paid and balance due.
Refunds are processed from the Orders page with an amount and a reason recorded against the order.
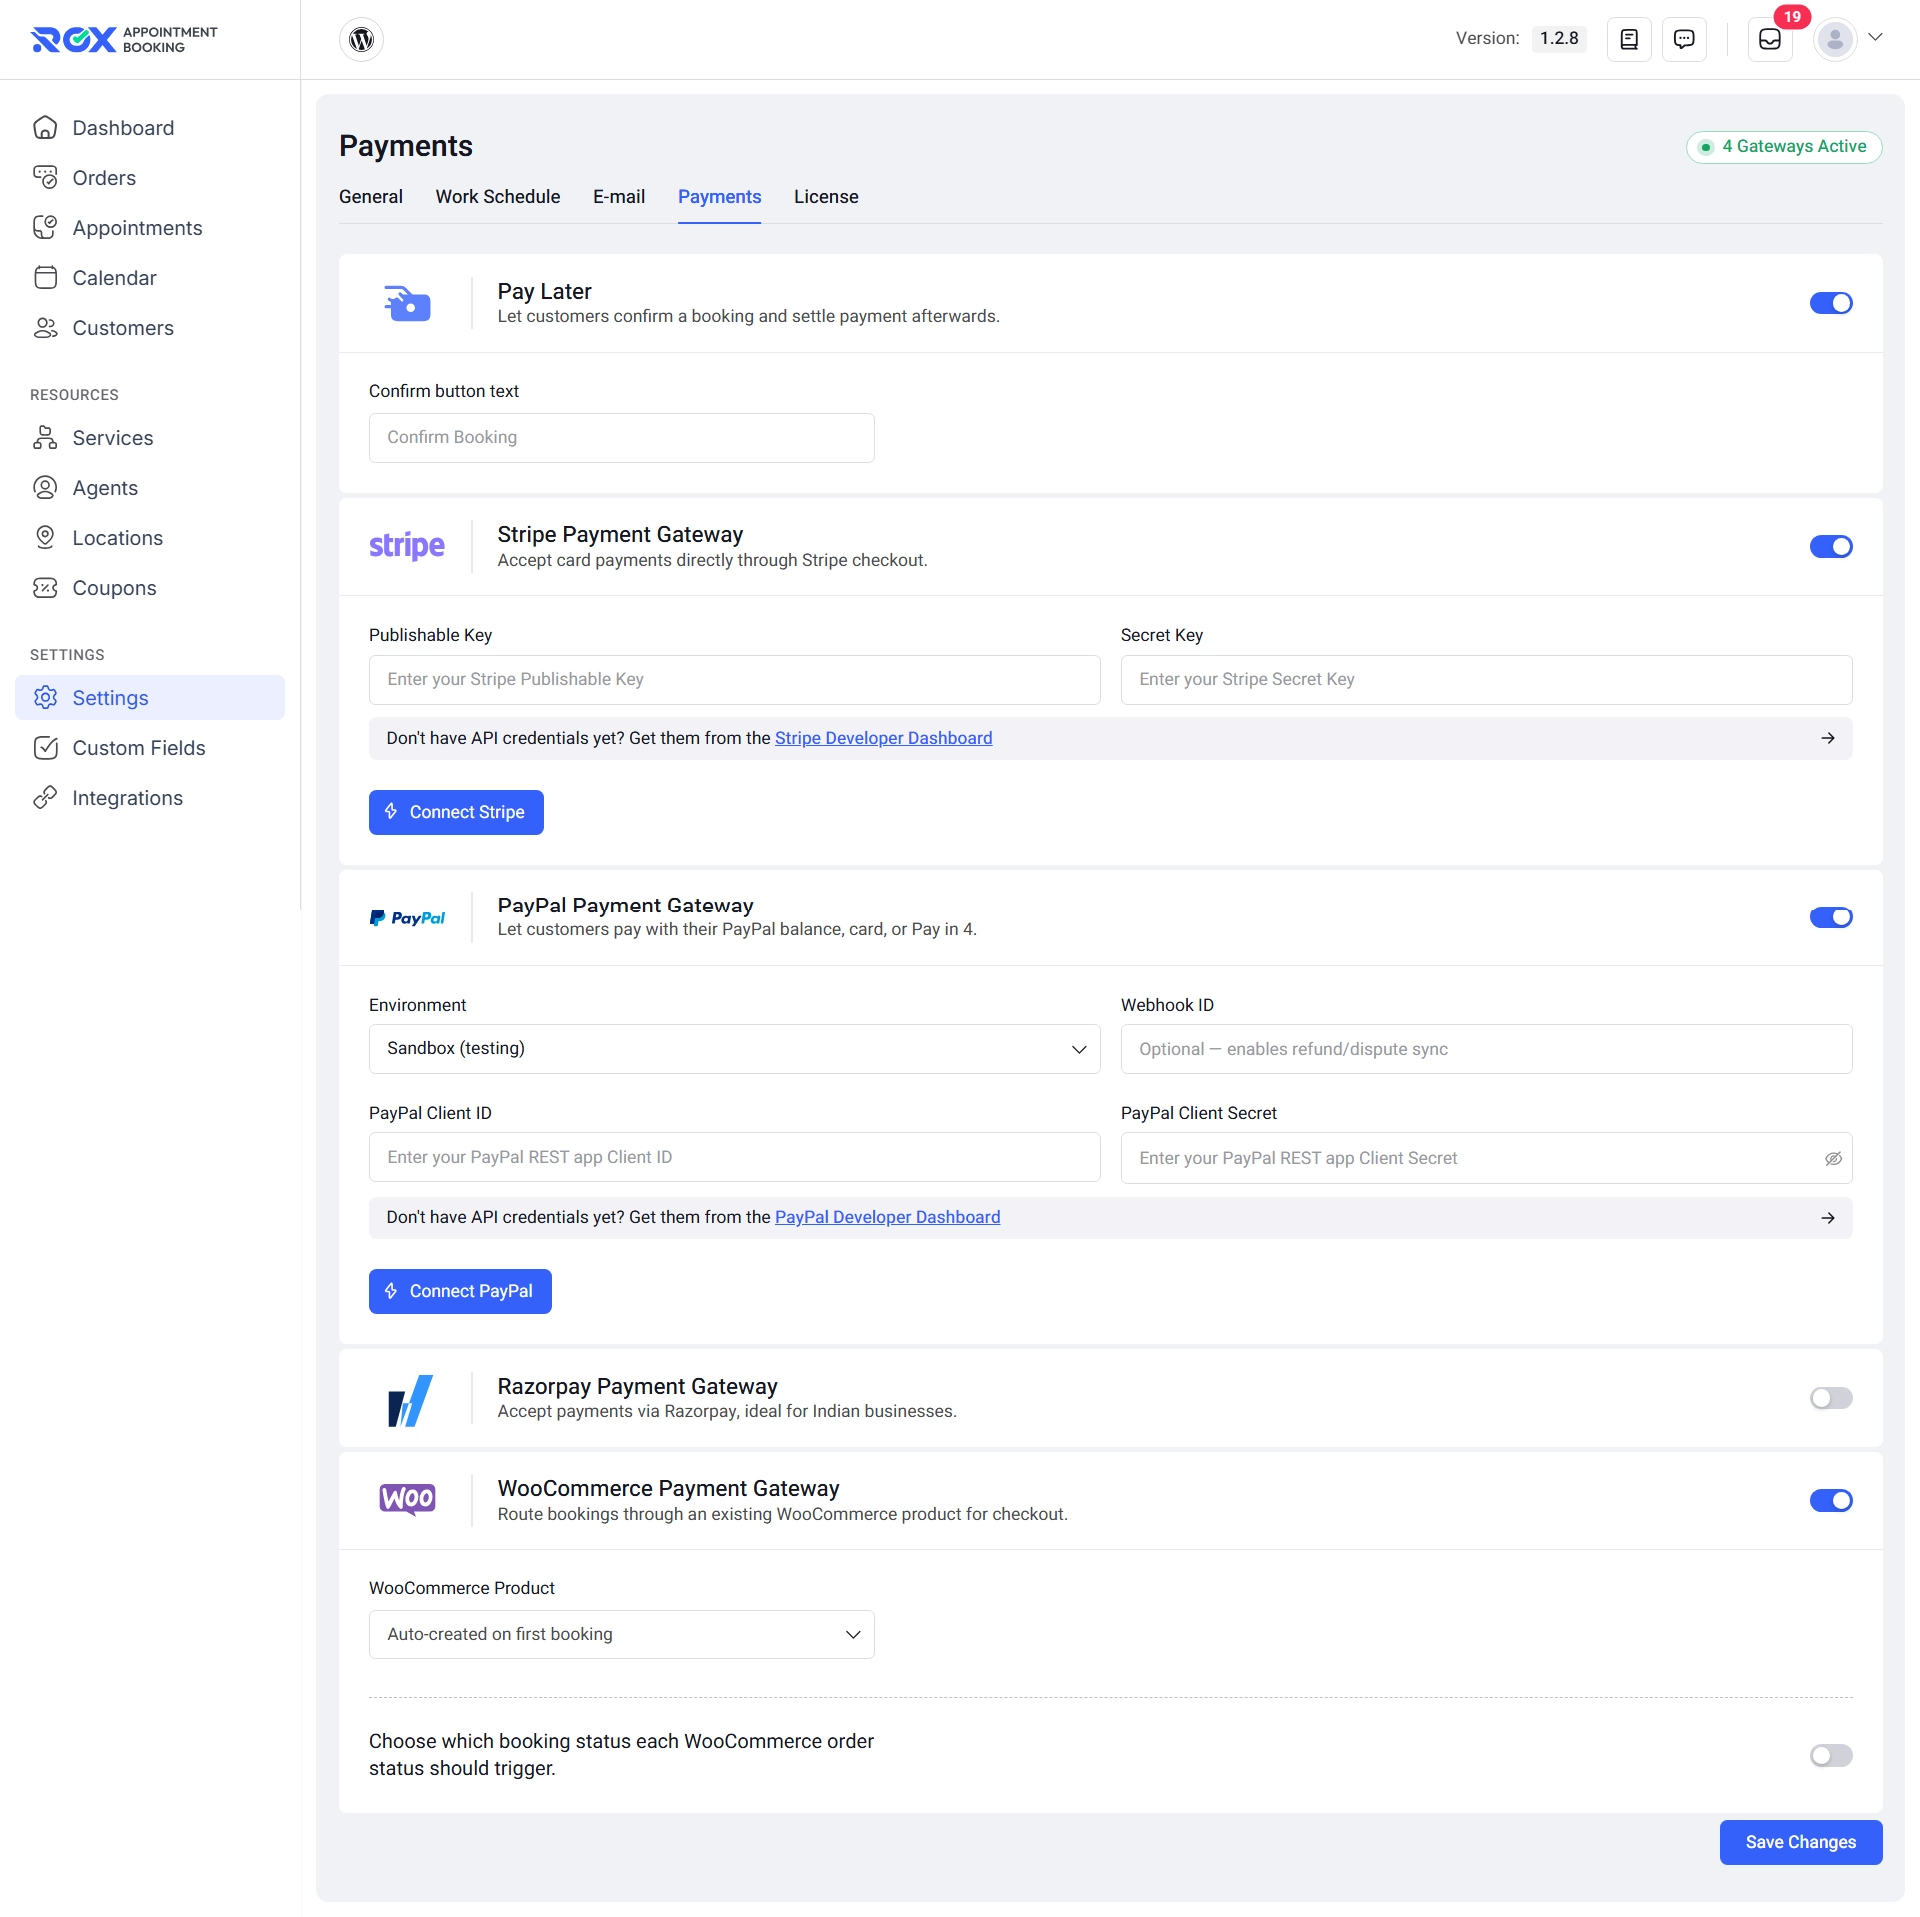
Testing with Stripe’s test keys before switching to live keys is worth the extra ten minutes: place a full booking, confirm the order appears, then reconnect with live credentials.
Step 8: Set up Booking Emails
A good booking website should keep both the customer and the business informed after an appointment is made.
Under Rox Appointment → Settings → E-mail, configure the sender name, sender email, and admin notification address. You can also customize the available email templates.
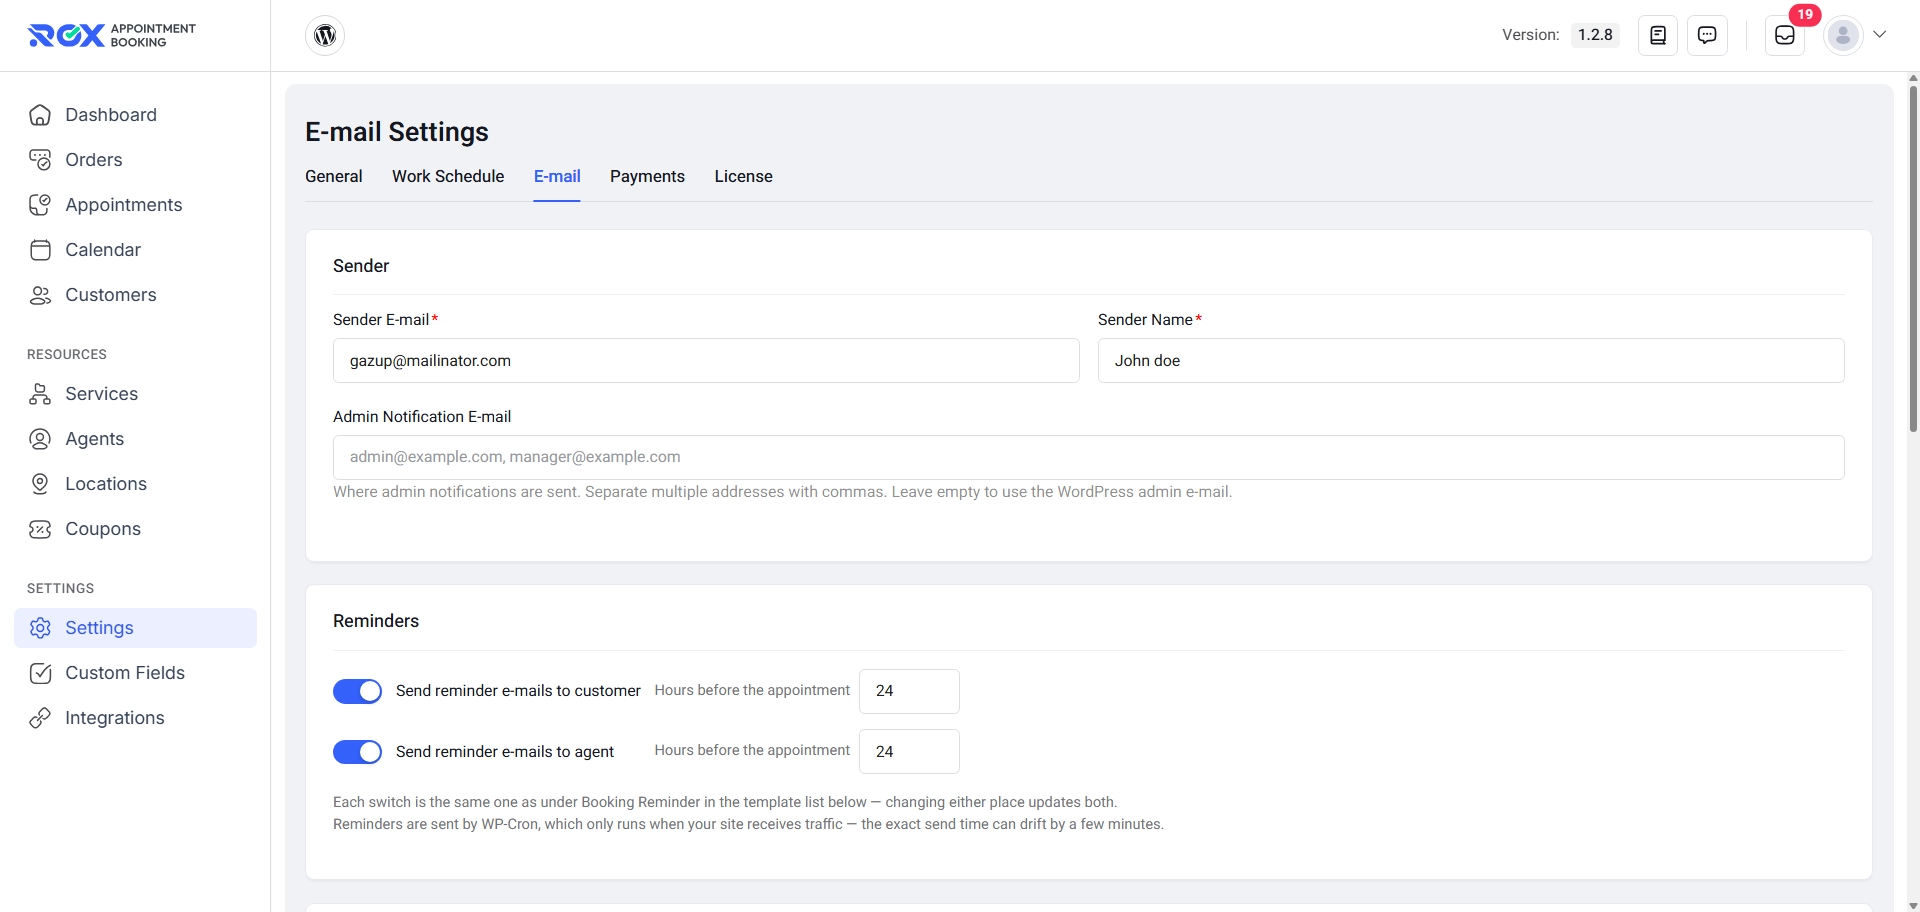
The plugin covers eleven notification events, each listed as an expandable row with a separate editor per recipient. Every editor provides an on/off switch, a subject line, an HTML body, a placeholder picker for tokens such as {customer_name}, and a reset-to-default option. Because each recipient has an independent switch, unwanted messages can be disabled without affecting the rest.
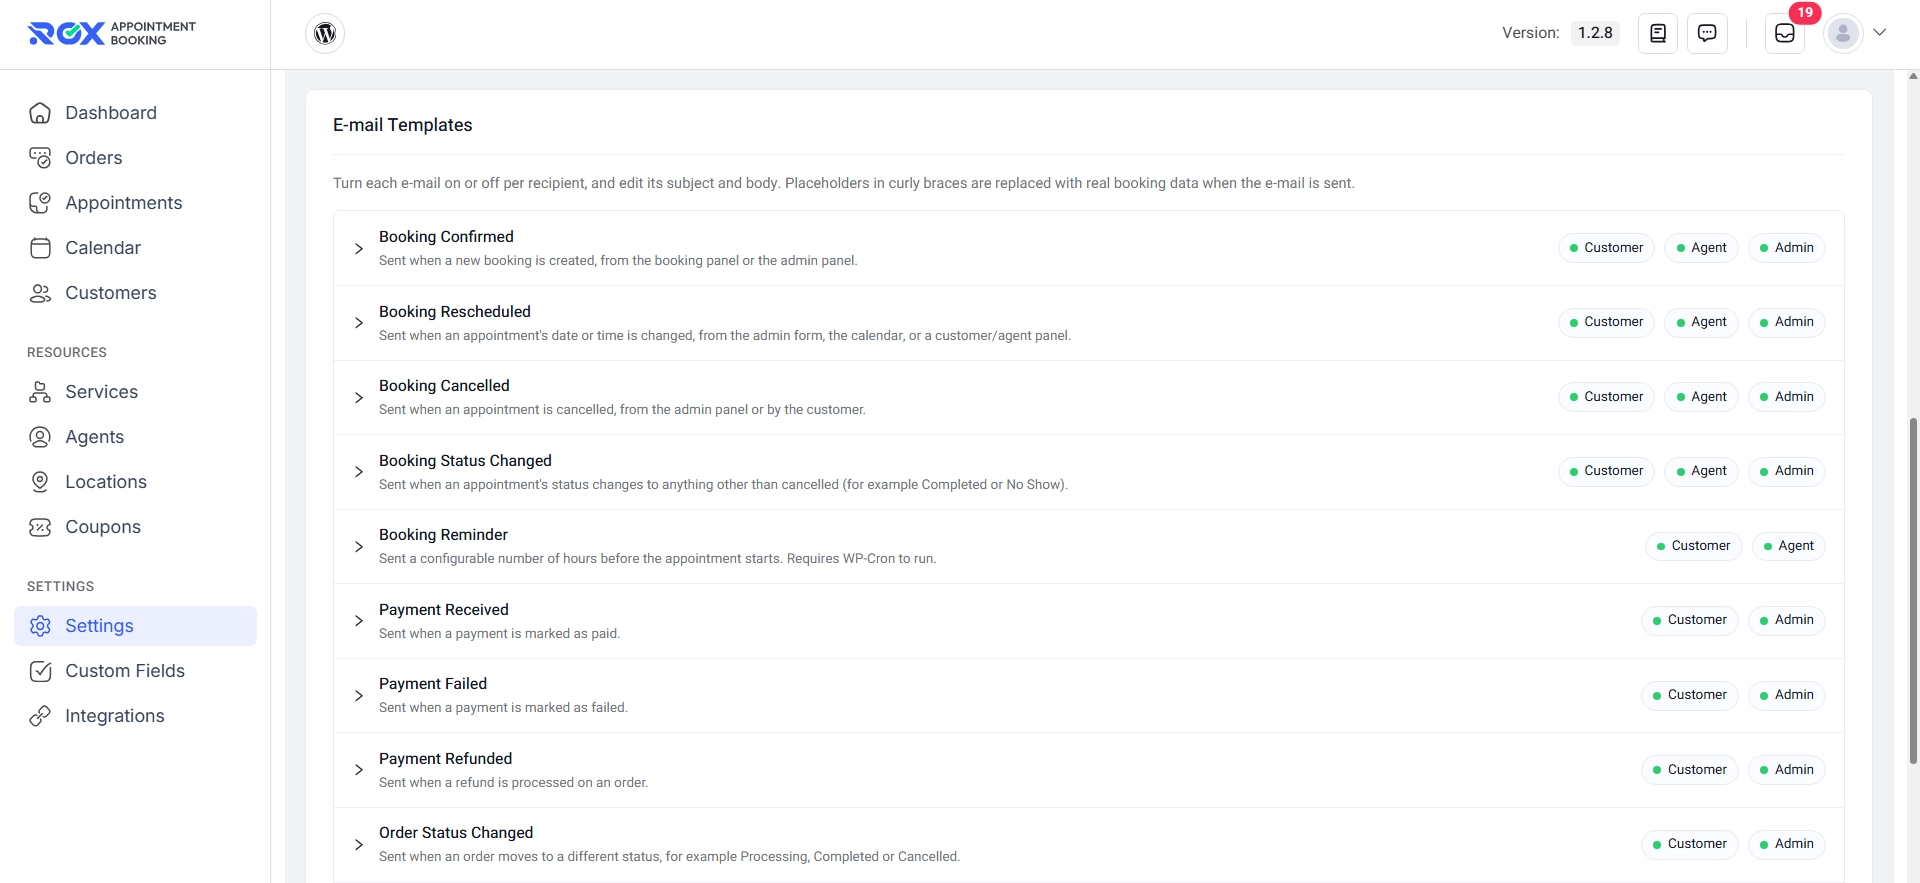
Each template also includes a Send test e-mail button, which confirms two things simultaneously: that the wording reads correctly, and that mail is leaving the server at all.
Appointment reminders are a Pro feature, with independent lead times for customer and agent — a customer can be reminded a day ahead and the staff member an hour ahead. Reminders run on WP-Cron, which fires on site traffic, so send times can drift by a few minutes on low-traffic sites. A server-level cron job resolves this.
Step 9: Build an Engaging Appointment Booking Page
Once you’ve completed the Rox Appointment Booking setup from Steps 1–7, it’s time to create the page where customers will actually book an appointment.
Instead of building the page from scratch, you can speed up the process with a starter template and then customize it with engaging animations.
Start With a Ready-Made Starter Template
There is a collection of professionally designed starter templates that can give your website a polished look without requiring you to design every section from the ground up.
Browse the available templates and choose a design that matches your business.
For this example, we’ll use the Insure starter template as the foundation for the website.

The Insure template provides a useful starting point for creating a professional service-based website. You can import the template and customize its pages, content, colors, images, and sections to match your brand.
Create Your Booking Page
After importing the starter template, create or customize a dedicated page such as Book an Appointment, Schedule a Consultation, or Book Now.
Using Elementor, you can build the page by combining the template’s existing sections with the Rox booking interface.
For example:
- Open your booking page with Elementor.
- Customize the template content to introduce your services.
- Add a clear heading and short explanation of the booking process.
- Add the Rox Appointment Booking Panel widget.
- Configure the booking panel according to your available services and categories.
- Add relevant call-to-action sections around the booking form.
- Publish the page when everything is ready.
Make the Booking Experience More Engaging With Animation Addons
A booking page doesn’t have to feel like a plain form. With Animation Addons, you can add subtle motion to important sections and guide visitors toward taking action.
For example, you can animate:
- The hero heading as the page loads
- Service cards as visitors scroll
- Icons and illustrations to create visual interest
- The appointment booking section to draw attention
- Call-to-action buttons with hover effects
- Testimonials and trust elements with scroll animations
The goal isn’t to animate every element. Instead, use motion strategically to direct attention, improve visual hierarchy, and make the booking journey feel more interactive.
Turn the Starter Template Into a Complete Website
The same starter template can also be used as the foundation for the rest of your website. Depending on your business, you can customize or create pages such as:
- Home – Introduce your business and highlight your services.
- Services – Explain what customers can book.
- About Us – Build credibility and introduce your team.
- Testimonials – Show customer experiences and build trust.
- Contact – Provide additional contact options and location details.
- Book an Appointment – Give customers a clear place to schedule their appointment.
You can also add Book Now buttons throughout the website that link visitors directly to the booking page. This reduces the number of steps between discovering your service and scheduling an appointment.
Create a Booking Page That Converts
With Rox handling the appointment functionality, the starter template providing the design foundation, and Animation Addons adding purposeful motion, you can create a booking experience that is both functional and visually engaging.
The key is to keep the booking process simple: help visitors understand your service, build trust, guide them toward the booking section, and make it easy to complete their appointment.
This version creates a much better transition from Rox setup → website creation → starter template → Animation Addons → conversion-focused booking page, rather than making Step 8 feel like another Rox configuration step.
Step 10: Set Up the Customer Portal
An appointment system shouldn’t stop working after someone clicks “Book.”
Customers may need to review, reschedule, cancel, or pay for their appointments later.
Rox provides a customer portal through:
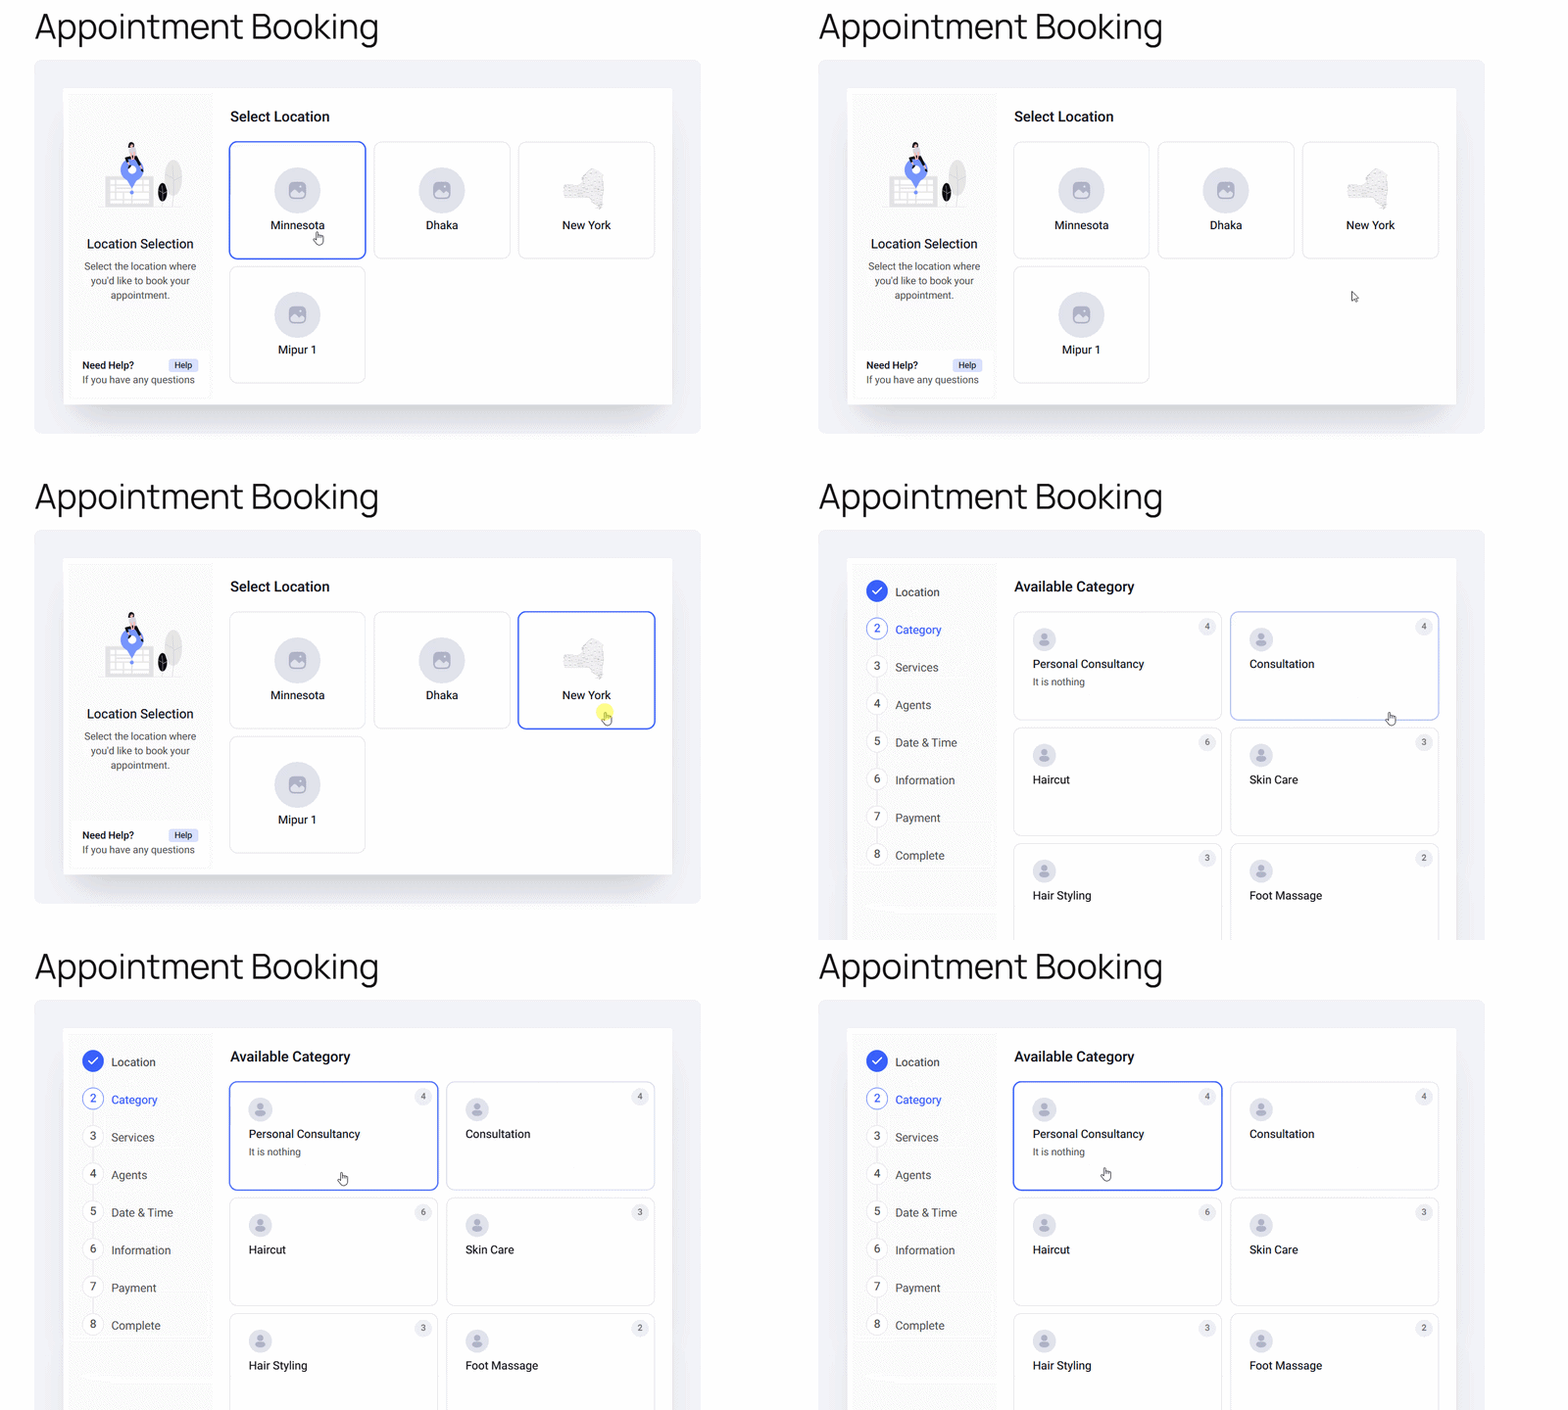
The plugin automatically creates the dashboard page when activated.
Logged-in customers can access features such as:
- Upcoming bookings
- Past bookings
- Cancelled bookings
- Rescheduling
- Cancellation
- Payment
- Booking again
- New bookings
- Payment history
- Profile management
You can also enable automatic customer account creation during booking under:
Settings → General → Booking Permissions
This can make repeat bookings considerably easier because customers don’t have to repeatedly enter the same information.
Add Multiple Locations When Your Business Needs Them
A single-location business can keep the booking experience relatively simple. If you operate several branches, however, customers need a way to select where they want their appointment.
Rox Pro supports multiple locations. You can enable the feature under Settings → General → Locations, create your locations, and associate services with the appropriate venues.
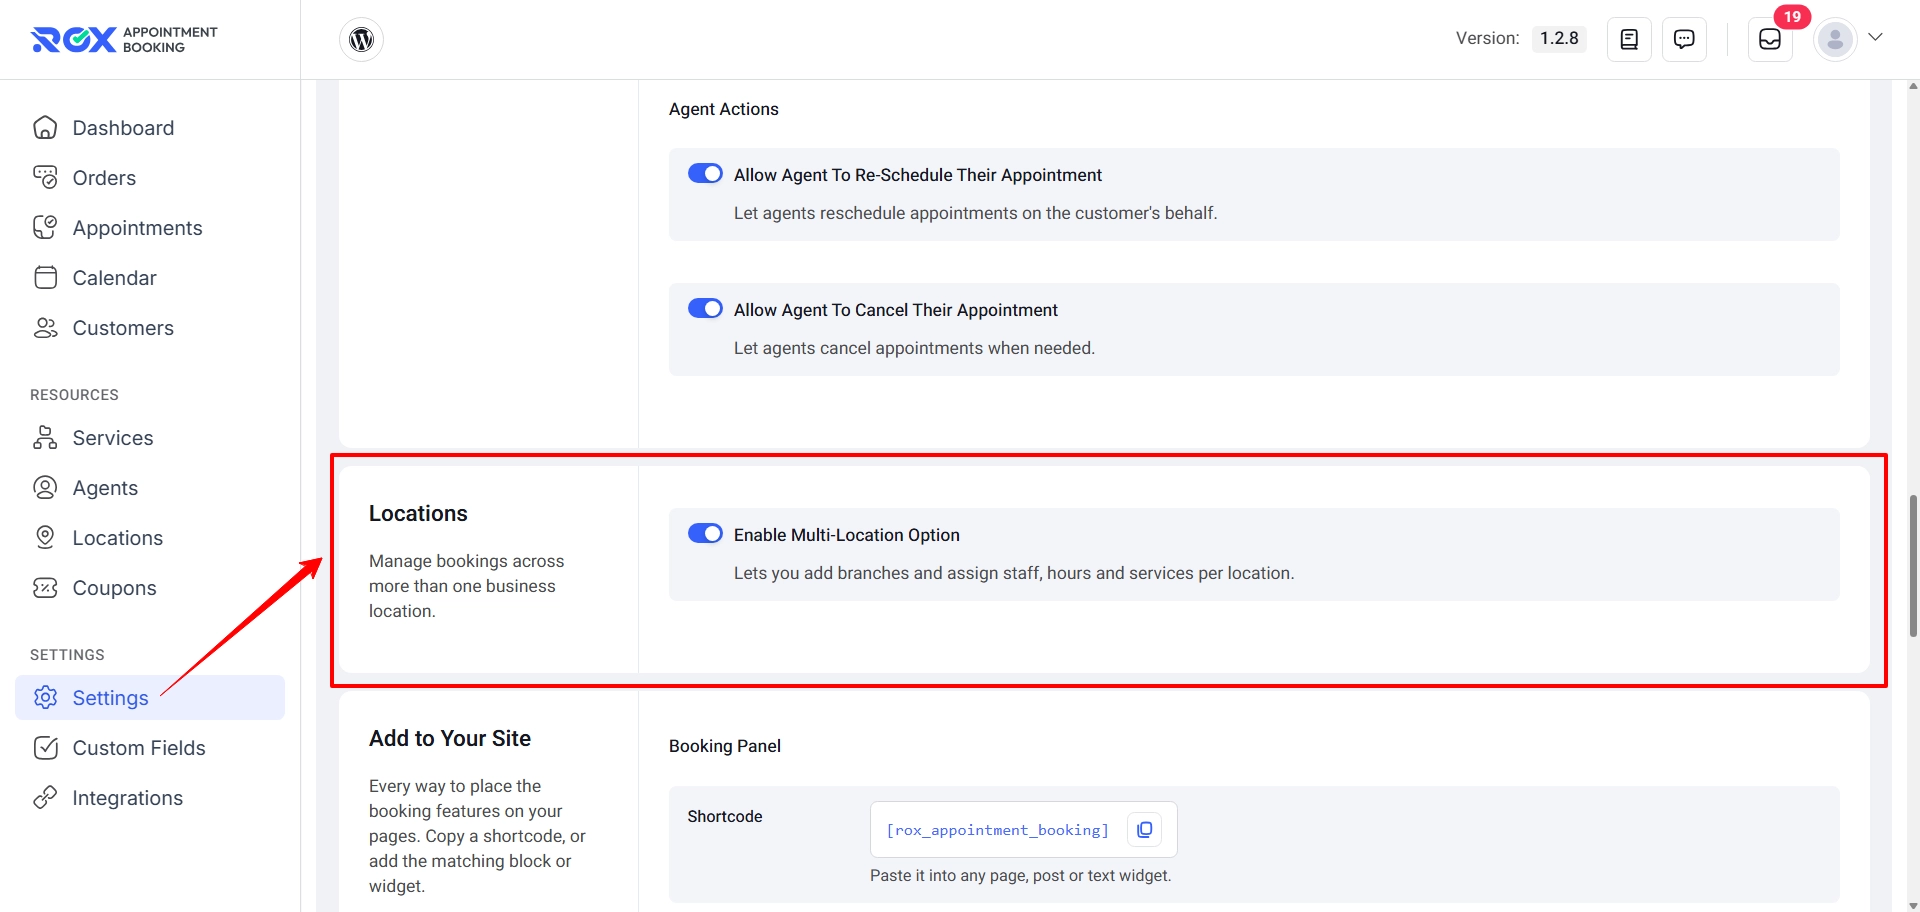
Once multi-location mode is active, the booking panel adds a Location step before the other selections. Services can then be filtered according to the selected location.
This can be useful for businesses such as salons, clinics, studios, or service centers that operate from multiple branches.
Integrate Your Google Calendar and Other Tools
If appointments are already part of your daily workflow, keeping them synchronized with the tools you use can save time.
Rox Pro includes integrations for Google Calendar & Meet, allowing bookings to be synchronized with a Google Calendar and, when enabled, adding Google Meet links to synced events. There are also integrations for Mailchimp, Sign in with Google, and webhooks.
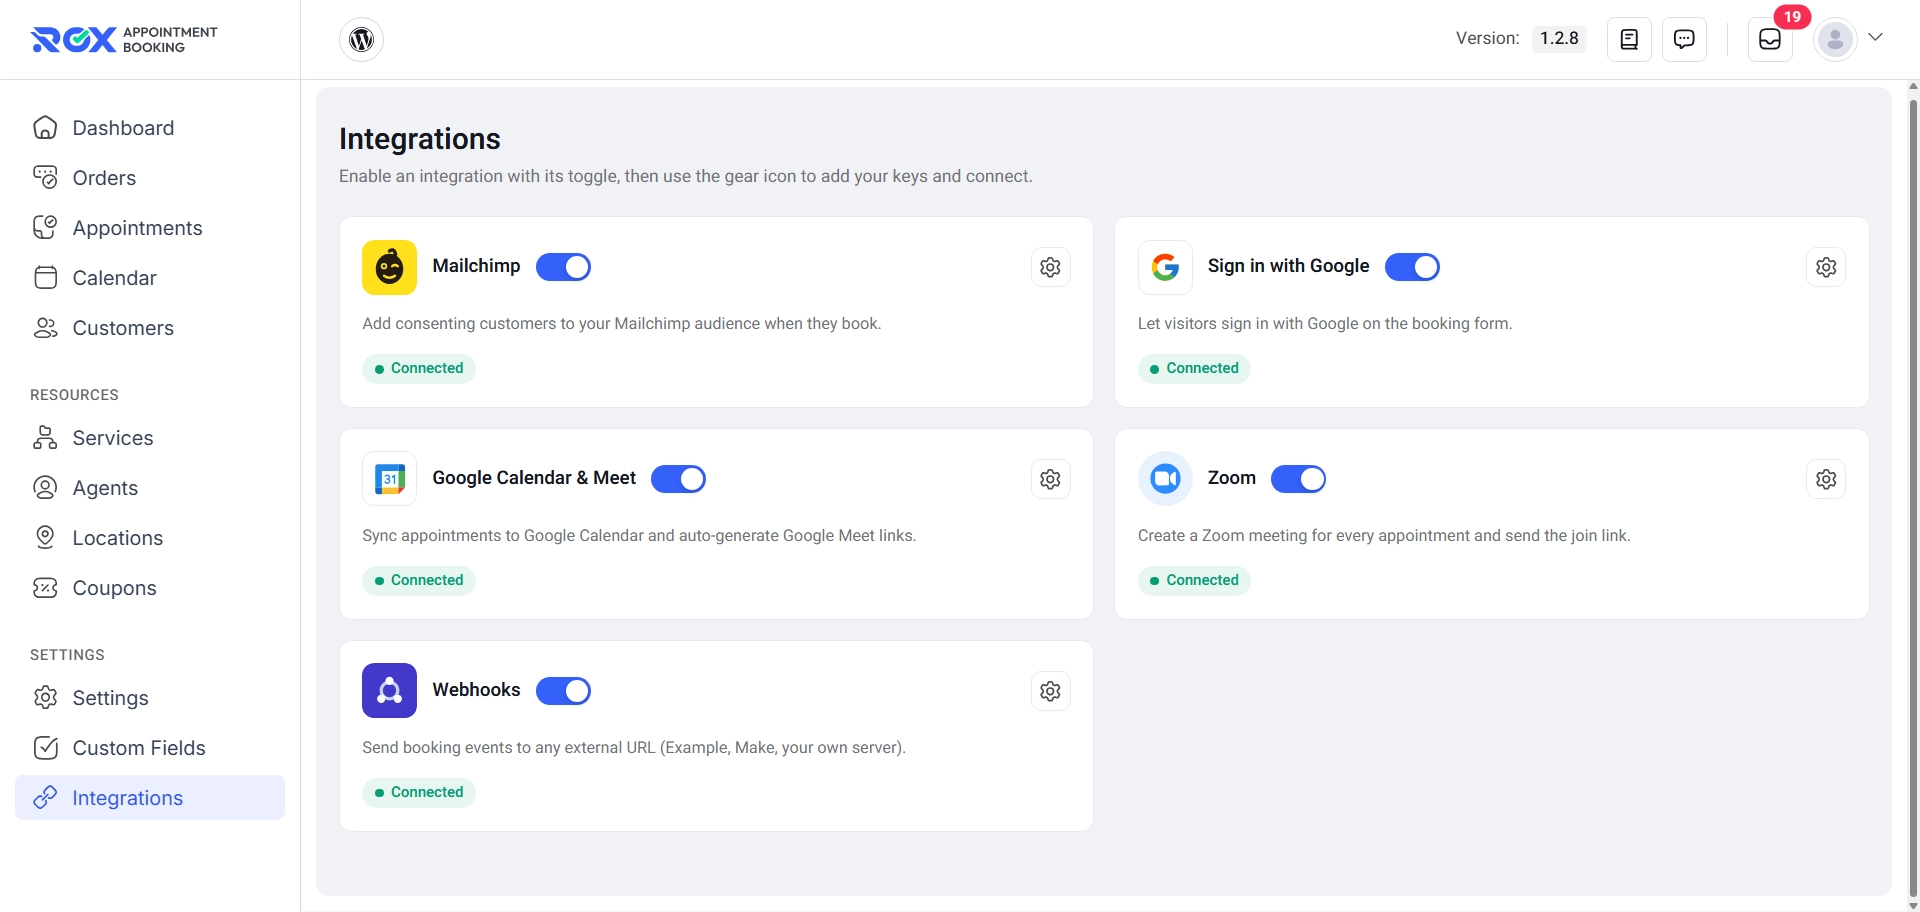
For example, a consultant conducting remote sessions can combine appointment booking with Google Meet, while a business that manages customer marketing through Mailchimp can connect new bookings to its audience.
What more you can do with the appointment booking system.
Add Optional Booking Features
Once your basic booking system is working, you can expand it based on your business model.
Extra Services
Offer optional add-ons during booking.
For example:
- Hot towel treatment +$5
- Express service +$10
- Premium package +$20
Extra services can increase both the appointment duration and price.
Coupons
Create discount codes with:
- Percentage discounts
- Fixed discounts
- Minimum booking amounts
- Usage limits
- Validity periods
- Automatic application
Deposits
For higher-priced services, customers can pay only a percentage or fixed amount upfront and settle the remaining balance later.
Group Bookings
If one appointment can accommodate several attendees, configure the service as a group service and set its maximum capacity.
These features are available in Rox Appointment Booking Pro.
How the Complete System Fits Together
At this point the website and booking system work as one connected process. A visitor lands on your animated home page, service cards reveal as they scroll, they read a service, and click Book Now. The Rox panel guides them through service and schedule, collects their information, takes payment when required, and confirms. You receive notifications and manage everything from the Rox dashboard. The customer returns to the portal later to review or change the booking.
The architecture, in order:
- WordPress → Book Now page → Rox Booking Panel → Service → Staff → Date & Time → Customer Information → Payment → Booking Confirmation → Customer Dashboard → Elementor site (animated with Animation Addons)
The exact flow shifts with your setup. A multi-location business starts with location selection, a group service adds attendee capacity, and a Pro service with no assigned agent removes the staff step. Animation Addons wraps every one of these steps in motion that keeps the visitor moving forward instead of stalling.
Best Practices for an Appointment Booking Website
A technically functional booking website can still be frustrating to use. Keep these principles in mind:
- Keep services clear: Use straightforward service names and descriptions. Customers shouldn’t need a detective license to understand what they’re booking.
- Show the duration: A customer should know whether they’re booking a 15-minute consultation or a two-hour treatment.
- Make availability accurate: Keep working hours, breaks, holidays, and staff schedules updated.
- Keep the booking form focused: Only ask for information you actually need.
- Offer convenient payment options: Depending on your business, offer card payments, Pay Later, PayPal, or WooCommerce checkout.
- Make account management easy: A customer portal gives returning customers a convenient way to manage their bookings.
- Test regularly: Create test bookings after major changes to services, schedules, payment gateways, or website configuration.
Conclusion
An animated appointment website with WordPress comes down to three tools doing three jobs. Elementor builds the pages. Animation Addons gives them motion that guides visitors toward booking. Rox Appointment Booking runs the services, schedules, payments, and confirmations underneath. Set it up once, and your site books customers while your team manages appointments from one place, and every visitor moves through a page that feels considered instead of static.
FAQs
No. Animation Addons is a GSAP-powered plugin built for Elementor, so scroll reveals, staggers, and transitions are added through Elementor’s drag-and-drop interface. You start from an animated template and adjust visually.
Not when it’s done with intent. Pair a lightweight theme with restrained, purposeful motion and the page stays fast. Heavy background video and dozens of competing effects are what hurt speed, not well-built GSAP animations.
Yes. Because the Rox booking panel renders inside your own theme, you can install Animation Addons afterward and animate the sections around the panel. Starting animated is smoother, but it’s not required.
The free version lets you validate the full flow with one agent, services, schedules, and Stripe or Pay Later. Multiple agents, deposits, PayPal, reminders, multi-location, and Google Calendar sync are Pro features you can grow into.


Leave a Reply