

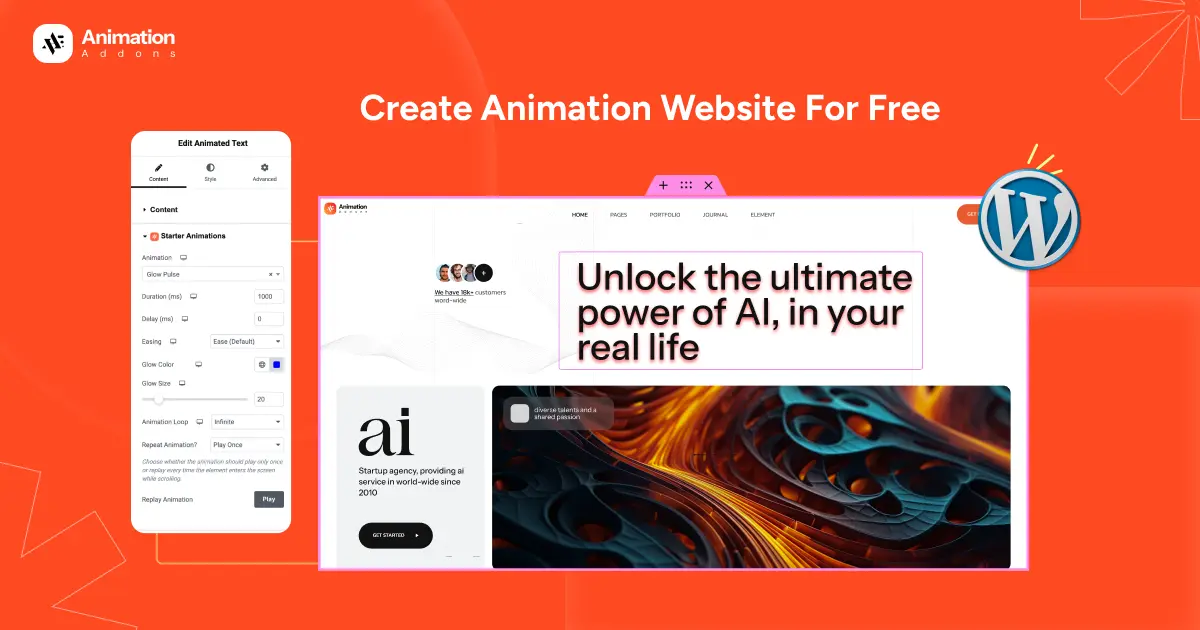
Imagine building a stunning animation website without writing a single line of code and without spending a single penny.
Sounds unrealistic?
Not anymore.
Today, creating a fully free animation website is easier than ever. With the right tools, anyone can design smooth, eye-catching animations that feel premium, completely free.
In this guide, you’ll learn how to create an animation website for free, step by step, using a powerful solution that removes all the complexity.
Build Stunning Animation Websites for Free — No Code Needed
For the first time, anyone can create a fully animated website for free without coding. Animation Addons makes it incredibly simple to add smooth scroll effects, eye-catching transitions, and interactive elements in just a few clicks.
You don’t need technical skills or expensive tools. Everything is designed to be fast, beginner-friendly, and powerful. With ready-made templates and flexible controls, you can build modern, engaging websites that look professional and feel dynamic.
There is no subscription required, no hidden cost, and no complexity. Just install, customize, and instantly transform your website into an interactive experience that captures attention and keeps users engaged.
Step-by-Step: Create Animation Website Free With Animation Addons
Now let’s build a beautiful animation website for free using Animation Addons with zero coding and zero cost.
What You Need to Get Started
To create your animation website for free, you only need:
- Elementor (Free version)
- Animation Addons (Free Version)
That’s it.
- Note
- Using the Animation Addons free extension, Starter Animation, you can easily create premium-level animations for your website at no extra cost.
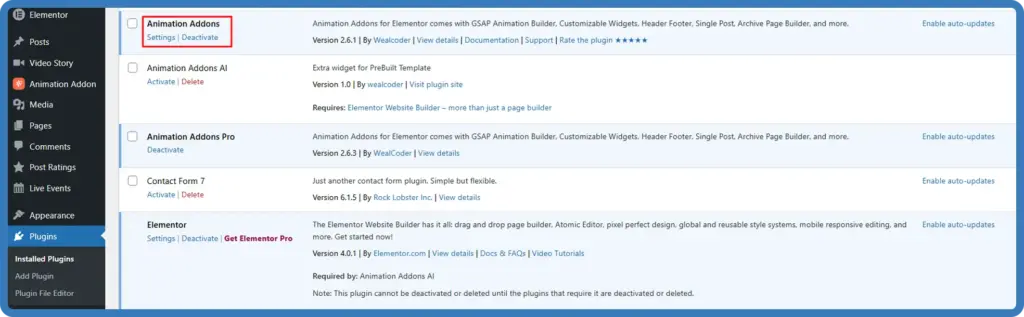
Step 1: Install Animation Addons & Activate
Go to the plugin and type Animation Addons in the search bar. Once it appears, click on Activate.
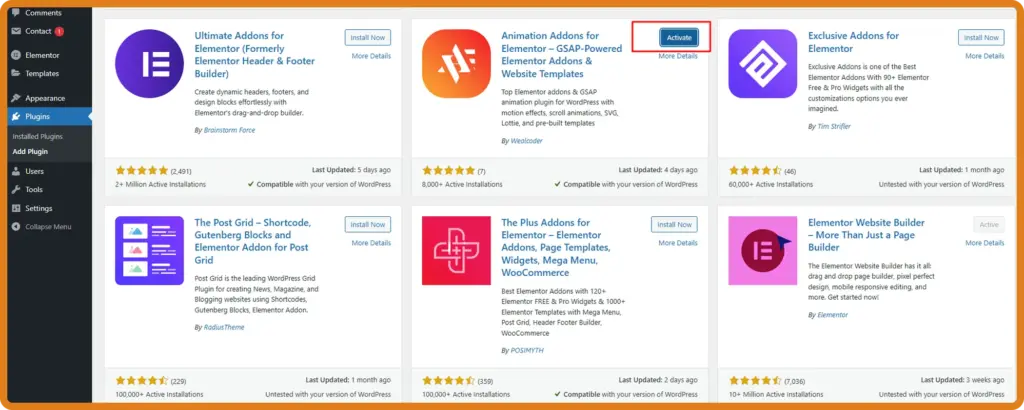
Once activated, the plugin is ready to use. For step by step instructions, check the official installation guide.
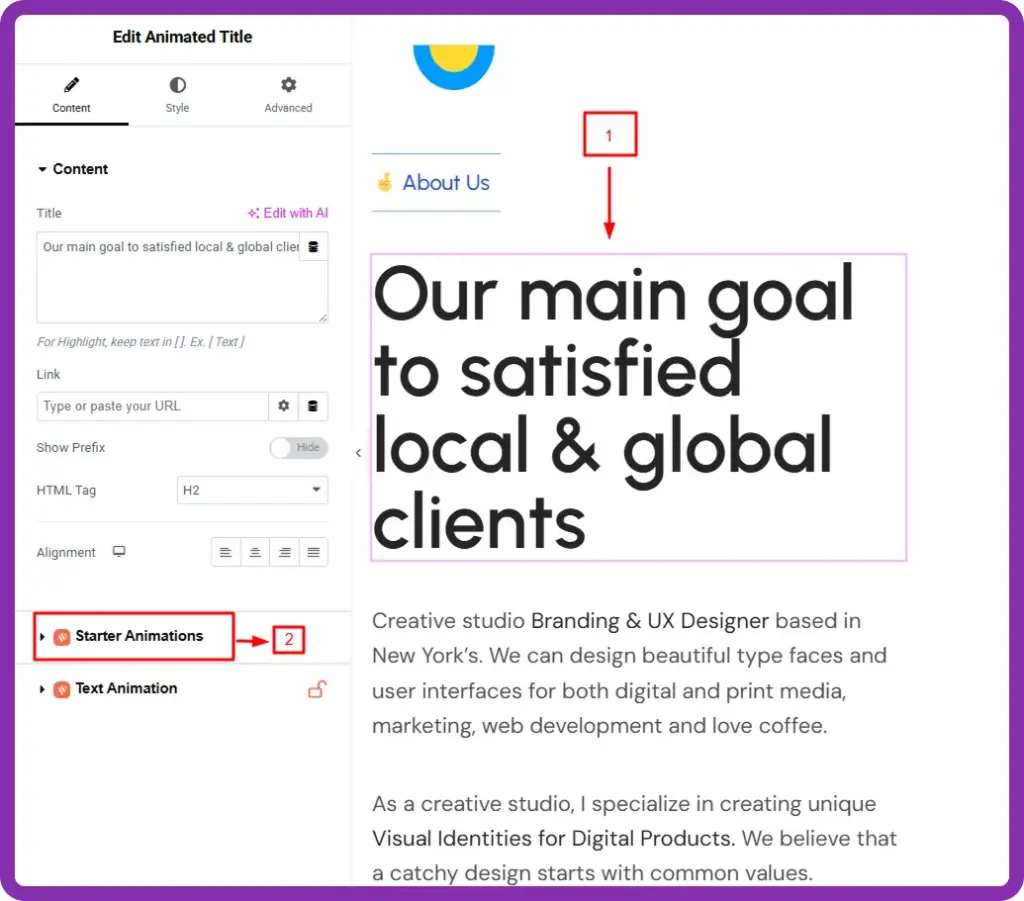
Step 2: Pick Your Element
Unlike other extensions, you do not need to activate Starter Animation separately. Once you install Animation Addons, it will be activated by default.
To find the Starter Animation extensions, go to your Elementor editor dashboard and click on the element that you want to add animation to. Then, the Starter Animation extension will appear on the left side of the screen.
Finally, click on Starter Animation to explore its options.
Step 3: Apply Animation
Now comes the magic part. The Starter Animation extension lets you add powerful animations instantly without coding. You can easily add animations to images, text, and containers.
Let’s start with Text Effect:
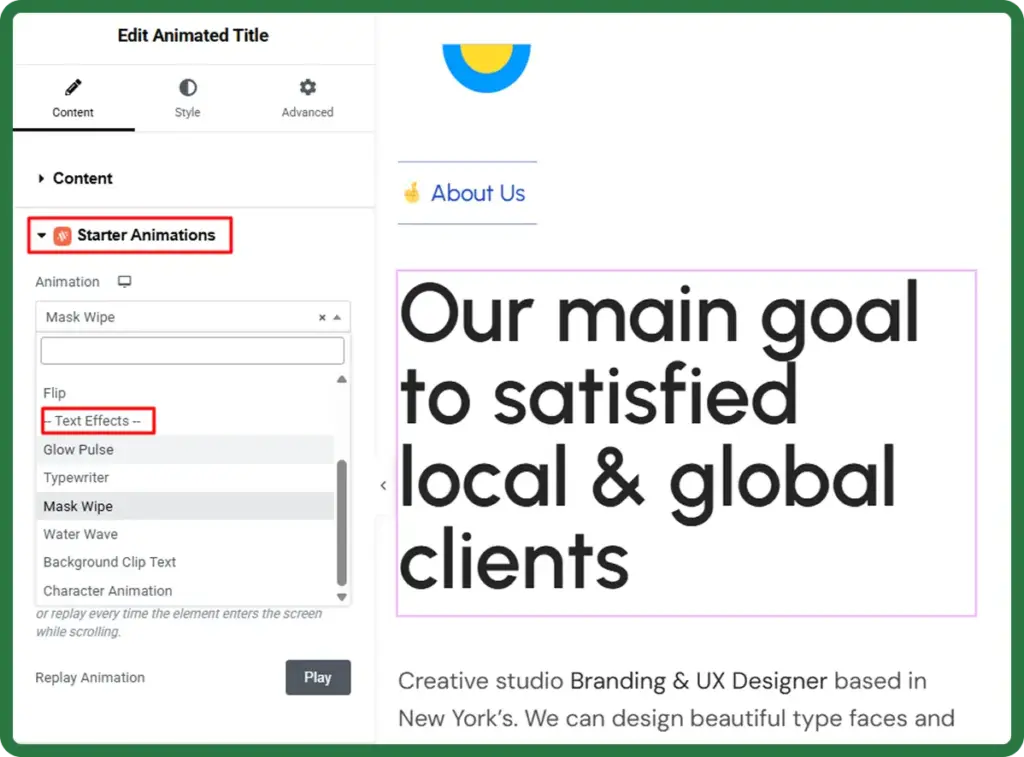
There are 3 types of effects for Starter Animation. These are – Text, Image and Container. We will explain these effects one by one.
Text Effect of Starter Animation
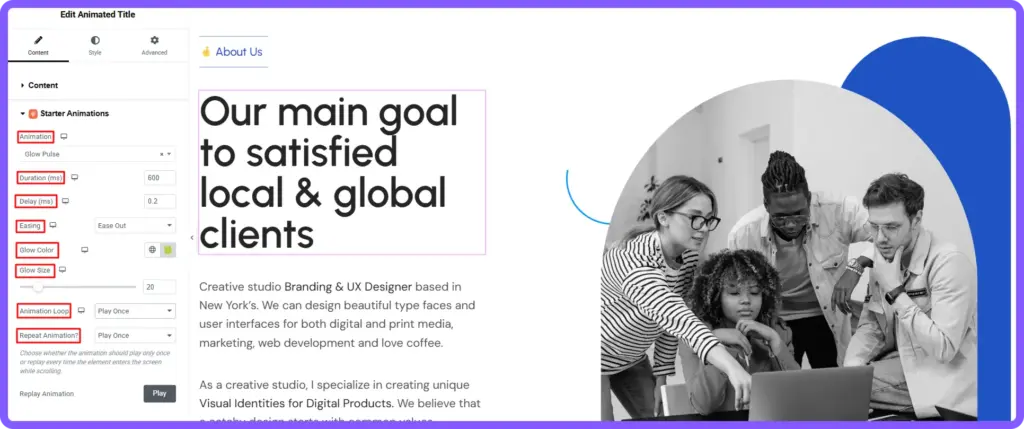
Glow Plus
The Glow Plus animation makes text shine with a glowing light effect.
- Note
- All animations share common settings like Duration, Delay, Easing, and Repeat. We’ll focus on what makes each animation unique.
Duration (ms): Controls how long one glow animation cycle takes. In this example, the duration is set to 600. However, you can set any value based on your preference.
Delay (ms): Controls how long the animation waits before starting. In this example, the delay is set to 0.02 ms. However, you can set any value based on your design needs.
Easing: Controls how the animation’s speed changes while the scaling effect runs.
Common easing types:
- Linear → keeps the same speed from start to end
- Ease In → begins slowly and then speeds up
- Ease Out → starts fast and slows near the end
- Ease In Out → slow at the start, faster in the middle, and slow again at the end
- Smooth Cubic → produces a very smooth and natural motion
- Elastic Feel → creates a spring-like bounce before the animation finishes
In this example, Ease Out is applied. However, you can select any easing type according to your needs.
Glow Color: Choose any color you want to apply to the text for the glowing light effect. In this example, lime green is selected.
Glow Size: Controls how large or intense the glow appears. Set the glow size based on your style needs. In this example, the value is set to 20.
Animation Loop: Controls whether the glow effect repeats continuously. You will find two options: Play Once and Infinite.
Repeat Animation: Controls whether the glow animation plays again when the element re-enters the viewport. In this example, Play once is selected.
Final Output of Glow Plus (if you choose Play Once):
Final Output of Glow Plus (Infinite)
💡
Pro Tip:
Ease Out works best for entrance animations because it feels natural with a fast start and a smooth stop. Use Elastic Feel for playful and creative websites. Avoid it on corporate or professional sites where clean motion is expected.
TypeWriter
Type Writer Animation makes text appear one character at a time, just like typing on a keyboard.
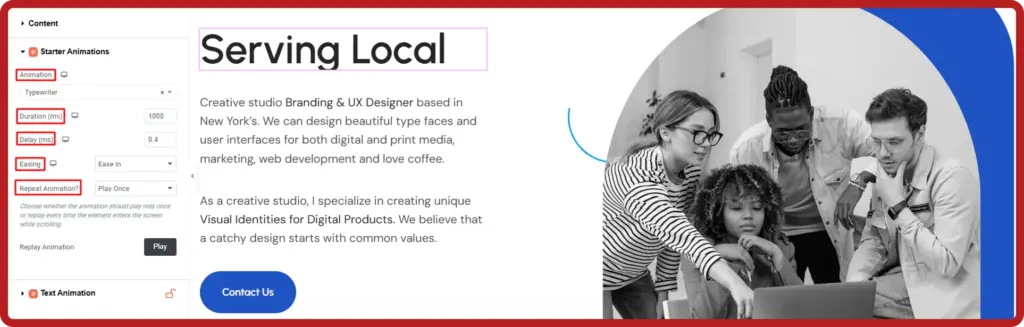
Duration (ms): Controls how long the typing animation takes to complete. In this example, the duration is set to 1000, but you can set any value based on your preference.
Delay (ms): Controls how long the animation waits before starting. In this example, the delay is set to 0.04 ms. However, you can set any value based on your preference.
Easing: Controls animation speed behavior (see Easing Guide above).
Repeat Animation: Controls whether the typing animation runs again when the element re-enters the viewport. You will find two options: Play Once and Everytime. In this example, Play Once is selected. However, you can choose either option based on your preference.
Final Output of Typewriter:
Mask Wipe
Mask Wipe Animation reveals text using a colored overlay that slides across the text like a wipe effect.
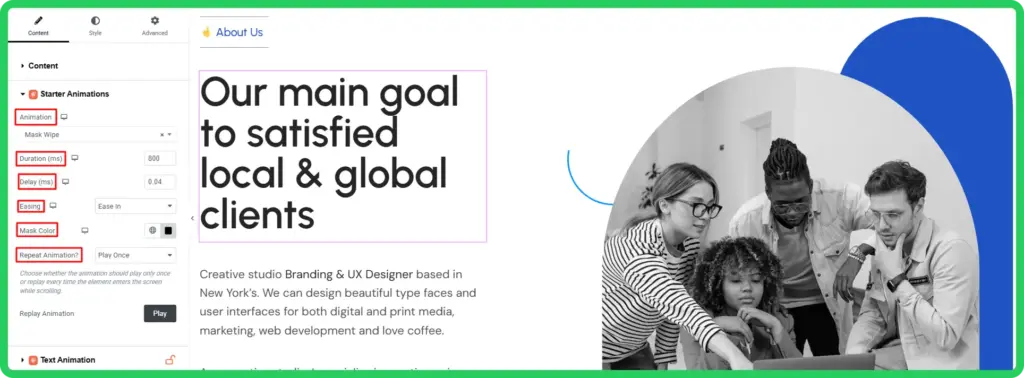
Duration (ms): Controls how long the wipe animation takes to complete. In this example, the duration is set to 800 ms. However, you can set any value based on your preference.
Delay (ms): Controls how long the animation waits before starting. In this example, the delay is set to 0.04 ms. However, you can set any value based on your preference.
Easing: Controls the timing and speed of the animation
Mask Color: Controls the color of the covering mask that moves across the text. Choose any color based on your style needs. In this example, black is selected.
Repeat Animation: Controls whether the wipe animation plays again when the element re-enters the viewport. You will find two options: Play Once and Every Time. In this example, Play Once is selected.
Final Output of Mask Wipe:
Water Wave
Water Wave Animation fills the text with a moving wave effect, similar to water flowing inside the letters.
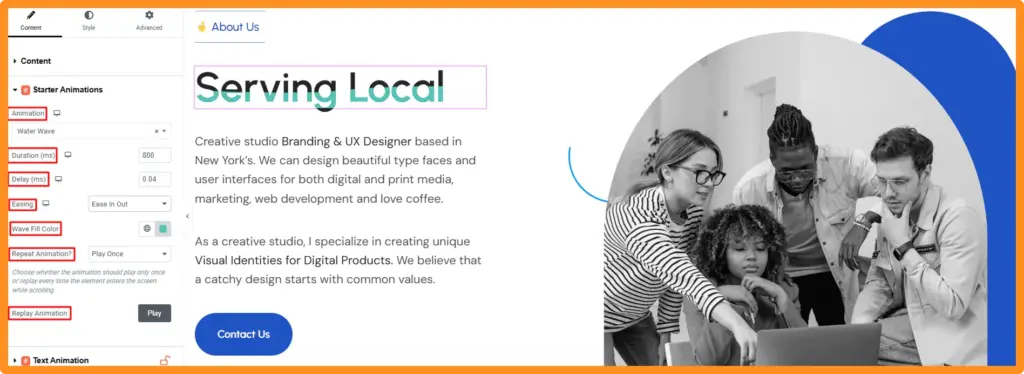
Duration (ms): Controls how long the wave animation takes to complete one movement cycle. In this example, the duration is set to 800 ms. However, you can set any value based on your preference.
Delay (ms): Controls how long the animation waits before starting. Here, the delay is set to 0.04 ms. However, you can set any value based on your preference.
Easing: Adjusts how fast or slow the animation runs.
Wave Fill Color: Controls the color of the wave that fills the text. In this example, Turquoise color is selected. However, you can choose any color based on your style needs.
Repeat Animation: Controls whether the wave animation plays again when the element re-enters the viewport. In this example, Play Once is selected. However, you can choose either option based on your preference.
Final Output Of Water Wave:
Background Clip Text
Background Clip Text Animation fills the text with a background image or pattern that is clipped inside the letters.
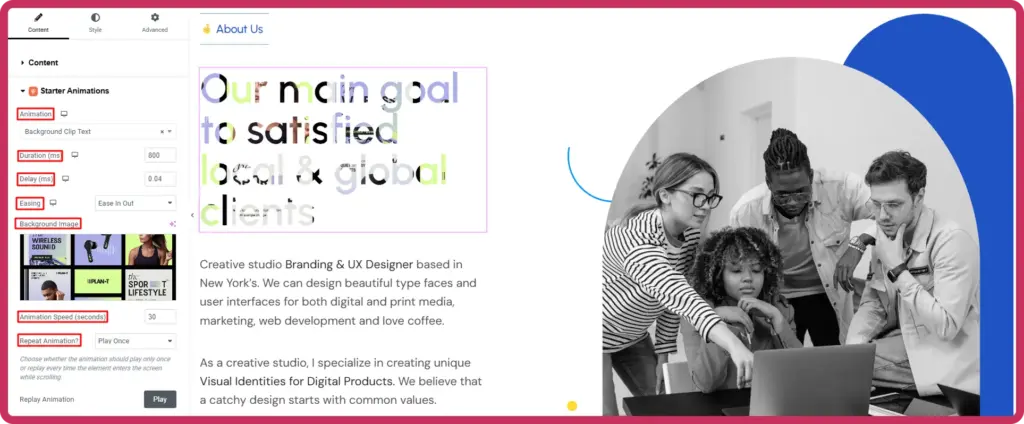
Duration (ms): Controls how long the entrance animation takes when the text first appears. In this example, the duration is set to 800 ms, however, you can set any value according to your choice.
Delay (ms): Controls how long the animation waits before starting.
Easing: Controls animation speed behavior.
Background Image: Sets the image used to fill the text.
Animation Speed (seconds): Controls how fast the background image moves inside the text. In this example, the animation speed is set to 30. However, you can set any value based on your design needs.
Final Output of Background Clip Text:
Image Effects of Starter Animation
Reveal
Reveal Animation makes an image gradually appear from a specific direction when it enters the viewport.
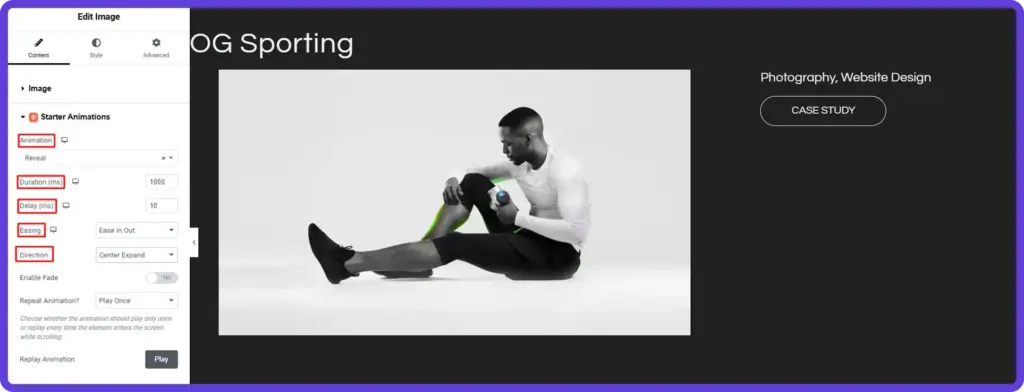
Duration (ms): Controls how long the reveal animation takes to complete. In this example, the duration is set to 1000 ms. However, you can set any value according to your design needs.
Delay (ms): Controls how long the animation waits before starting. In this example, the delay is set to 10 ms. However, you can set the delay to any value according to your preference.
Easing: Controls how the animation accelerates and slows during the reveal motion.
Direction: Control the direction from which the image appears.
Common directions include:
- Bottom → Top: Image slides upward.
- Top → Bottom: Image slides downward.
- Left → Right: Image slides from the left side.
- Right → Left: Image slides from the right side.
- Center Expand: Image reveals outward from the center in all directions.
In this example, Center Expand is selected. However, you can choose any option according to your preference.
Enable Fade: Controls whether the image also fades in while revealing. In this example, the option is disabled, but you can choose either option.
Repeat Animation: Controls whether the reveal animation plays again when the image re-enters the viewport. In this example, Play Once is selected. However, you can choose Every Time based on your design needs.
Final Output of Reveal:
Skew Reveal
Skew Reveal Animation reveals an image with a tilted motion combined with movement.
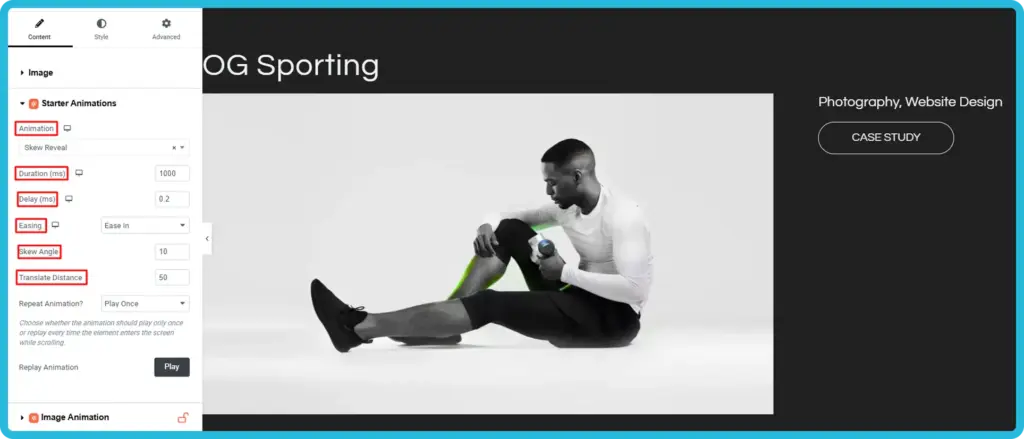
Duration (ms): Controls how long the skew reveal animation takes to complete. In this example, the duration is set to 1000 ms. However, you can adjust it to any value.
Delay(ms): Sets the delay before the animation begins. Here, it is set to 0.2 ms, but you can modify it as needed.
Easing: Adjusts how the animation speed varies throughout the scaling effect.
Skew Angle: Control how much the image is tilted at the start of the animation. In this example, the angle is set to 10 degrees, but you can adjust it to any value.
Translate Distance: Controls how far the image begins from its final position before moving into place. In this example, the translate distance is set to 50 px. However, you can adjust it to any value as needed.
Repeat Animation: Controls whether the animation replays when the image re-enters the viewport. Two options are available: Play Once and Every Time. In this example, Play Once is selected, but you can choose either option.
Final Output Of Skew Reveal:
Container Effects of Starter Animation
Animation
Under Animation, three options are available: None, Slide, and Flip. Choose the option that best fits your design. Selecting None will disable the animation.
Slide
The Slide Animation moves the entire container (section, column, or block) from a specific direction into its normal position.
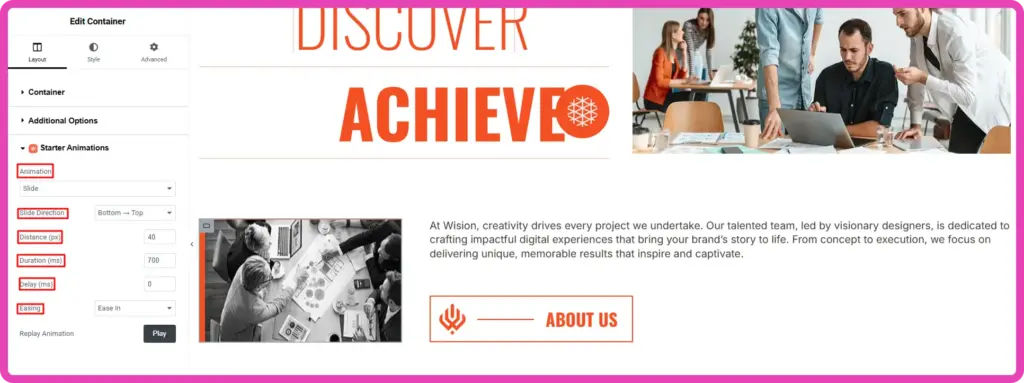
Slide Direction
Controls the direction from which the container enters the screen. Common directions you will find include:
- Bottom → Top: container slides upward
- Top → Bottom: container slides downward
- Left → Right: container slides from the left side
- Right → Left: container slides from the right side
In this example, Bottom → Top is selected. However, you can choose any option according to your design needs.
Distance (px): Controls how far the container starts from its original position before sliding in. In this example, 60 px is selected. However, you can choose any distance value in pixels according to your preference.
Duration (ms): Controls how long the slide animation takes to complete. In this example, 600 ms is selected. However, you can choose any duration according to your preference.
Delay: Controls how long the animation waits before starting. In this example, the duration value is 0. You may change it to any value as needed.
Easing: Controls how the slide animation accelerates and slows during movement.
Common easing types:
- Ease → Controls how the animation speed changes from start to finish.
- Ease in → starts slowly
- Ease Out → slows near the end
- Ease in Out → smooth start and end
- Linear → constant speed
In this example, Ease In is selected, but you can choose any option based on your needs.
Final Output Slides Animation:
Flip
The Flip Animation rotates the entire container in 3D space before it settles into its normal position.

Flip Direction: Controls the axis on which the container rotates during the flip animation. Available options include Flip X and Flip Y.
- Flip X → Rotates the container horizontally from left to right.
- Flip Y → Rotates the container vertically from top to bottom.
In this example, Flip X is selected. However, you can choose either option according to your preference.
Flip Angle: Controls the rotation angle of the container during the flip animation. In this example, the flip angle is set to 180 degrees. However, you can set the angle to any value according to your preference.
Perspective: Controls the depth of the 3D effect during the flip. In this example, 800 px is used. You can set any value according to your needs.
Final Output of Flip Animation:
Tips to Make Your Animation Website Look Professional
Adding animations to your website is only half the job. The other half is making sure those animations feel intentional, smooth, and purposeful, not distracting or overdone.
Many websites with great design fall flat because their motion effects feel out of place or slow the experience down. The good news is that a few simple principles can make a dramatic difference.
Whether you’re building a portfolio, a landing page, or a full business website, these tips will help your animations look polished, refined, and genuinely professional.
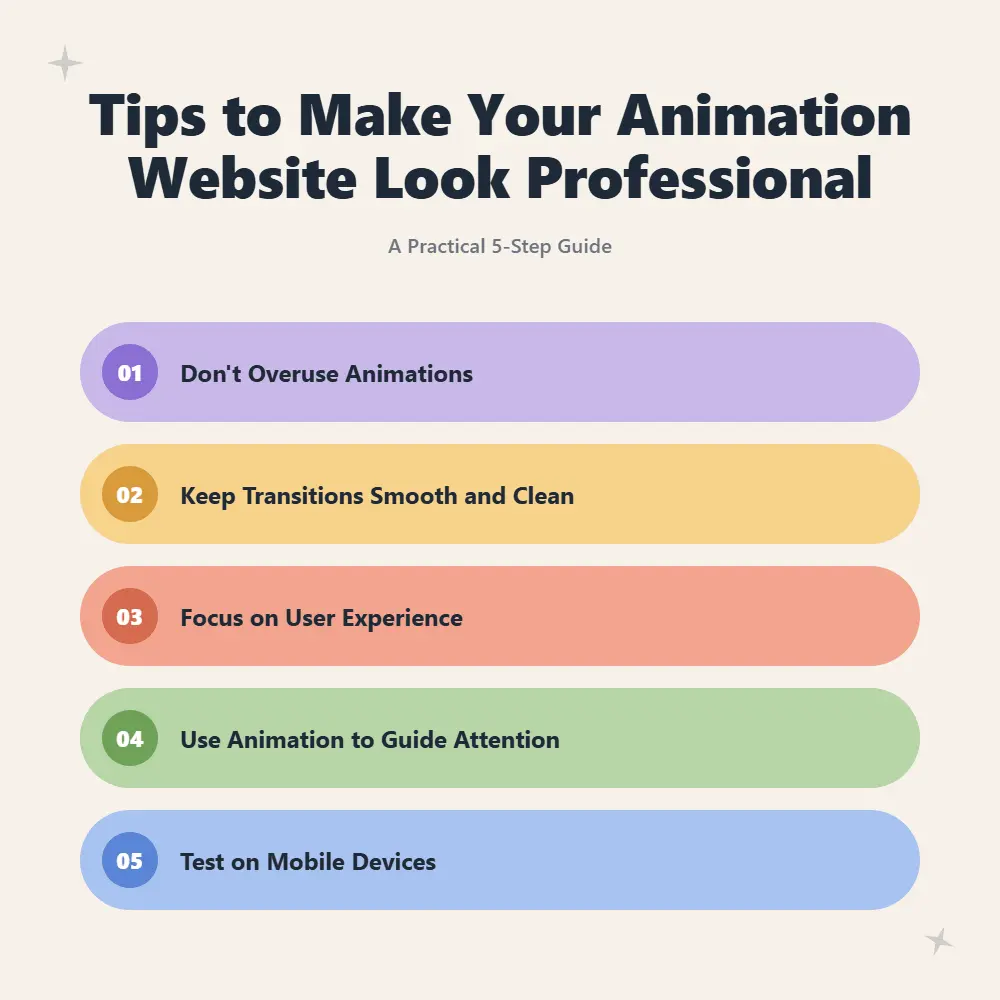
1. Don’t Overuse Animations
The most common mistake beginners make is adding animation to everything on the page. When everything moves, nothing stands out, and visitors can feel overwhelmed or distracted.
Professional websites use animation with care. A smooth hero text reveal, a soft image fade in on scroll, or a simple button hover effect is often enough to make a strong impression.
A practical rule of thumb: animate your most important elements first. Headlines, CTAs, featured images, and section intros are the right candidates. Leave secondary content like body text, sidebars, or footers relatively still. This contrast is what makes the animated elements feel special.
With Animation Addons, you can apply animations selectively, widget by widget or extension inside Elementor — so you stay in full control of what moves and what stays still.
2. Keep Transitions Smooth and Clean
Choppy and rough transitions make a website look unprofessional. If elements jump or snap into place, it breaks the flow and feels bad. Smooth transitions depend on easing and duration. Easing controls how the animation starts and stops.
Instead of straight movement, use smooth easing to make it feel natural. Duration also matters. Most animations should be between 300 milliseconds and 800 milliseconds. Too fast feels glitchy, and too slow feels heavy.
With GSAP-powered animations in Animation Addons, you can easily control easing and timing inside Elementor without any coding. The Animation Extension lets you fine-tune duration, delay, and easing for every element, so your transitions always feel intentional and refined.
💡
Pro Tip:
Stick to the 300ms to 500ms range for hover and entrance effects. Use 600ms to 800ms for larger and slower reveals like hero sections or full-screen transitions. Anything above 1 second starts to feel slow for most users.
3. Focus on User Experience
Animations should serve the user, not the designer. If an animation slows the page, hides content, or makes users wait, it works against you. Ask yourself one question for every animation you add: Does this help the user understand or enjoy the page more? If the answer is no, remove it.
Performance matters just as much as aesthetics. Heavy or poorly optimized animations can increase load time, hurt Core Web Vitals, and push visitors away before they even see your content.
Keep these practical habits in mind:
- Avoid animating above-the-fold content with long delays. Visitors should see your hero section immediately.
- Use scroll-triggered animations instead of auto-play timelines so effects only run when the user reaches them.
- Enable Scroll Smoother if your site uses scroll-based effects — it gives your site a cleaner, more polished feel without adding extra load.
Animation Addons ‘Scroll Smoother setting integrates directly into your workflow, making scroll behavior feel natural across all devices.
4. Use Animation to Guide Attention
The most effective animations do not just look good. They guide the visitor’s attention to what matters most. This is called visual hierarchy through motion, and it is often overlooked in web design.
Visitors usually scan a page instead of reading everything. Animation helps direct their focus in the right order. For example, show the headline first, then the subheading, and finally the call to action button. This sequence creates a clear flow and naturally leads visitors to take action.
Here’s how to apply this effectively:
- Stagger your entrance animations. Instead of all elements appearing at once, let them appear one after another with a small delay between each. This creates rhythm and flow.
- Use motion to highlight CTAs. A subtle pulse or hover effect on a button makes it stand out without being aggressive.
- Animate toward the next section. A scrolling arrow or a fade-up effect near the bottom of a section encourages users to keep scrolling.
Animation Addons ‘Text Animation and Starter Animation features make it easy to create staggered reveals and guided sequences directly inside Elementor — no timeline coding needed.
5. Test on Mobile Devices
A website can look stunning on a desktop and completely broken on mobile. This is especially true with animations, where elements that float or slide beautifully on a large screen can overlap, clip, or stutter on a phone.
Always test your animated pages on actual mobile devices, not just browser preview modes. Pay attention to performance, layout shifts, and any elements that feel oversized or too fast on a small screen.
A few practical checks to run on every mobile test:
- Reduce or disable heavy animations on mobile to protect performance. Many professional sites serve lighter motion on mobile intentionally.
- Check touch interactions — hover-based effects don’t translate to touchscreens, so make sure nothing critical depends on a hover state.
- Use breakpoint previews inside your animation settings to adjust timing, scale, or triggers per device.
Animation Addons include built-in breakpoint control inside the Animation Extension. You can preview and adjust how animations behave on mobile portrait and tablet portrait separately. This helps your site look great on all devices.
Final Thoughts
Creating an animation website is no longer complicated or expensive. Tasks that once required coding skills, heavy tools, and long development time can now be done in minutes with the right approach.
With Elementor and Animation Addons, building smooth, professional, and engaging websites is completely free and requires no coding. The real impact comes from using animation with intention. Proper use of motion transforms a static page into an experience that feels modern, interactive, and highly converting.
Start simple, focus on user experience, and improve step by step. This approach helps create a website that not only looks good but also performs effectively.
FAQs
Is it possible to create an animation website for free
Yes. Elementor free version and Animation Addons allow you to build a fully animated website without any cost. The available features are strong enough to create premium-looking designs.
Is coding knowledge required to use Animation Addons
No. Everything works inside Elementor through a visual interface. Animations, timing, and effects can be controlled without writing code.
Can animations affect website performance
Properly optimized animations do not slow down a website. Keeping effects lightweight and avoiding overuse ensures smooth performance.
Do animations work well on mobile devices
Yes. Animation Addons provides control for different screen sizes, allowing adjustments for mobile and tablet to maintain a smooth experience.
Leave a Reply