Have you ever scrolled on a website and seen things move or appear just as you reach them? A headline slides in, an image fades up, or a section shifts slightly to the side. These are scroll animations in WordPress, and they make a website feel more interesting and easier to follow.
In WordPress, adding scroll animations is easy even without coding. With the right scroll animation plugin for WordPress, you can guide visitors, highlight important features, or make your pages look modern and professional.
In this guide, we will show you different types of WordPress scroll animations and how to add them using WordPress plugins, Elementor, or even custom code. By the end, you’ll be able to create smooth scroll-triggered animations in WordPress, keeping visitors scrolling and exploring more.
What is Scroll Animation in WordPress?
Scroll animation in WordPress makes things on your website move when someone scrolls. Words, pictures, or sections can fade in, slide, zoom, or spin. This makes the page feel dynamic and more engaging to explore.
The animation happens only when the visitor reaches that part of the page. For example, a headline can fade in when it appears on the screen. A picture can slide up from the bottom. A background can move more slowly than the rest of the page to create a 3D effect.
These WordPress animations on scroll catch attention and make visitors keep scrolling. They’re also useful for showing important parts of your site like services, product features, or buttons you want people to click.
Let’s explore the different types of scroll animation effects you can add.
Types of Scroll Animation
Scroll animations are visual effects that trigger as users move down or up a page. They enhance engagement, add depth to your content, and make websites feel dynamic.
In WordPress, these animations can be applied to text, images, sections, buttons, or any other element. The main types include:
Scroll Trigger Animation
ScrollTrigger animation activates when elements come into view while scrolling. Items can fade, slide, bounce, or zoom for a smooth reveal. It’s one of the simplest ways to grab attention. Great for highlighting sections without overwhelming the design.
Horizontal Scroll Animation
Instead of moving content up and down, sections glide sideways across the screen. It’s widely used in creative portfolios, galleries, and timelines. Horizontal scrolling breaks the traditional layout. It instantly makes your website animated, feel modern and interactive.
Sticky Elements Animation
Add sticky elements animation for an easy flow instead of a jumpy motion. Works well on long-form blogs, portfolios, and one-page websites. It creates a premium, polished feel across devices. Visitors stay longer when navigation feels effortless.
Scroll Motion Cards
Cards or blocks change with different effects like flip, tilt, or scale as you scroll. This adds life to static sections such as services, pricing, or features. It helps keep readers engaged with your content. Perfect for showcasing multiple items with style.
Now you know the types of scroll animation in WordPress that you can use on your website. Next, let’s look at the different ways to add scroll animation to your WordPress site.
Various Ways to Add Scroll Animation in WordPress
There are multiple ways to bring scroll animation into your WordPress website. Whether you’re a beginner or an advanced user, you can choose the method that fits your skills:
- WordPress Plugins
- Custom CSS
WordPress Plugins
The simplest way to add scroll animation is by using a plugin. Some popular options include: Animation Addons and Elementor Pro. First, let’s start with Animation Addons.
Animation Addons
Animation Addons is a WordPress plugin that adds smooth animations to Elementor websites. It includes over 100 widgets, 25+ extra tools, and a huge library of ready-made content, like 200+ full website starter templates, 2,000+ pages, and 10,000+ sections.
Plus, it also has a custom Animation builder. By using it, you can also make your own animations. The best part is that it allows you to create various scroll animations in WordPress. In Animation Addons, you can create many types of scroll animations, but in this example, we’ll focus on four main types.
First, let’s see how you can create a ScrollTrigger animation using the custom animation builder.
1. Scroll Trigger Animation
Step 1: Go to your pages and click ‘Build Animation’ (make sure Animation Addons is installed).

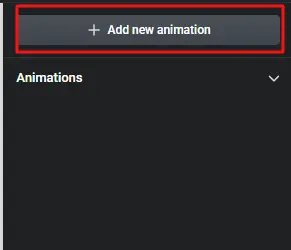
Step 2: After that, click on ‘Add New Animation’ button.
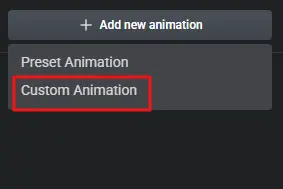
You’ll see two options: Preset Animation and Custom Animation. Choose Preset Animation for quick results without changing settings. Choose Custom Animation for full control to create your own style.
In this example, we’ll use Custom Animation.
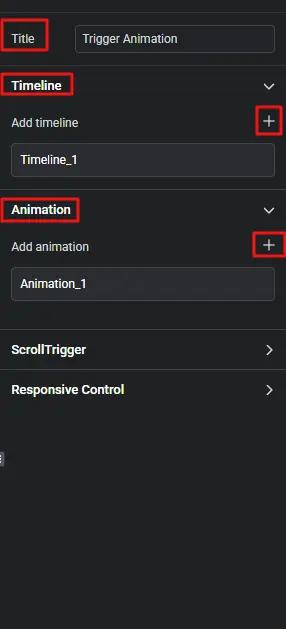
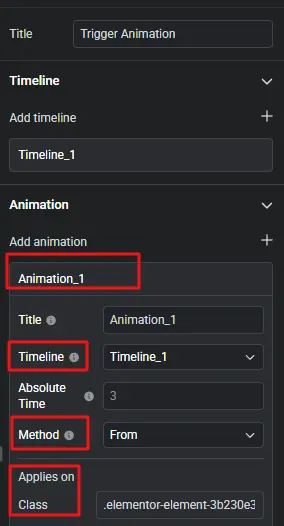
Step 3: Next, enter a title of your choice. For example, here it is set to Trigger Animation. Then, click the ‘+’ icon to add a timeline and animation in the same way.
Step 4: Select an element, such as an image or text, where you want to apply the animation.
For example, we selected ‘Text’ here. Then, click on ‘Animation_1’ to open the animation settings. Add the timeline you created.
Since we made ‘timeline_1’, we’ll add it to the property box. Next, you’ll see method options: To, From, and Set. Choose the one that fits your style.
For example, we selected ‘From’ here.
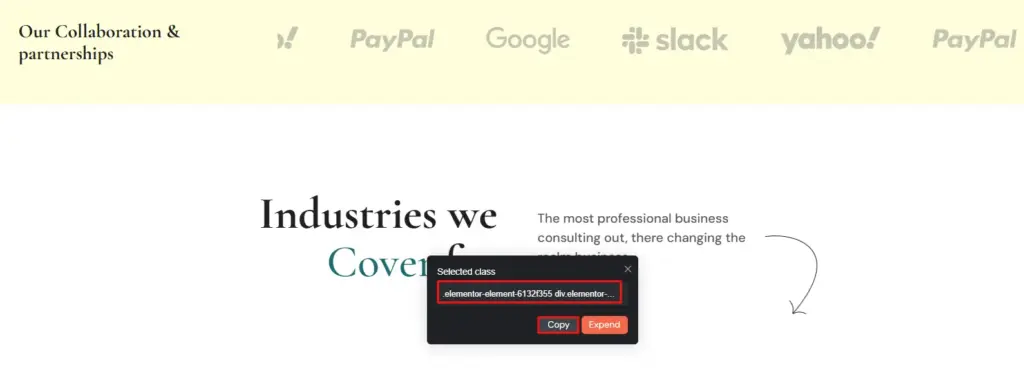
Select the element you want to animate by clicking it with the left mouse button. A box will appear showing its class name. Copy that name and place it in the Class box.
Step 5: Now, go to Add Properties and click on the ‘Add New’ button. Then, add effects like Y and Opacity. Set their values to Y: -50, Opacity: 0.
Step 6: Next, click on ScrollTrigger and turn it on. After that, set Timeline 1 the same way. Choose the section where you want the ScrollTrigger animation to run. Then set the Start point to Top Center.
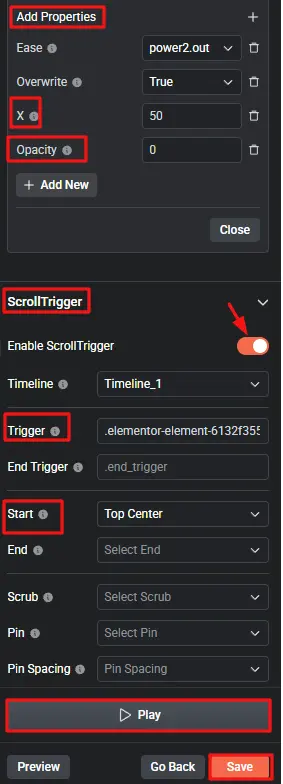
Finally, hit the “Save” button, then click “Play” to preview the ScrollTrigger animation.
2. Horizontal Scroll Animation
Step 1: Add Container & Image
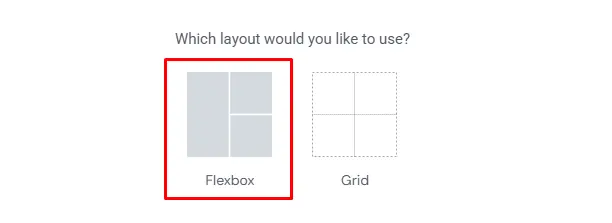
To create a horizontal animation on your website, you first need to select a container. To do that, click the “+” icon. (Make sure Animation Addons is installed.)
After clicking the ‘+’ icon, two layout options, Flexbox and Grid, will appear. Flexbox is selected in this example, but any layout that suits your needs can be chosen.
Afterward, click on the upper “+” icon on your left screen, then click on ‘Image’ and drag it to the container that you have selected.
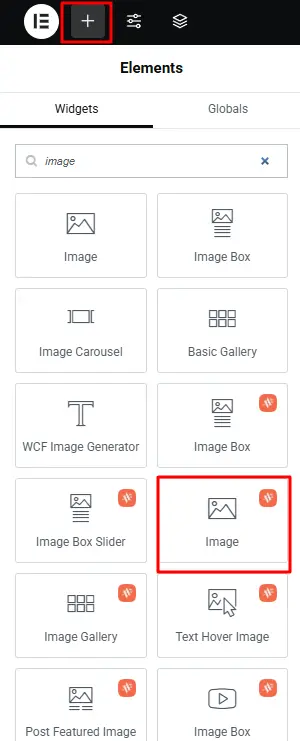
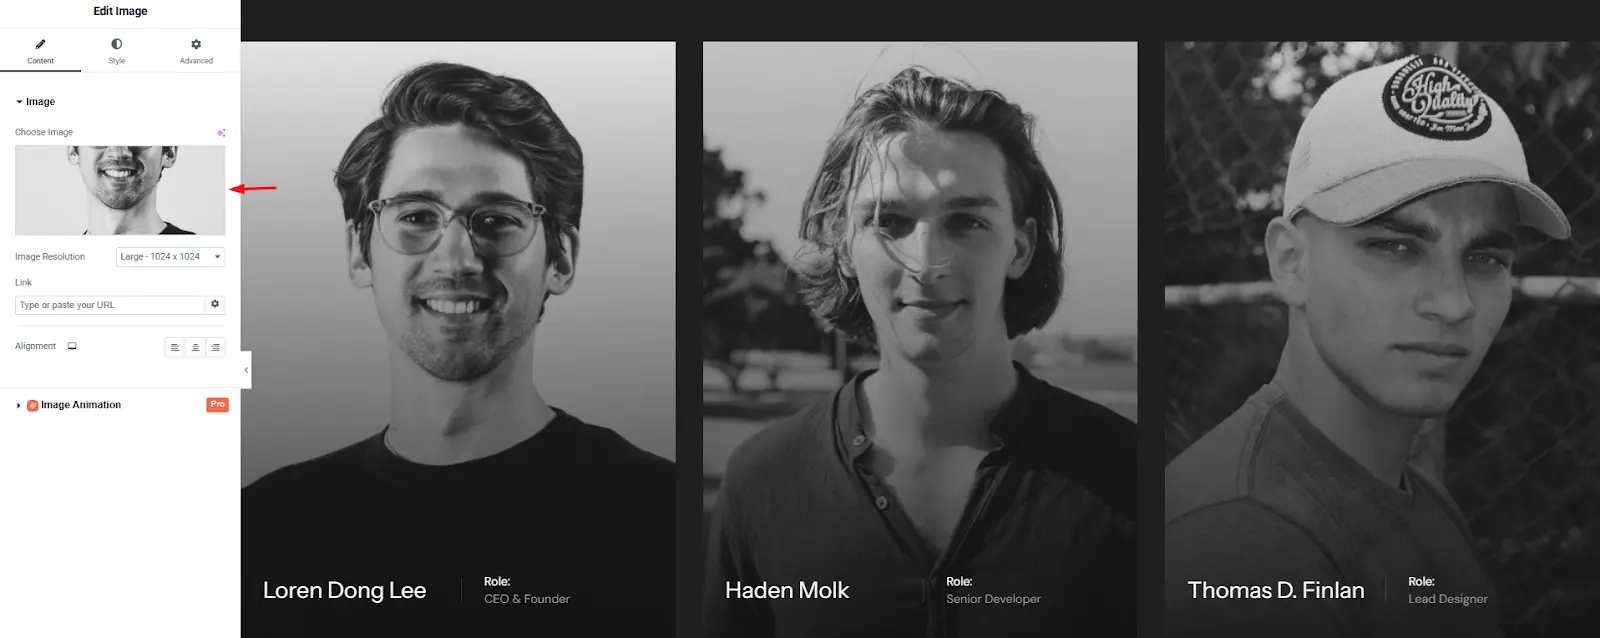
Next, add an image to each container based on your preference. For example, I selected an image that suited my choice.
Step 2: Enable Horizontal Scroll
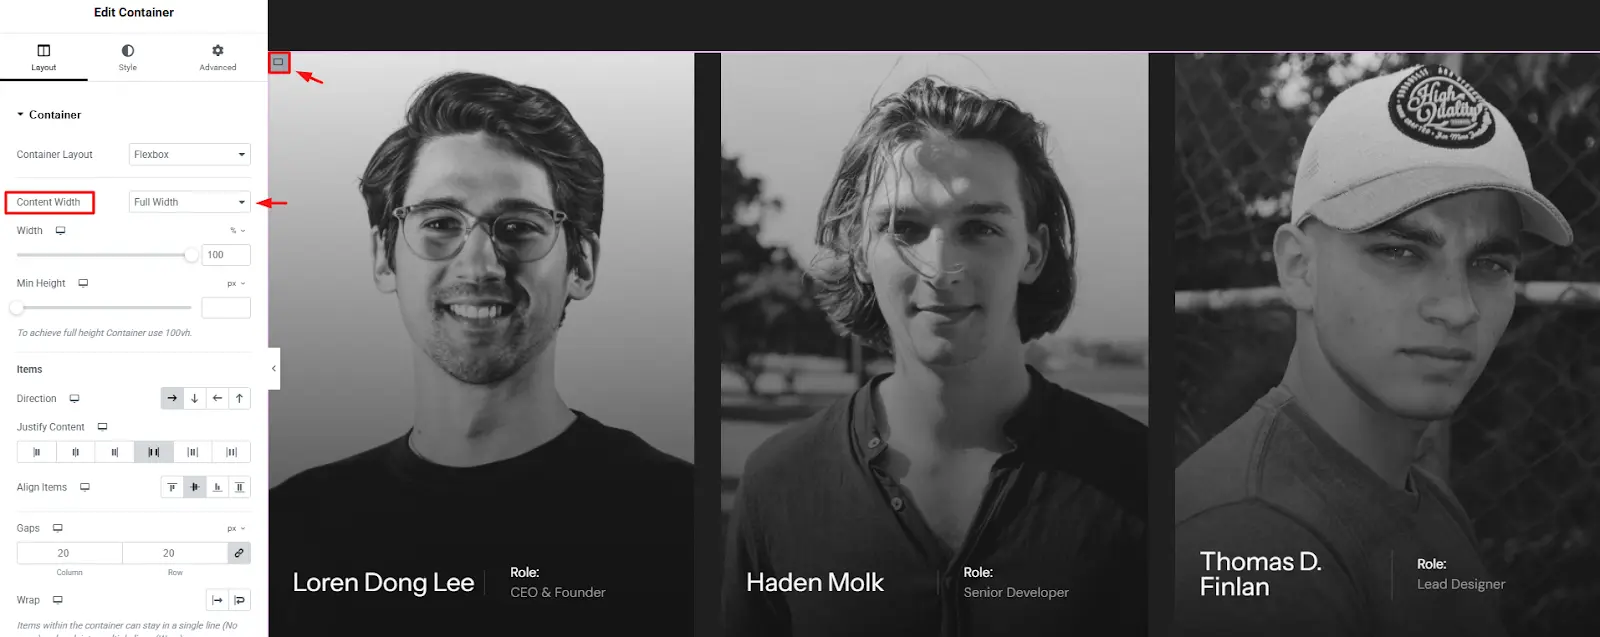
First and foremost, click on the main container, as shown in the image below.
Content Width
Then, make sure the content width is set to “Full Width” so the container works properly. Otherwise, the horizontal animation won’t work while scrolling on your website.
Width
Next, I set the width to 100, but you can change it to any value that works for you. There are no strict rules. You can use whatever value fits your layout.
Direction
After that, choose the direction you want the horizontal animation to move. I selected “Row-horizontal,” which moves the container to the left.
However, you can choose any direction you prefer. On top of that, i left the remaining settings at their default values.
Note: (I only changed the settings marked in red circle on the image. However, you’re free to adjust the other settings and explore them in your own way.)

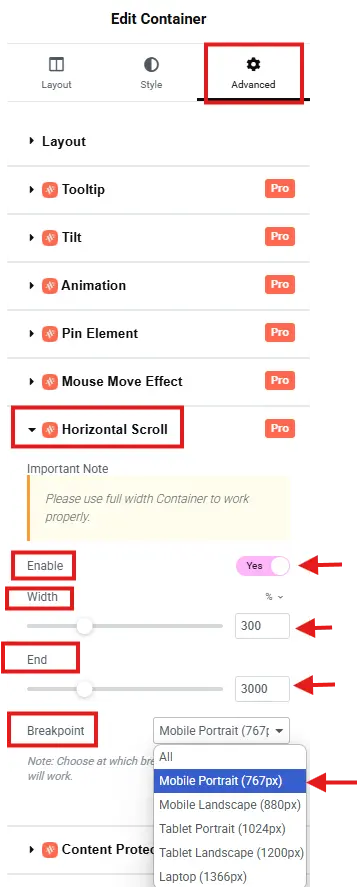
Click on the ‘Advanced’ Tab to find the Horizontal Scroll option.
Enable: Once you find it, click on it and enable it by toggling it to ‘Yes.’ Otherwise, the rest of the settings options won’t appear.
Width: Adjust the width based on the number of containers. For example, use 300 for three containers or 600 for six. You get the idea. Since I selected three containers, I set the width to 300.
End: The End setting controls when the horizontal scroll animation stops. For example, if you set it to 2000, the animation will finish after the user scrolls 2000 pixels down the page.
If you set it to 800, the animation will complete after 800 pixels of scrolling. You get the idea.
In my case, I set it to 3000, so the animation starts when the top of the container reaches the screen, and ends after the user scrolls 3000 pixels down the page.
However, you can change this number to match how far you want the scroll to go.
Breakpoint: The Breakpoint settings offer various options such as Mobile Portrait, Mobile Landscape, Tablet Portrait, Tablet Landscape, and Laptop. These settings help control the minimum screen width where the horizontal scroll effect is applied.
In my case, I chose Mobile Portrait, but you can select any option based on your preference.
Step 3: Customize Container Design
Now, click on “Edit Container,” go to the “Layout” tab, and make sure the Content Width setting for each container is set to Full Width. After that, leave the rest of the settings as they are. No need to change anything.
However, you can customize them if you prefer.
Note: (You must set each container to Full Width)
Finally, click on ‘Publish’ and enjoy the horizontal scroll animation on your website.

Final Output
3. Sticky Element Animation
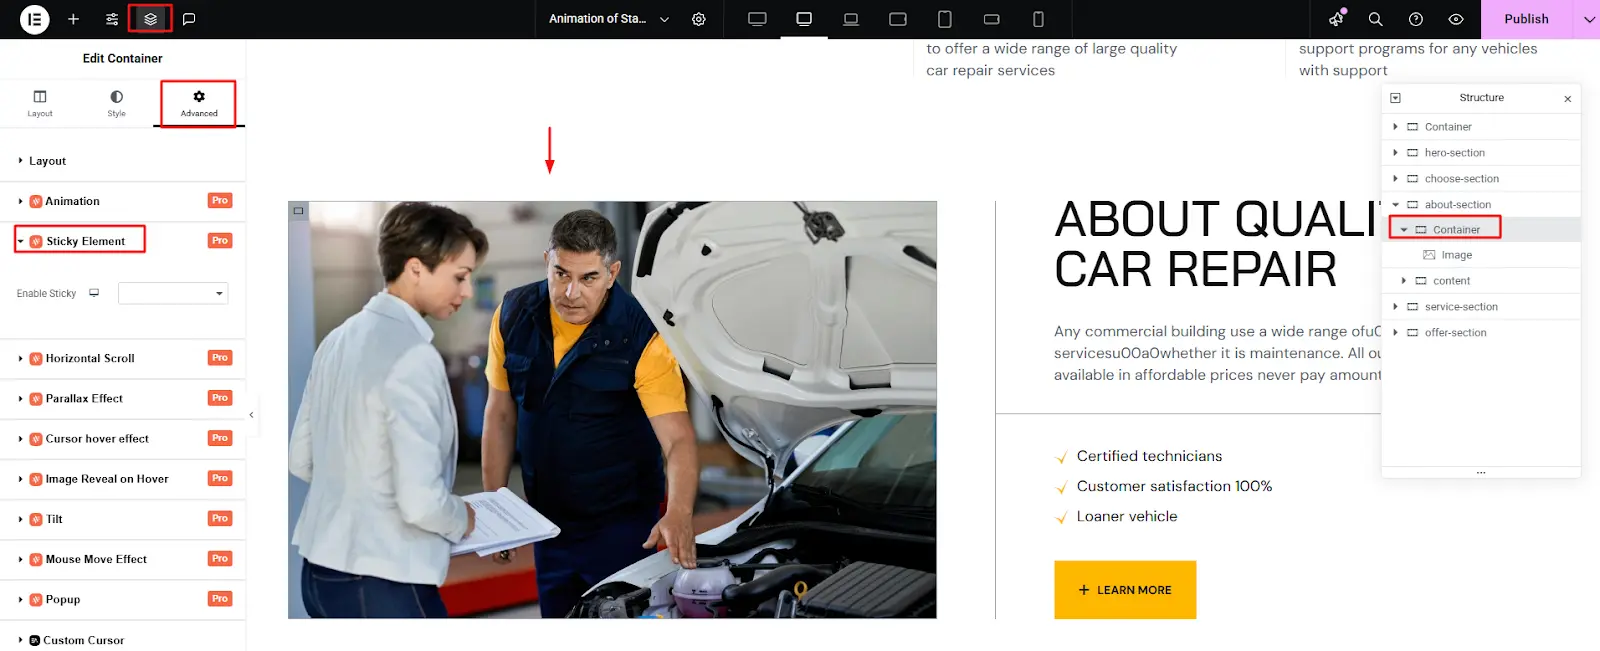
Step 1: Choose Your Target Element & Enable the Wrapper
- Select the element you want to make sticky. Then, go to Structure and click on the container to enable the wrapper.
- Next, click on the ‘Advanced’ tab and look for the Sticky elements option.
- Click on ‘Sticky Elements’ and toggle the ‘Enable’ switch to ‘Yes’.
Note: In the top-left corner of your screen, you’ll see the container option called ‘Structure’. Also, please use a full-width container to work properly and see the results in viewer mode.
Enable Sticky Element
The first option you will see is Enable Sticky.
- Purpose: Turn this setting on if you want to add a Sticky Element to your website container.
- Behavior:
- If set to Yes, all the Sticky Element editor functions (Content and Active Style tabs, along with Pin Wrapper, End Trigger, etc.) will appear. This allows you to configure and control the sticky behavior easily.
- If set to No, no editor elements for the sticky functionality will be shown.
Select Yes to enable and begin configuring the Sticky Element for this container.

Step 2: Set the Pin Wrapper
Customize how your element stays pinned during scroll by adjusting key settings like Pin Type, Scrub, Spacing, and more.
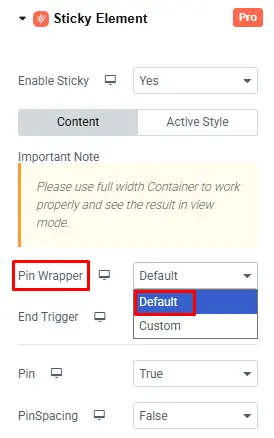
Pin Wrapper
The Pin Wrapper controls how your element stays in place while scrolling. You can choose Default for a quick setup or Custom for full control over wrapper placement.
- Default: Automatically adds a wrapper around the pinned element to maintain layout and handle pinning behavior—no extra setup needed.
- Custom: Lets you select your own wrapper, giving you complete control over where and how the element is pinned during scroll.
For example, ‘Default’ is selected here, but you can choose any option that suits your needs.
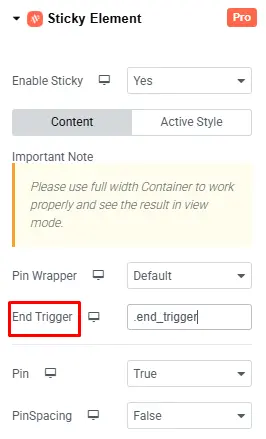
End Trigger
The End Trigger sets the point where the pinned element stops staying fixed and starts scrolling like normal. You can change it to any value, such as a custom class, but by default, it is set to ‘end_trigger,’ and it’s usually best to leave it that way.
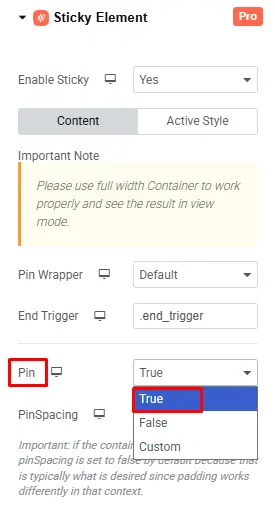
Pin
The Pin setting offers three options: True, False, and Custom.
- True: Keeps the element fixed in the viewport while the page scrolls.
- False: Allows the element to scroll normally with the page.
- Custom: Defines specific scroll behavior, such as custom start/end positions, durations, or advanced triggers.
For example, ‘True’ is selected here, but you can choose the option that fits your preference.
Pin Spacing
The Pin Spacing setting offers three options: True, False, and Custom.
- True: Adds spacing below the pinned element equal to its height.
- False: No space will be added for the pinned element.
- Custom: Manually define how much space should be added where the element originally was.
For example, here selected False, but you can choose whichever option you prefer.

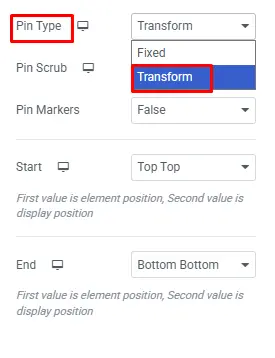
Pin Type
The Pin Type has two options: Fixed and Transform.
- Fixed: The element stays visible and fixed in place while scrolling.
- Transform: The element appears pinned but moves smoothly using transform values as you scroll.
Here, ‘Transform’ is selected, but you can choose whichever option suits your preference.
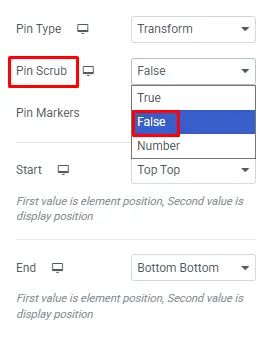
Pin Scrub
The Pin Scrub setting offers three options: True, False, and a Number.
- True: Links the animation timeline directly to the scroll progress for precise synchronization.
- False: Plays the animation independently of the scroll, without syncing to the scroll position.
- Number: Syncs animation to scroll with a smoothing delay equal to the number of seconds you specify.
For example, False is chosen here, but you can pick what works best for you.
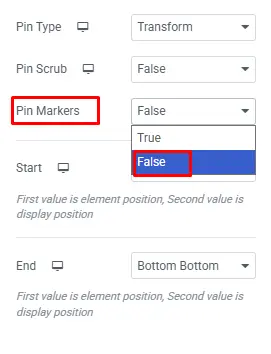
Pin Markers
Pin Markers has two options: True and False.
- True: Displays colored markers on the page to indicate the start and end of pinned elements visually.
- False: Hides the markers from view.
For example, False is chosen, but feel free to explore and select what works best for you.
Step 3: Set the Pin Trigger Points
Choose where the pinning starts and ends by aligning your element with the viewport, such as when its top hits the viewport’s top. You can also set a custom position.
Use Breakpoint to decide which devices the pinning works on, ensuring your animation fits all screen sizes.
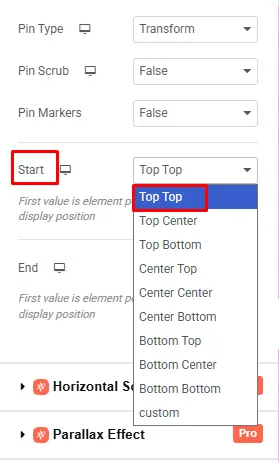
Start
The Start setting offers options like:
Top Top, Top Center, Top Bottom, Center Top, Center Center, Center Bottom, Bottom Top, Bottom Center, Bottom Bottom, and Custom.
Each option matches a part of the element (Top, Center, Bottom) with a part of the screen (Top, Center, Bottom) or uses a custom position.
For example, ‘Top Top’ is selected, so pinning starts when the top of the element reaches the top of the viewport.
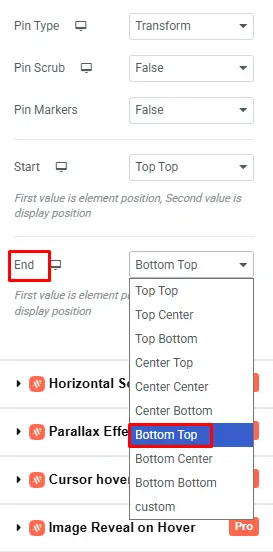
End
The End setting offers similar options to Start.
For example, ‘Bottom Top’ is selected, which means the pin stops when the element’s bottom reaches the top of the viewport.
Lastly, click the ‘Publish’ button and then Preview to see the smooth scroll animation in action.
4. Scroll Motion cards Animation
Requirement
- Elementor (Page Builder)
- Animations Addons (Our Plugin)
Tip: Make sure Animation Addons is installed and activated on your WordPress site before you start.
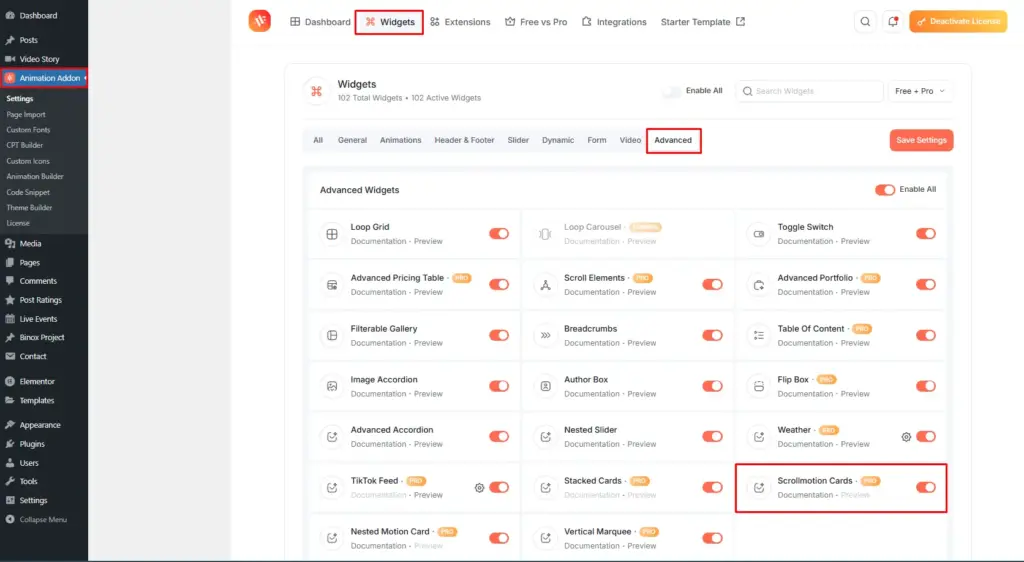
How To Activate Scrollmotion Cards
- Go to your WordPress Dashboard.
- Click on Animation Addons.
- Head to the Widgets Tab.
- Under Advanced, toggle on Scrollmotion Cards.
- Scrollmotion Cards are now enabled. You’ll find the option available in the page builder.
Step 1: Configure Card Panels
Start by clicking the ‘+’ icon, searching for ScrollMotion Cards, and picking it.
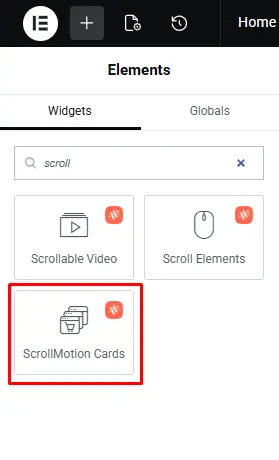
Afterward, you will find three panels to design your elements: Section Title, Card Content, and General Setting.
Step 2: Personalize Card Groups
Decide how many groups you want and name each one with a Group Title. Then add images, text, or saved templates to fully personalize your ScrollMotion Card.
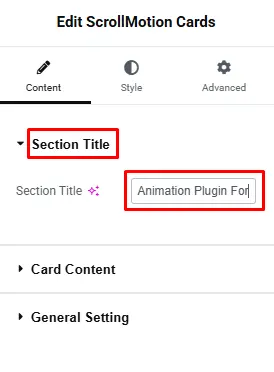
Section Title
In the section title, you can set any title you want for your content. For example, here it is set to “Animation plugin for.”
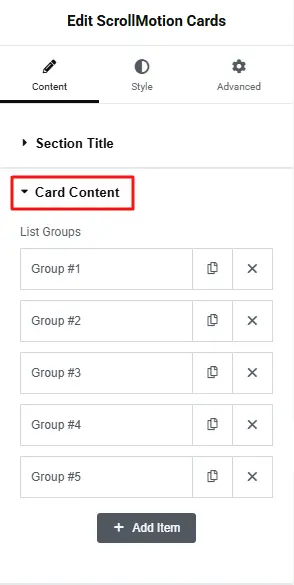
Card Content
Once you click on the card content, you will see many group options to create. First, determine how many content you want to show on your scroll motion cards. Then, based on that, keep the group list based on your choice.
Content Type: Content lets you directly add text animation, image animation, or any Elementor content inside the card. Afterward, Save Templates lets you reuse any template you’ve already saved in Elementor. For example, Content is selected here, but you can choose any option you prefer.
Group Title: For example, the group name is set to Freelancer & Individuals here. However, you can choose any group name you like.
Choose Image: Next, upload any image as per your choice.
Items: In Items, you can set any subtitle you want to display on your content. For example, here it says “Instant animated site creation, and pick from 2000+ prebuilt pages.
In the same way, you can personalize all the list groups as you like.

Step 3: Manage Display Options
Easily show or hide the Section Title and Card Title with a toggle. Keep them on for clarity or turn them off for a cleaner look.
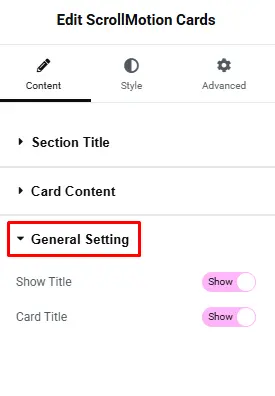
General Setting
Show Title: If you want to show your title, toggle the button to Show. If not, leave it disabled. For example, here is set to ‘Show’.
Card Title: If you want to show your card title, toggle the button to Show. Otherwise, leave it disabled. The choice is yours. For example, here is set to ‘Show’.
Final Result
Elementor Pro
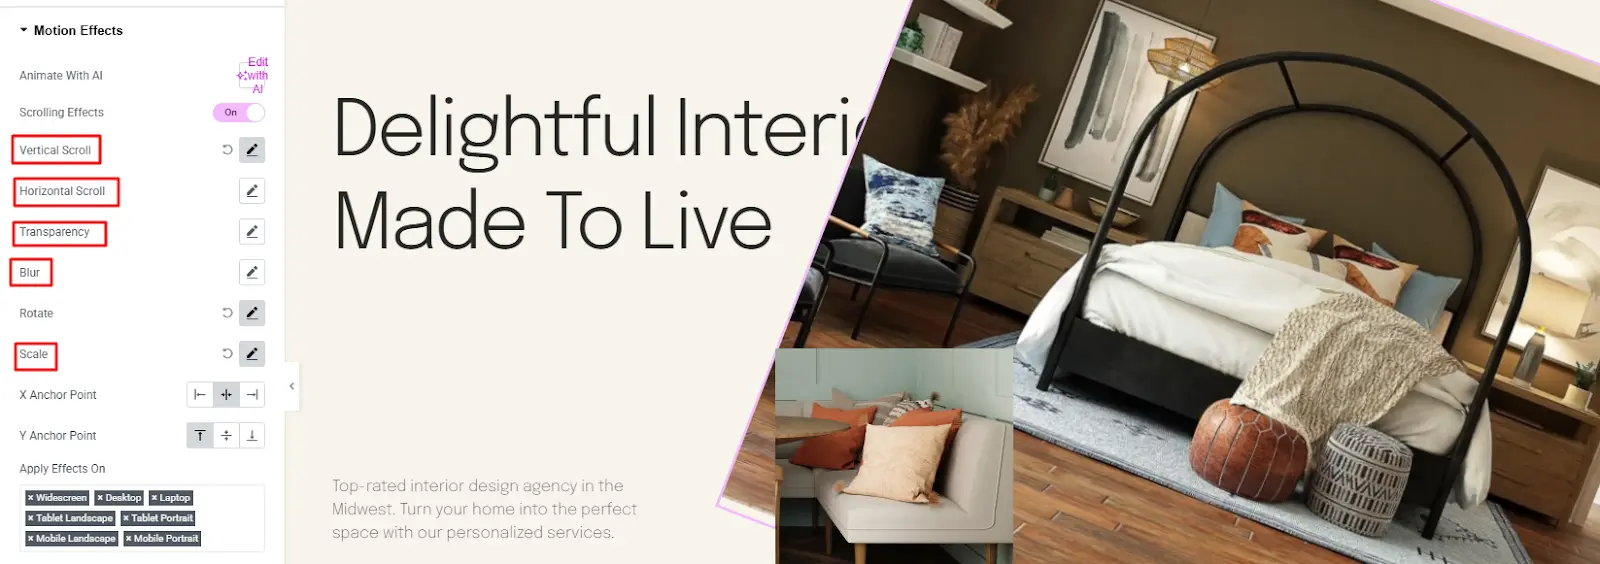
Step 1: To begin, select the element where you want to add a scroll animation. Then, go to the ‘Advanced’ tab.
Next, search for Motion Effect and click on it.
Step 2: Now enable the scrolling effect option. Then, click on ‘Rotate’ here you will find two options: To Right, and To Left.
The To Left option rotates the element counterclockwise (like turning left), while the To Right option rotates it clockwise (like turning right).
For example, To Right is selected here, but you can choose either option depending on your preference.
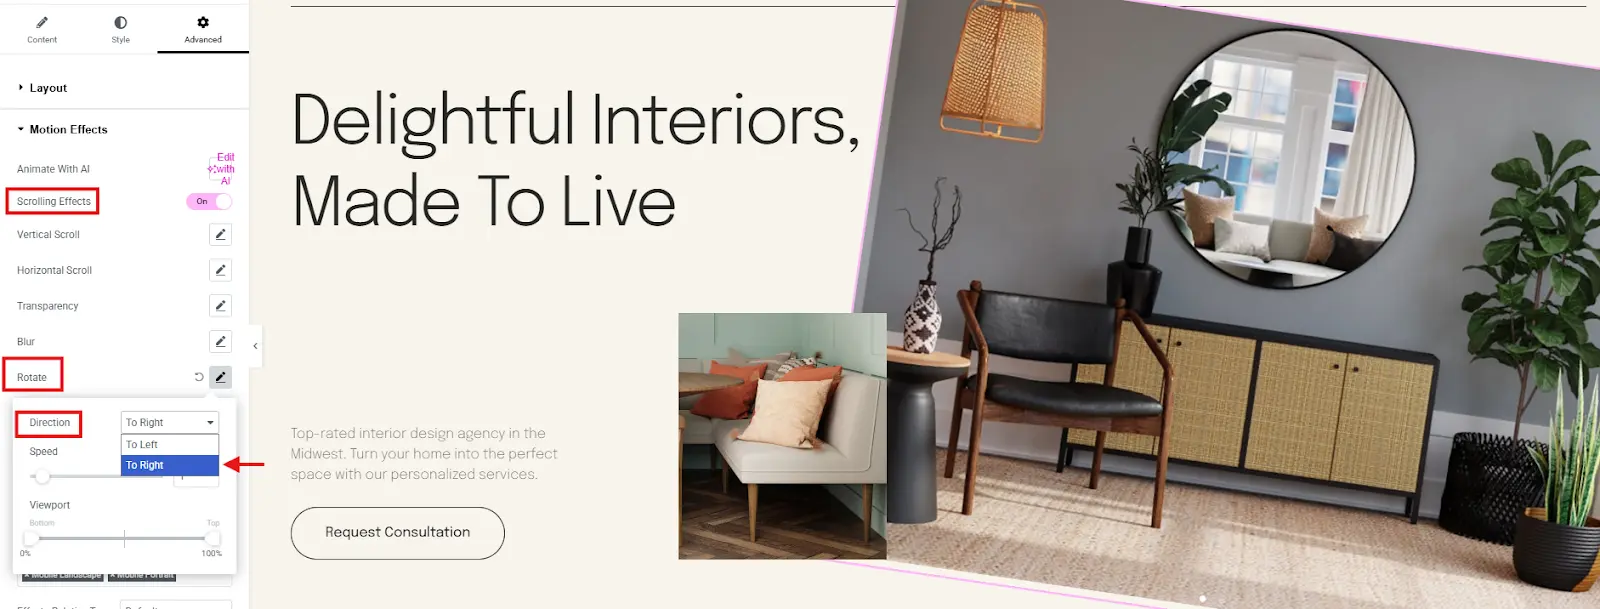
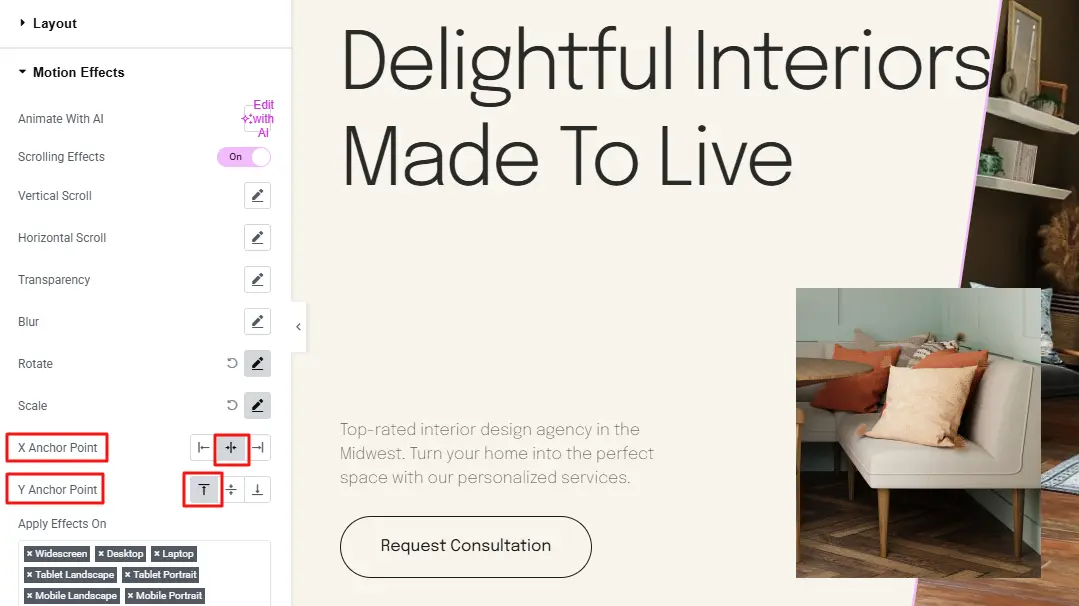
Afterward, set the X Anchor Point and Y Anchor Point based on your choice.
The X Anchor Point sets if the movement starts from the left, middle, or right side of the element, and the Y Anchor Point sets if it starts from the top, middle, or bottom. Together, they decide the exact spot where the element moves or rotates from.
For example, here is selected ‘Center’ from the X Anchor Point and then ‘Top’ from the Y Anchor Point.
Step 3: Customize the rest of the settings for your chosen element on the site. Once finished, click the ‘Publish’ button and then preview to see how your scroll animation looks.
Custom CSS
For developers or those comfortable with code, custom CSS provides full control over animations. By combining CSS with a little JavaScript, you can create unique scroll-triggered effects that are not limited by plugin presets.
1.Using @keyframes for scroll-triggered animations
@keyframes lets you define step-by-step animations for any element, controlling movement, rotation, scaling, opacity, and more.
CSS Example – Fade in while sliding up:
					.element {

  opacity: 0;    /* Start invisible */

  transform: translateY(20px);    /* Start slightly below */

  transition: all 0.3s ease-out;

}

/* Animation triggers when .active class is added */

.element.active {

  animation: fadeSlideUp 1s ease-out forwards;

}

@keyframes fadeSlideUp {

  0% { opacity: 0; transform: translateY(20px); }

  100% { opacity: 1; transform: translateY(0); }

}
JavaScript to trigger on scroll:
					const element = document.querySelector(".element");

window.addEventListener("scroll", () => {

  const top = element.getBoundingClientRect().top;

  if (top < window.innerHeight) {

    element.classList.add("active");  // triggers the animation

  }

});
How it works:
- The element starts invisible and slightly moved.
- When the user scrolls to it, the .active class is added.
- CSS animation runs smoothly.
2. Transform and opacity for simple scroll effects
You can combine transform and opacity to create sliding, zooming, or rotating effects.
CSS Example – Rotate while fading in:
					.rotate-element {

  opacity: 0;

  transform: rotate(0deg);

  transition: all 0.3s ease-out;

}

.rotate-element.active {

  animation: rotateFade 1.2s forwards;

}

@keyframes rotateFade {

  100% {

    transform: rotate(360deg);

    opacity: 1;

  }

}
JavaScript remains the same:
					const rotateElement = document.querySelector(".rotate-element");

window.addEventListener("scroll", () => {

  const top = rotateElement.getBoundingClientRect().top;

  if (top < window.innerHeight) {

    rotateElement.classList.add("active");

  }

});
Key Points
- Pure CSS cannot detect scroll; it always needs JavaScript or a library to trigger animations.
- This method gives full control: you can animate anything exactly how you want.
- Always test on mobile and desktop to ensure smooth performance.
- For multiple elements, loop through them in JavaScript instead of repeating the code.
Best Practices & Common Mistakes to Avoid
Scroll animations can make your website more interesting, but they need to be used carefully. Using too many animations can distract visitors and make your content hard to follow. Some animations or plugins can slow down your site if they add too much extra code.
It is also important to use the same style and speed for animations so your website looks clean and professional. Keep animations simple, smooth, and consistent, and test them on different devices to make sure they work well for everyone.
Overuse
Using too many scroll animations can confuse your visitors and make your website look messy. If every heading, image, or button moves when a user scrolls, people may not know where to focus, and your main message can get lost. It is better to use animations only for important sections like animated heading, featured posts, category showcases or elements to keep your site clear and easy to read.
Heavy Scripts
Some animation plugins or custom code can add extra files to your website like SVG or Lottie animations, which can slow down page loading. Heavy scripts can make scrolling lag, especially on phones and tablets. To avoid this, use lightweight plugins, limit the number of animations, how to add SVG and Lottie flies and check your website speed after adding effects.
Inconsistent Styles
Using different animation styles in a random way can make your site look unprofessional. If some elements fade, some slide, and some spin at different speeds, visitors may feel confused. Keep your website clean by using the same style and speed for similar elements, and make sure movements are smooth and natural.
Wrapping Up
Scroll animations are a powerful way to make your WordPress website look modern, professional, and interactive. They help highlight important sections, guide visitors’ attention, and make your pages feel alive as users scroll.
You can add these animations using plugins like Animation Addons or Elementor, or use custom CSS and JavaScript if you want full control.
Avoid overusing them, keep styles and speeds consistent, and test them on different devices to ensure smooth performance. Well-placed, smooth animations make your content easier to read and more engaging, while poorly used effects can distract or slow down your site.
By starting with a few key scroll animations and gradually exploring advanced effects, you can make your website more dynamic and enjoyable for visitors without overwhelming them.
FAQs
Do scroll animations slow down my WordPress site?
Scroll animations won’t slow your site if used carefully. Avoid heavy or too many animations, use lightweight plugins, and test your site speed. Well-optimized animations can enhance user experience without hurting performance.
Can I add scroll animations without a plugin?
Yes, you can add scroll animations with custom CSS or libraries like GSAP, giving full control over style and speed. But this requires coding. For beginners, using a plugin is easier and safer, letting you add animations in just a few clicks.
Does Elementor support scroll animations?
Yes, Elementor includes motion effects for scroll-based animations like fade, slide, zoom, and rotate. You can animate sections, columns, or widgets. For more advanced effects, addons like Animation Addons offer extra options, control, and prebuilt templates without coding.
How many scroll animations should I use per page?
There is no fixed number, but it is best to use them only where they add value. Animations should highlight key content or guide users’ attention. Too many animations can distract visitors and make the site feel heavy. A few well-placed effects per page are usually enough.
Leave a Reply