A bouncing button can increase clicks. The same bounce can also annoy users and hurt trust. Bounce animation is not about adding motion everywhere. It is about using motion at the right moment, on the right element, for the right reason.
Most WordPress sites get this wrong. They either overuse bounce effects or apply them where they do not belong. You can find many bounce animations in WordPress examples online that look playful but harm usability.
Elementor makes bounce animation easy. Plugins make it even easier. GSAP gives full control. The challenge is knowing which approach to use and how to use it correctly.
This guide shows how to add bounce animation in WordPress and Elementor without breaking usability. You will learn where bounce animation works, where it fails, and how to implement it using Elementor, animation plugins with higher revenue cleanly and intentionally.
Where to Use Bounce Animation on a Website?
Bounce animation works best when it has a clear purpose and responds to user intent. It should guide attention, confirm interaction, or highlight important elements without becoming distracting.
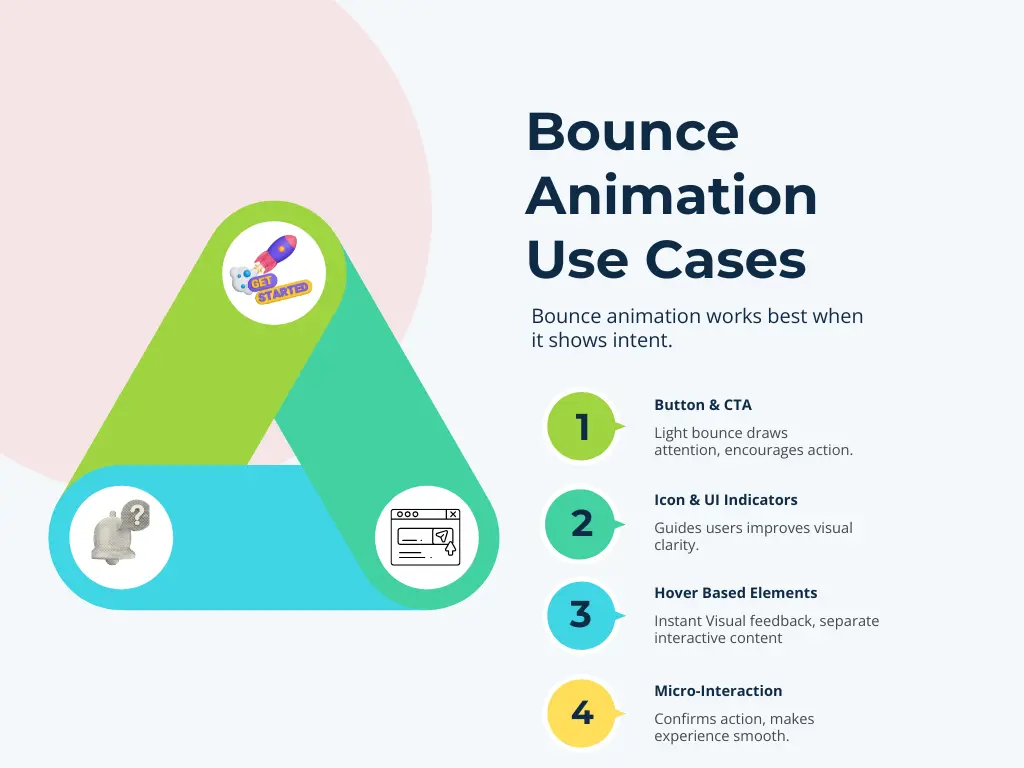
Buttons & CTAs
Bounce animations are most effective on call-to-action elements like Buy Now, Get Started, Sign Up, or Subscribe. A light bounce helps draw attention to the action you want users to take and makes the button feel more interactive.
The movement should be light so it supports the action and does not distract from it.
Icons & UI indicators
Icons such as arrows, scroll indicators, notification bells, or dropdown hints benefit from a gentle bounce motion. This helps users understand that the animated icon is interactive or that there is more content to explore. It also improves visual clarity, especially for first-time visitors.
Hover-based interactive elements
Bounce effects work well on hover states for cards, feature boxes, pricing tables, or product highlights. A small bounce on hover provides instant visual feedback and makes the interface feel responsive. It also helps separate interactive elements from static content.
Micro-interactions
Small bounce animations are useful after actions like clicking a button, submitting a form, or toggling a setting. These micro interactions confirm that an action was successful and make the experience feel smooth and polished. Used correctly, they improve usability without interrupting the user flow.
How to Add Bounce Animation in WordPress & Elementor?
Adding bounce animation in WordPress and Elementor is simple and does not require complex setup. You can use Elementor’s built-in motion effects, an animation plugin, or GSAP bounce animation in Elementor for more precise control.
1. WordPress Plugin
Animation Addons
Animation Addons is a WordPress plugin that makes it easy to create animations in Elementor without coding. It includes a wide range of widgets and extensions, along with ready-made templates you can use right away.
With hundreds of full websites, thousands of pages, and a large collection of prebuilt sections, you can build animated layouts quickly without starting from scratch.
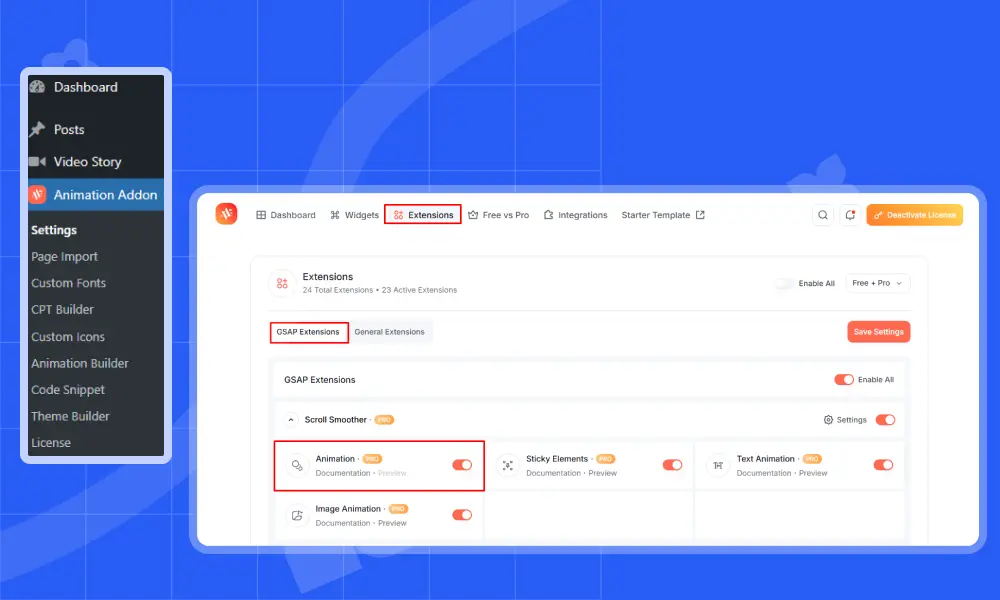
Adding a bounce animation with Animation Addons is simple. Most settings are already configured by default, so you only need to adjust a few options to get started.
First, make sure you have installed and activated the animation addons plugin in your WordPress website.
Next, select the element where you want to apply the bounce animation. The Animation extension will then appear in the Advanced tab of the left sidebar.
All you have to do is keep the default settings as they are and adjust only the values you need.
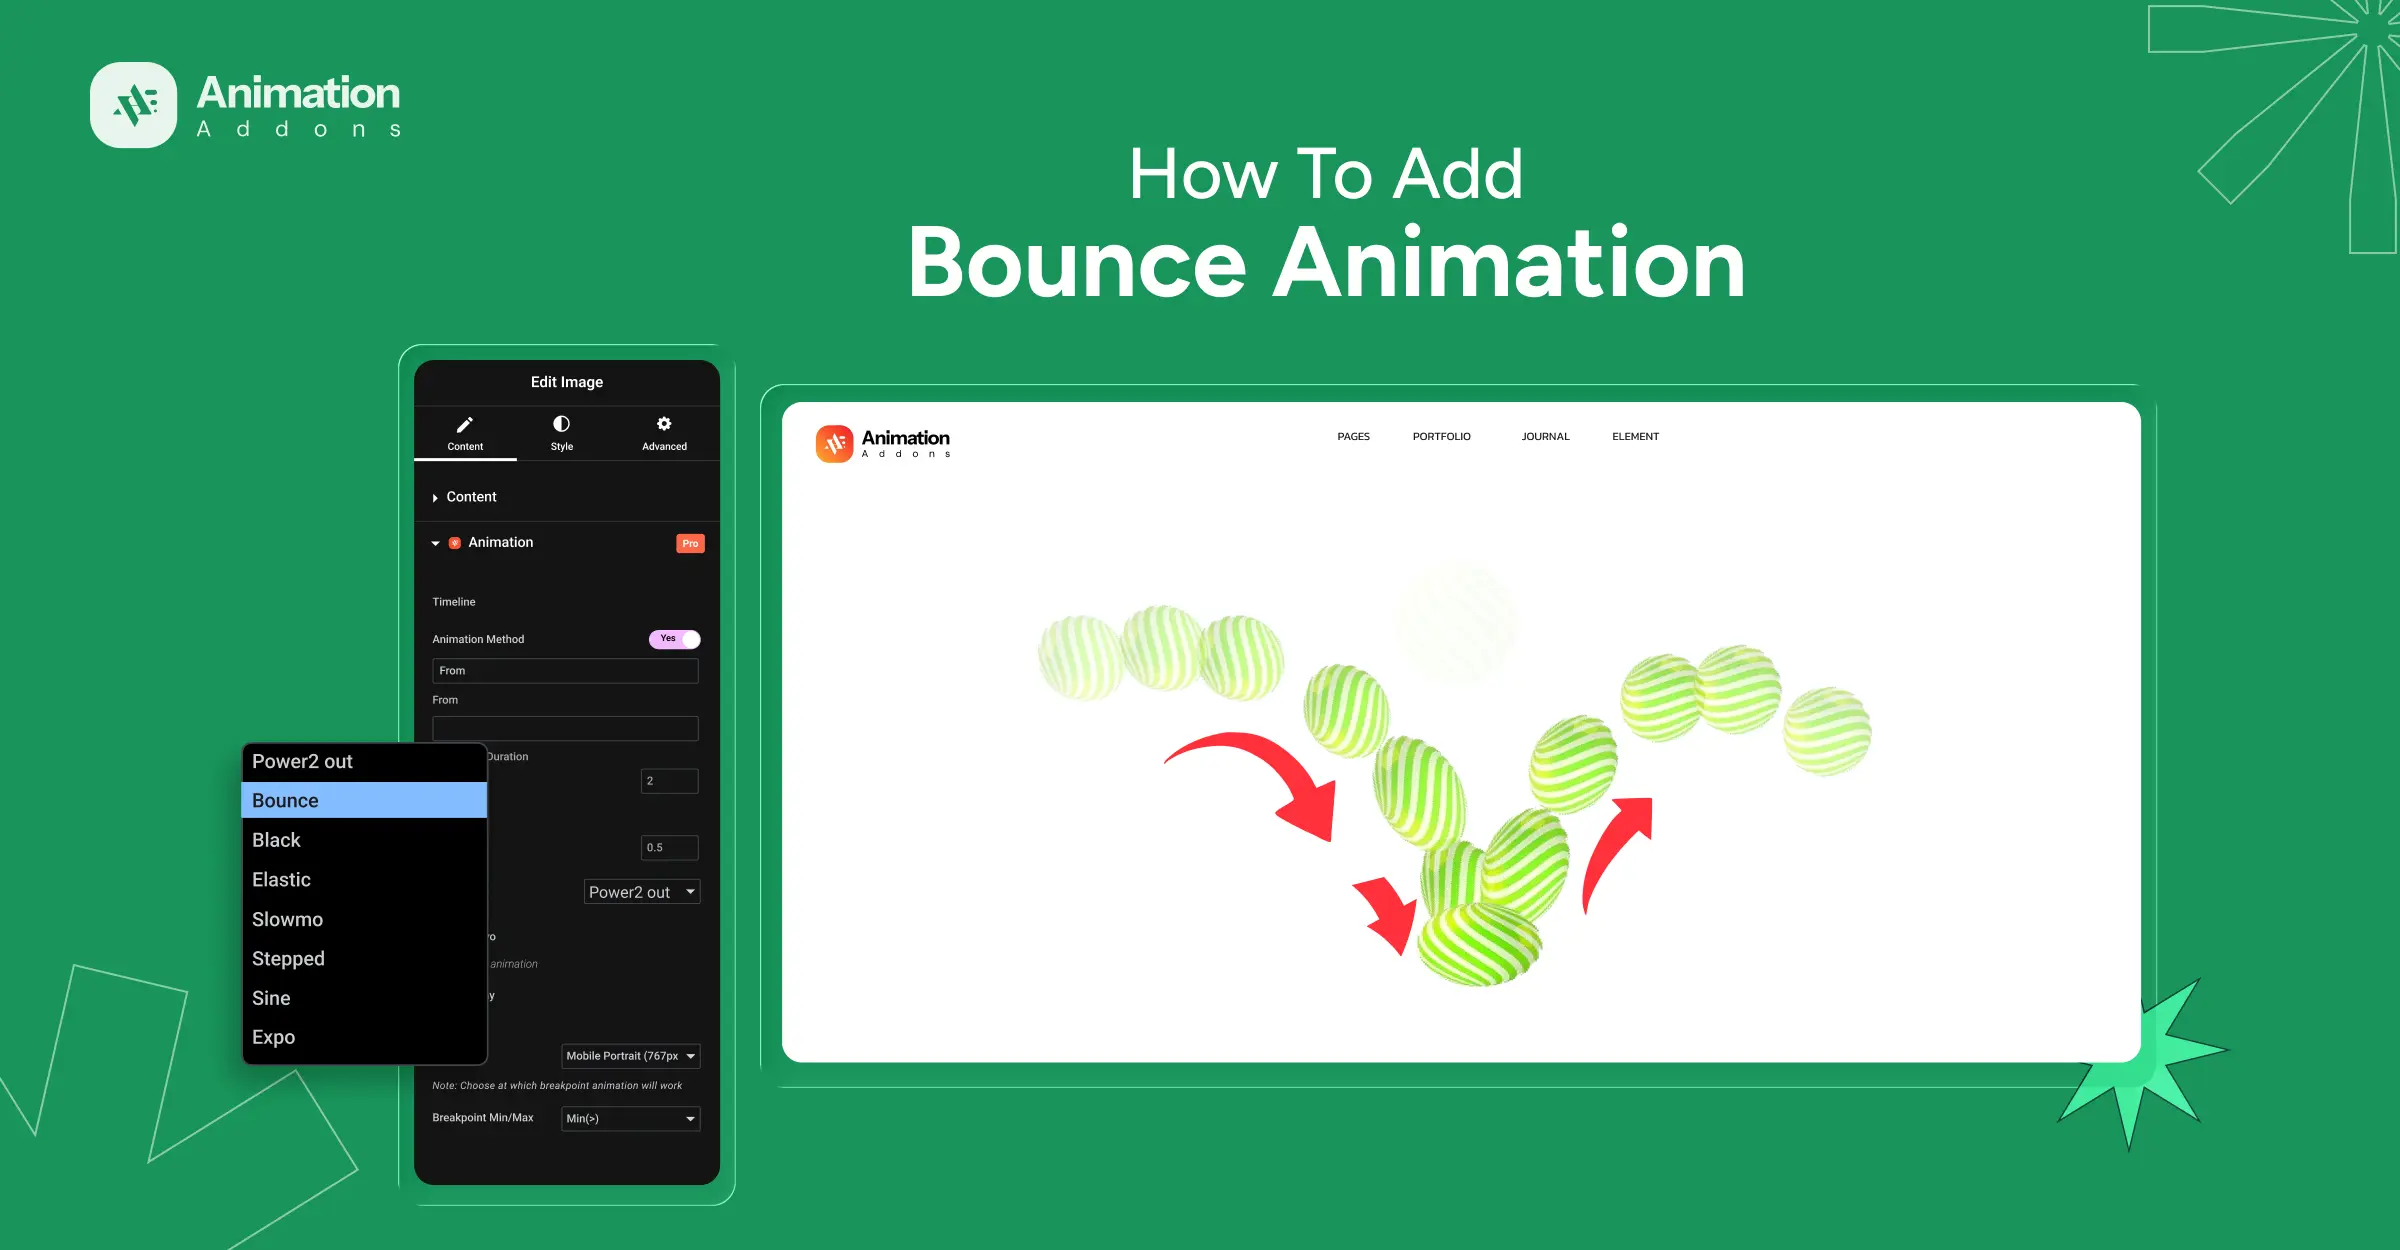
- Animation: Among the available animation types, select ‘Fade Animation’.
- Method: Leave the Method option unchanged, as it is already set to ‘From’ by default.
- Trigger: There is no need to change the Trigger option since the default option is ‘On Scroll’ chosen.
- Wrapper: This option controls which part of the element is animated. Simply leave it as it is, since it is already set to the default.
- Delay: Leave the Delay setting as it is because it already uses the default value of 0.15s.
- Fade From: The Fade From option is already set to ‘Bottom’, so you can leave it unchanged.
- Duration: Keep the Duration value as it is. It is set to 1.5 by default.
- Ease: Among the available option Select ‘Bounce’ to make our animation bounce.
- Fade Offset: Leave the option unchanged as it is already set to 50.
Elementor On Editor: Toggle on the Enable on Editor option to make the Play Animation option available. Finally, click it to view the output.
Elementor
Elementor also provides basic bounce animations out of the box. This method is ideal for simple and cool entrance effects when you do not need advanced timing or triggers.
These built-in effects are useful for lightweight bounce animation use cases, especially on buttons and icons.
In Elementor, adding a bounce animation is also quite simple. Follow these steps to add a bounce animation to your WordPress site.
Step 1: Select an element that you want to add a bounce animation to.
After selecting the element, whether it is a button, icon, or any interactive element, the Motion Effects option appears in the Advanced tab on the left sidebar.
Step 2: Under Entrance Animation, choose Bounce In Down from the list of available animations. Other bounce effects are available if you want a different style.
Step 3: Now set the Animation Duration option to ‘Slow’.
Step 4: Finally, set the animation Delay (ms) value to 2000. The best part is that you can see the bounce animation effect while adjusting the option.
2 . GSAP Library
This GSAP animation adds a subtle bounce effect when the page loads. The element moves slightly downward while fading in. The motion feels smooth and natural and helps draw attention without interrupting the reading flow.
Additionally, if you need precise timing, easing control, or custom triggers, GSAP bounce animation in Elementor offers the most flexibility.
Step 1: HTML (Element Markup)
Add a class to the element you want to animate.
In Elementor, this means adding the class in Advanced → CSS Classes.
					<button class="gsap-bounce">

  Purchase Now

</button>
This class will be used as the animation target.
Step 2: CSS (Basic Styling)
Keep CSS minimal. GSAP handles the animation—CSS only prepares the element.
					.gsap-bounce {

  display: inline-block;

  padding: 14px 18px;

  border-radius: 10px;

  background: #ffffff;

  border: 1px solid #e5e5e5;

  cursor: pointer;

  will-change: transform, opacity;

}
will-change helps the browser render the animation smoothly.
Step 3: JavaScript (GSAP Bounce Animation)
Load GSAP once, then apply the bounce animation.
					document.addEventListener('DOMContentLoaded', () => {

    gsap.from('.gsap-bounce', {

      y: -24,

      opacity: 0,

      duration: 0.8,

      ease: 'bounce.out'

    });

  });
Best Practices For Bounce Animation
Bounce animation can add energy and personality to a website when used correctly. But if it is overdone or poorly placed, it can quickly feel distracting and unprofessional. The key is restraint and intention.
Follow these best practices to make bounce animations enhance your design instead of hurting it.
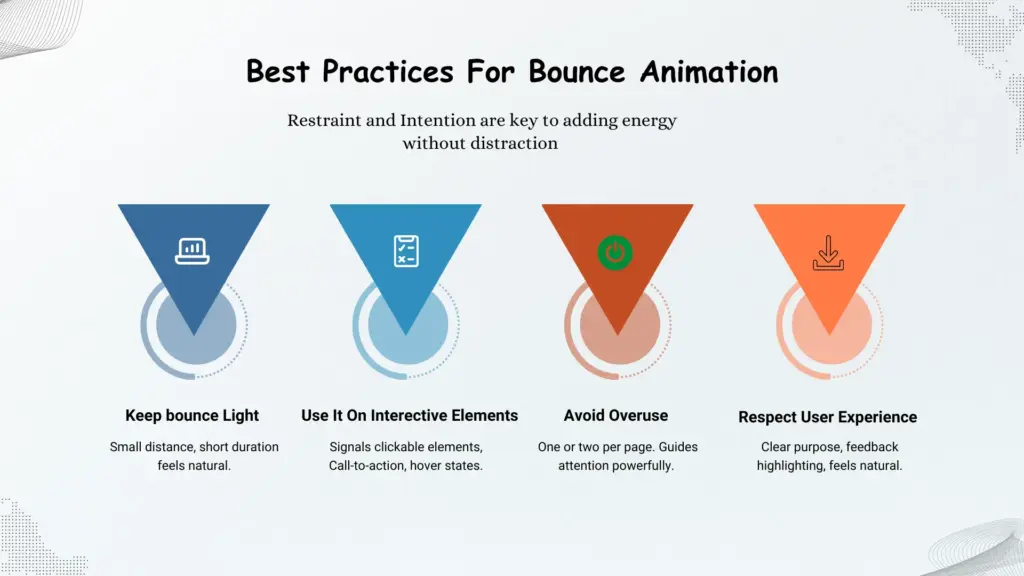
1. Keep Bounce Light
Bounce effects work best when the movement is subtle. Use a small distance and a short duration so the animation feels natural and smooth.
A heavy or exaggerated bounce can feel playful in the wrong way and may distract users from the actual content. The goal is to add a hint of motion, not steal attention.
2. Use it Only on Interactive Elements
Bounce animation is most effective on elements that users can interact with. Buttons, icons, call-to-action elements, and hover states are ideal places to use it. These animations help signal that an element is clickable or important.
Avoid applying bounce effects to large text blocks, long paragraphs, or full sections, as this can make the layout feel unstable.
3. Avoid Overuse
Bounce animation is powerful because it stands out. Using it too often removes that impact. In most cases, one or two bounce animations on a page are enough to guide attention where it matters.
Overusing bounce effects can overwhelm users and make the page feel noisy, which negatively affects usability and focus.
4. Respect User Experience
Every animation needs a clear purpose. Bounce animations should help guide attention, offer feedback, or highlight key actions. They must not distract users or interrupt the reading flow. Interactive animations for user experience feels natural and intentional . Unnecessary ones stand out in the wrong way.
Wrap Up
Bounce animation is a simple yet effective way to make WordPress and Elementor websites feel more interactive. It helps draw attention to important actions and adds subtle feedback without overwhelming the design.
This guide covered where bounce animation works best and how to add it using Elementor, animation plugins, and GSAP. Each approach serves a different purpose. Some are quick to apply, while others offer more control and flexibility.
The key is balance. Keep movements light and purposeful. Apply bounce only to interactive elements. Avoid using it too often, as overuse reduces impact and hurts usability.
Animations should support the user experience. They should guide attention and improve clarity. Thoughtful use of bounce animation makes a site feel responsive, polished, and professional.
FAQs
How many bounce animations should I use on a page?
In most cases, one or two bounce animations per page are enough. Using too many bounce effects reduces their impact and can make the page feel distracting or noisy.
Where should I avoid using bounce animation?
You should avoid using bounce animation on long text blocks, paragraphs, or large content sections. Continuous or repeated motion in these areas can interrupt reading flow and negatively affect user experience.
Does bounce animation affect SEO or performance?
Bounce animation does not negatively affect SEO when it is lightweight and used correctly. Tools like GSAP are performance-optimized and rely on transform-based animations, which are efficient for browsers.
Problems usually happen only when animations are overused or applied to too many elements at once.
What is the difference between plugin-based bounce animation and GSAP?
Plugin-based bounce animations are easier to set up and ideal for most users. GSAP provides smoother motion and advanced control over timing, easing, and triggers. GSAP is better suited for custom or interactive animations where precision matters.
Leave a Reply