Modern websites are no longer static pages, they are interactive experiences. One subtle yet powerful way to enhance user engagement is through cursor hover effects. These micro-interactions respond instantly to user movement, adding depth, personality, and visual feedback to your design. If you’re using Elementor to build WordPress websites, creating hover effects might seem technical at first. However, with the right tools, it becomes surprisingly simple and efficient.
In this guide, we’ll explore how to create a cursor hover effect in Elementor using Animation Addons. If you want to highlight buttons, images, text, or entire sections, hover effects can dramatically improve user experience and make your animated website to reduce development cost, feel more dynamic and modern.
What Is a Cursor Hover Effect?
A cursor hover effect is an interactive visual response that appears when a user moves their mouse pointer over a specific element on a website, such as a button, image, link, or text. Instead of remaining static, the element reacts to the cursor’s presence by changing its color, size, shape, opacity, or animation state.
These effects provide instant visual feedback, helping users understand that an element is clickable or interactive. Cursor hover effects also add a layer of polish and creativity to a website, making interactions feel smoother and more engaging.
Why Use Cursor Hover Effects on Your Website?
Cursor hover effects play an important role in improving both user experience and visual appeal on modern websites. They provide immediate feedback, letting users know which elements are interactive, clickable, or important. This clarity helps reduce confusion and makes navigation feel more intuitive, especially for first-time visitors. Hover effects can also guide user attention by subtly highlighting buttons, links, or calls to action at the right moment.
Beyond usability, cursor hover effects add personality and depth to your website. When implemented correctly, hover effects enhance storytelling and brand identity without overwhelming the design. Overall, cursor hover effects make your website feel responsive, modern, and interactive in creating memorable digital experiences.
Where to Use Cursor Hover Effect Animation on a Website
Cursor hover effect animations are most effective when used intentionally. Instead of applying them everywhere, placing them in the right areas can improve usability, guide attention, and enhance the overall experience without distracting users.
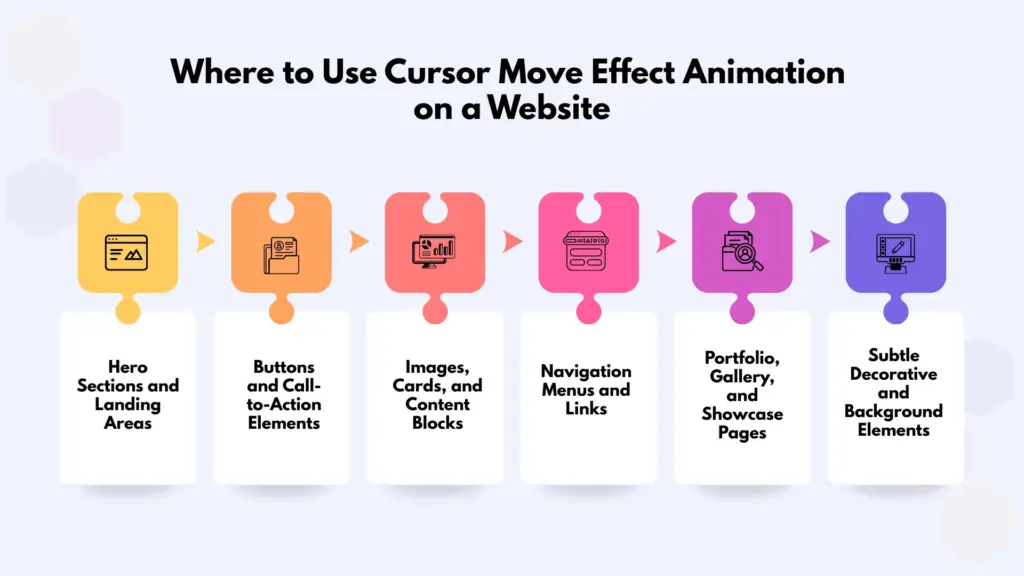
Buttons and Call-to-Action Elements
Buttons are one of the most common and effective places to use cursor hover effects. Subtle animations like color transitions, icon movement, or background fills instantly signal that the element is clickable. Hover effects on CTAs such as “Get Started,” “Buy Now,” or “Learn More” can encourage interaction and improve conversion rates by making actions feel more inviting and responsive.
Navigation Menus and Links
Hover animations work especially well in navigation menus. When users move their cursor over menu items, effects like underline animations, background highlights, or text transitions improve clarity and usability. These effects help users quickly understand where they are about to click and make navigating the website smoother and more intuitive.
Images and Media Sections
Applying hover effects to images, galleries, or portfolio items adds depth and interactivity. For example, revealing text overlays, zoom-in effects, or subtle motion on hover can provide extra context without cluttering the layout. This is particularly useful for portfolios, case studies, and product showcases where visual storytelling matters.
Cards, Boxes, and Content Grids
Content cards such as blog previews, service boxes, or feature sections benefit greatly from hover animations. Elevation effects, shadow changes, or slight movements help separate individual items and make them feel interactive. These effects improve scan-ability and guide users toward important content naturally.
Forms and Input Fields
Hover effects can enhance form usability by highlighting input fields, buttons, or labels when users interact with them. Simple animations like border color changes or icon responses make forms feel more user-friendly and reduce friction during user input.
Icons and Social Media Elements
Icons are ideal for hover animations because they are small but highly interactive. Subtle rotations, color changes, or scale effects on hover can make icons more engaging while maintaining a clean design. This works well for social media links, feature icons, and action interactive buttons.
How to Add Cursor Move Effect Animation in WordPress & Elementor?
Method 1: Adding Cursor Hover Effect Using Elementor
One of the biggest advantages of Elementor is its ability to create interactive effects visually, without touching any code. While Elementor does not offer a fully custom cursor system by default, you can still design effective cursor hover interactions using its built-in hover, transition, and motion features. This method is ideal for beginners or anyone who wants quick results with minimal setup.
Using Elementor’s Built-In Hover Controls
Elementor allows you to apply hover effects to almost every element like buttons, images, icons, columns, and sections. To begin, select an element and go to the Style or Advanced tab. Most styling options include a Normal / Hover toggle, allowing you to define how the element looks when the cursor hovers over it.
You can change colors, backgrounds, borders, shadows, opacity, and even spacing on hover. These changes act as visual feedback, clearly indicating interactivity to users.
Adding Smooth Transitions for Better UX
Hover effects feel much better when transitions are smooth. Under Advanced → Motion Effects or Advanced → Custom CSS (if available), you can control transition duration indirectly using Elementor’s built-in transition settings.
By adjusting hover transition timing (such as easing and duration), you can create subtle, professional-looking hover animations instead of sudden changes.
Creating Depth with Hover Animation and Transforms
Elementor also includes Hover Animation options like Grow, Shrink, Float, Sink, and Rotate. These effects slightly transform the element when hovered, giving a sense of depth and motion.
For more advanced interactions, you can use Transform settings (available in newer Elementor versions) to scale, rotate, or move elements on hover simulating a cursor-responsive effect.
Method 2: Creating Cursor Hover Effect Using Animation Addons
Cursor hover effects are easy to create when you use Animation Addons. Below is a simple, step-by-step explanation so you can apply the effect to your website easily.
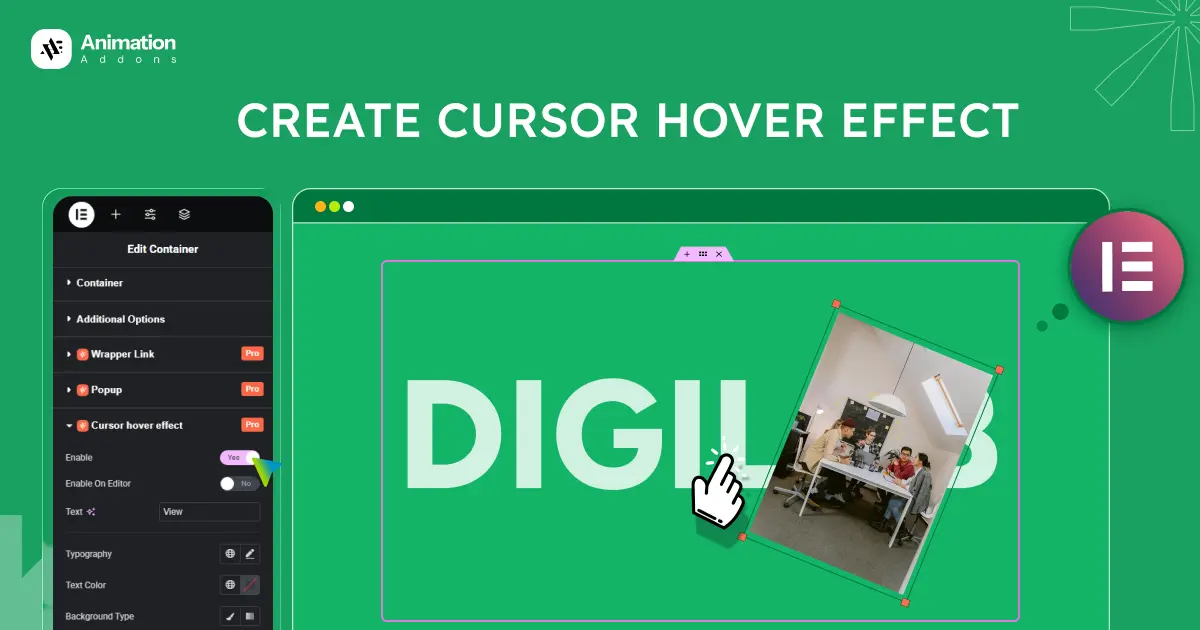
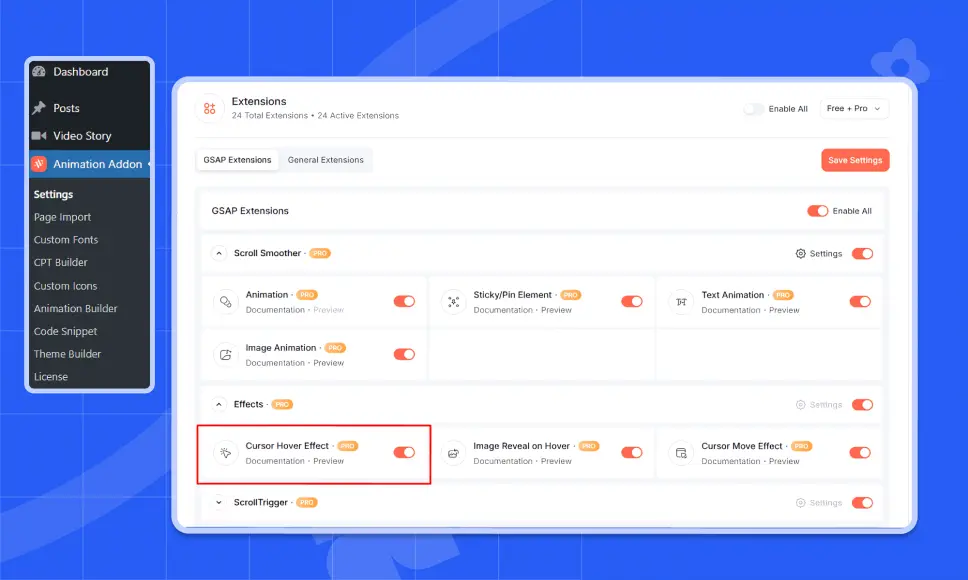
Step 1: Activate Cursor Hover Effect from WordPress Dashboard
Start by logging in to your WordPress Dashboard. From the left-hand menu, click on Animation Addons and open the Extensions tab. In the Effects section, locate Cursor Hover Effects and toggle it ON to activate the feature.
Once enabled, the Cursor Hover Effect option will automatically appear inside the Elementor editor, allowing you to apply cursor-based animations to your elements.
Step 2: Select Your Target Element
Next, open the page where you want to add the cursor move effect using Elementor. First take a container. Under that main container take 4 containers. For each container, take an image box.
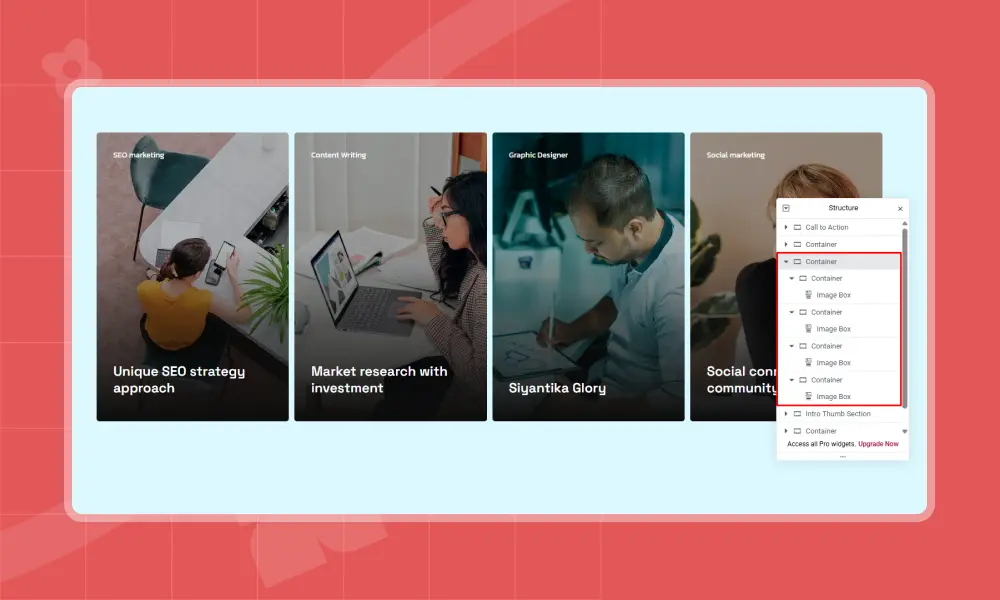
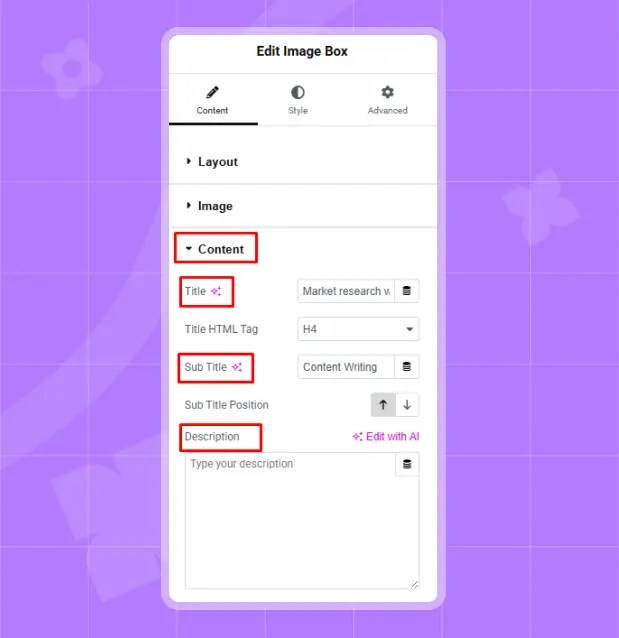
Step 3: Add Content and Images for the Image Box
For each of the Image box, select the Image section. Upload the required image and select the image resolution according to your requirements. Here, I choose the full resolution. Therefore, upload four images for the four containers. For each of the containers, go to the Advanced option. You will find Cursor Hover Effect and toggle it ON to enable the extension.

Then go to the Content section. Here, write the content for the title and sub title. Also, you can add a description in the description box. I keep it blank.
Step 4: Add Cursor Text and Enable the Editor
Now for each of the containers, in the Text field, enter the label you want to appear inside the cursor hover element (for example, here we use “View”). This text will follow the cursor when it hovers over the target element.
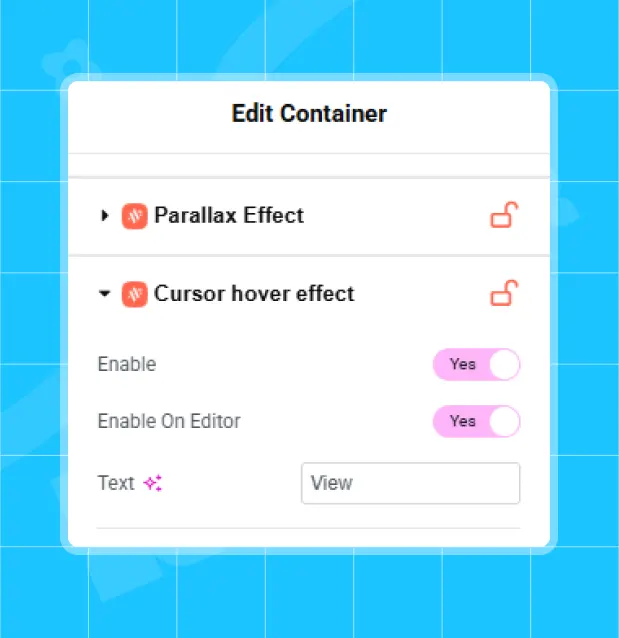
Toggle on the Enable on Editor so the effect is visible while you are working inside the Elementor editor. This helps you preview and fine-tune the animation in real time.
Step 5: Customize Typography, Set Text Color and Background Type
Open the Typography settings to adjust font family, size, weight, and alignment. This ensures the cursor text matches your website’s overall design and branding.
Use the Text Color option to choose a color that contrasts well with the cursor background, ensuring readability during hover interactions.
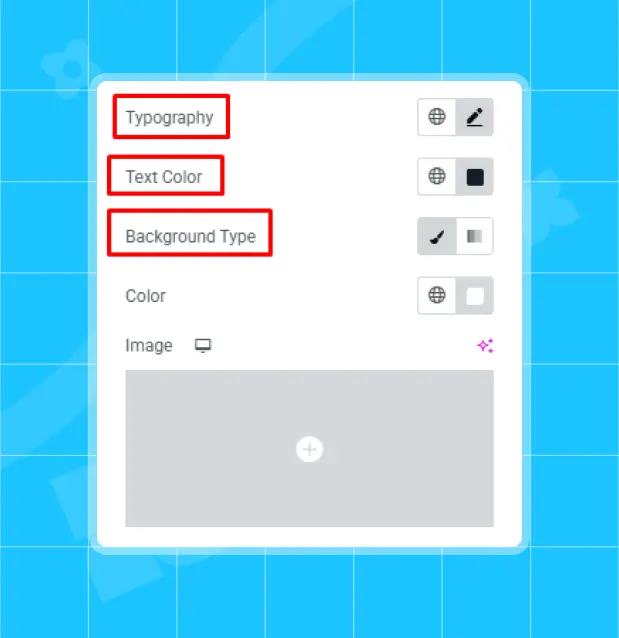
Under Background Type, select whether you want a solid color or an image background for the cursor hover effect.
- If you choose Color, pick a suitable background color.
- If you choose Image, upload an image that will appear inside the cursor.
Step 6: Adjust Cursor Size, Configure Border Settings and Border Radius
Use the Width and Height sliders to define the size of the cursor hover element. In the image, both are set to 140px, creating a balanced circular or square hover area depending on border radius.
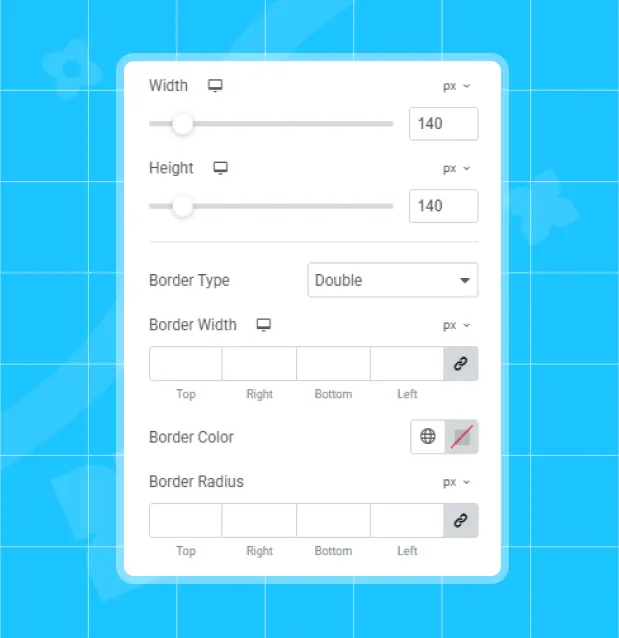
Choose a Border Type (such as Double). Then adjust the Border Width for each side if needed. Set a Border Color to make the cursor stand out visually.Finally, adjust the Border Radius to control the shape of the cursor hover element. Higher values create a circular cursor, while lower values produce rounded or sharp corners.
Step 7: Final Preview
Common Mistakes to Avoid When Using Cursor Hover Effects
Cursor hover effects can greatly enhance interactivity and user engagement, but when misused, they can harm usability, performance, and accessibility. Understanding common pitfalls helps you apply these effects in a more thoughtful and effective way.
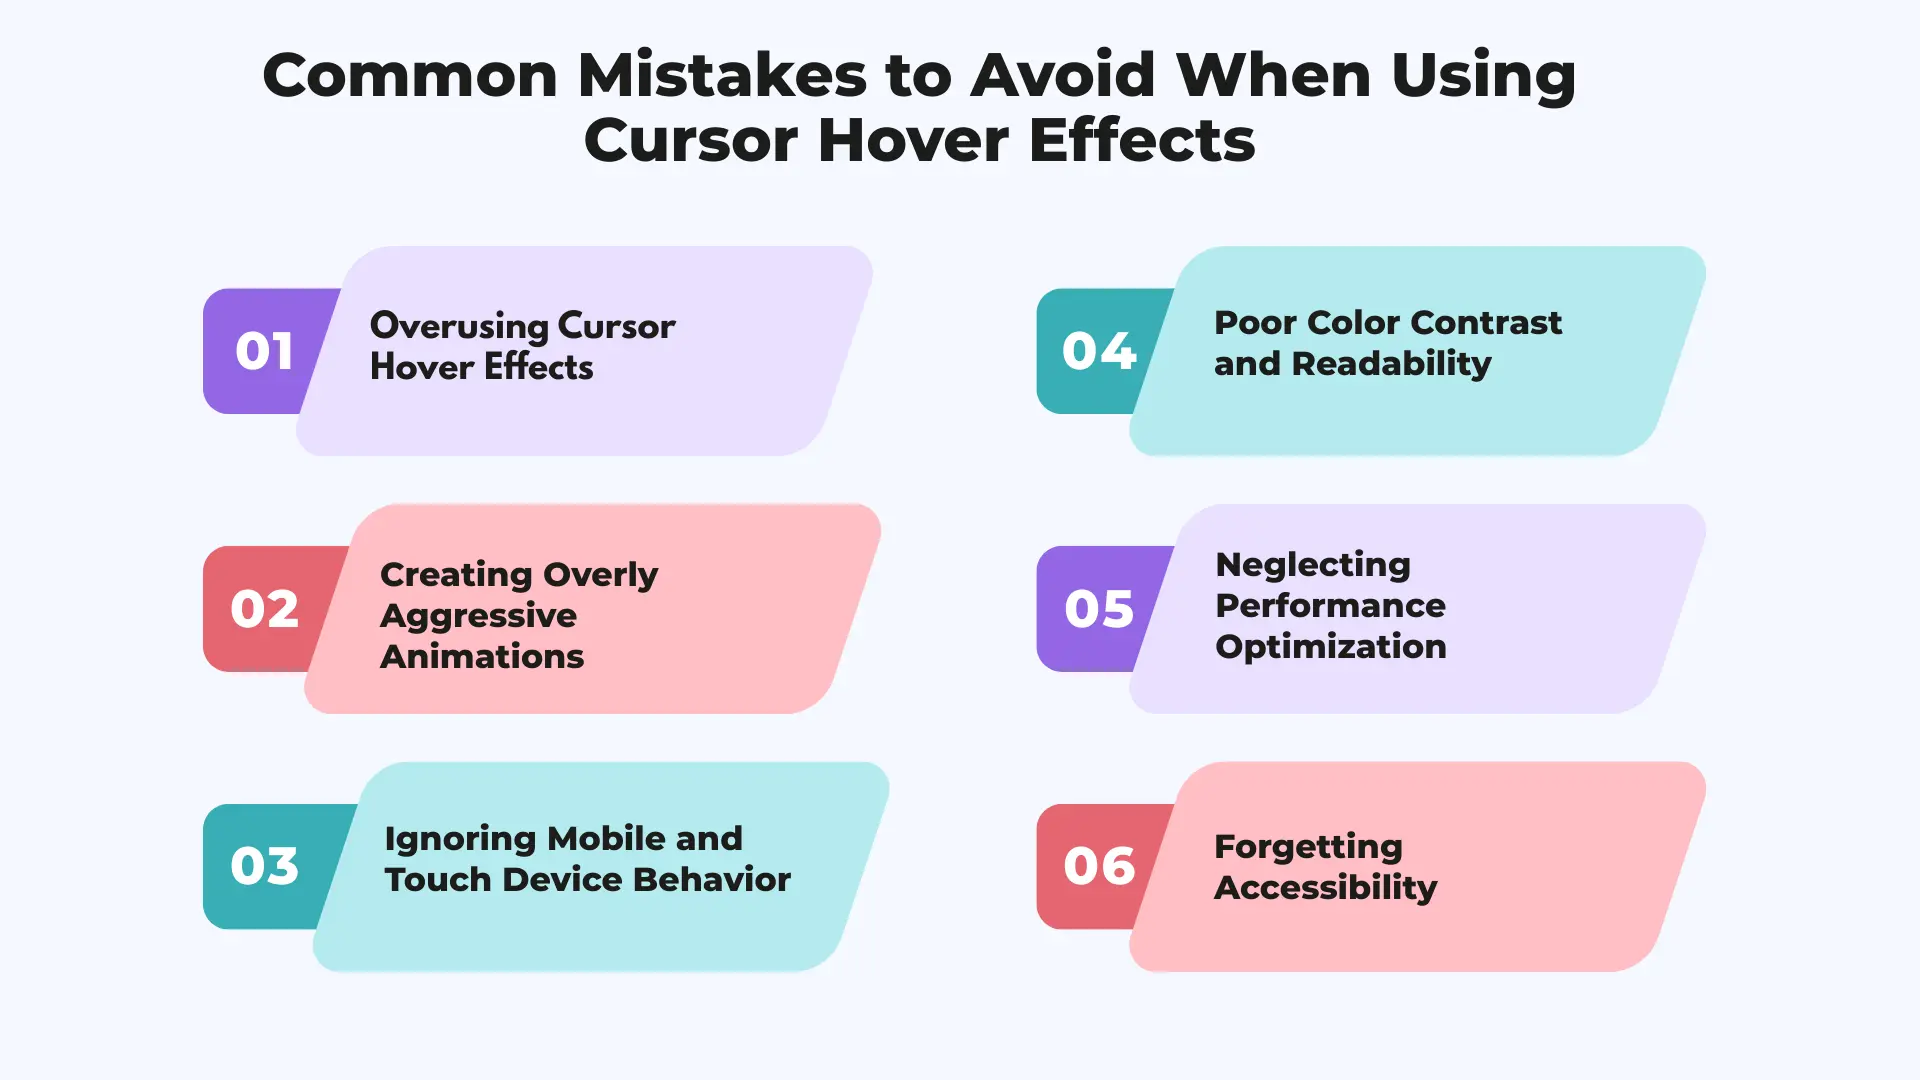
Overusing Cursor Hover Effects
One of the most frequent mistakes is adding hover effects to too many elements on a page. When every button, image, and section reacts to the cursor, the interface can feel noisy and distracting. Cursor hover effects should be used selectively to highlight important interactions, such as calls to action or featured content, rather than applied everywhere.
Creating Overly Aggressive Animations
Large movements, fast transitions, or dramatic scaling can overwhelm users. Instead of enhancing the experience, aggressive animations may feel unprofessional or cause motion discomfort. Cursor hover effects work best when they are subtle, smooth, and natural, complementing the design rather than dominating it.
Ignoring Mobile and Touch Device Behavior
Cursor hover effects are designed for mouse-based interaction and often provide little value on touch devices. Leaving them enabled on mobile can result in unnecessary processing or inconsistent behavior. Always disable or limit cursor hover effects on smartphones and tablets to maintain performance and usability.
Poor Color Contrast and Readability
If your hover effect includes text or animated icons, insufficient contrast between the text, background, and surrounding elements can reduce readability. Make sure hover states remain clear and accessible in all scenarios, including different backgrounds and lighting conditions.
Neglecting Performance Optimization
Heavy animations, multiple hover effects running simultaneously, or large unoptimized assets can slow down your website. This negatively affects user experience and SEO. Keep animations lightweight and cool and test performance regularly.
Forgetting Accessibility
Cursor hover effects should never hide essential information or block navigation. Ensure your website remains usable for keyboard users and visitors using assistive technologies. Hover effects should enhance interactions not replace core functionality.
Performance Tips for Cursor Hover Animations
Cursor hover animations can add a premium, interactive feel to your website, but performance should always be a top priority. Poorly optimized animations can lead to lag, high CPU usage, and a frustrating user experience. Following these performance best practices will help keep your website smooth and responsive.
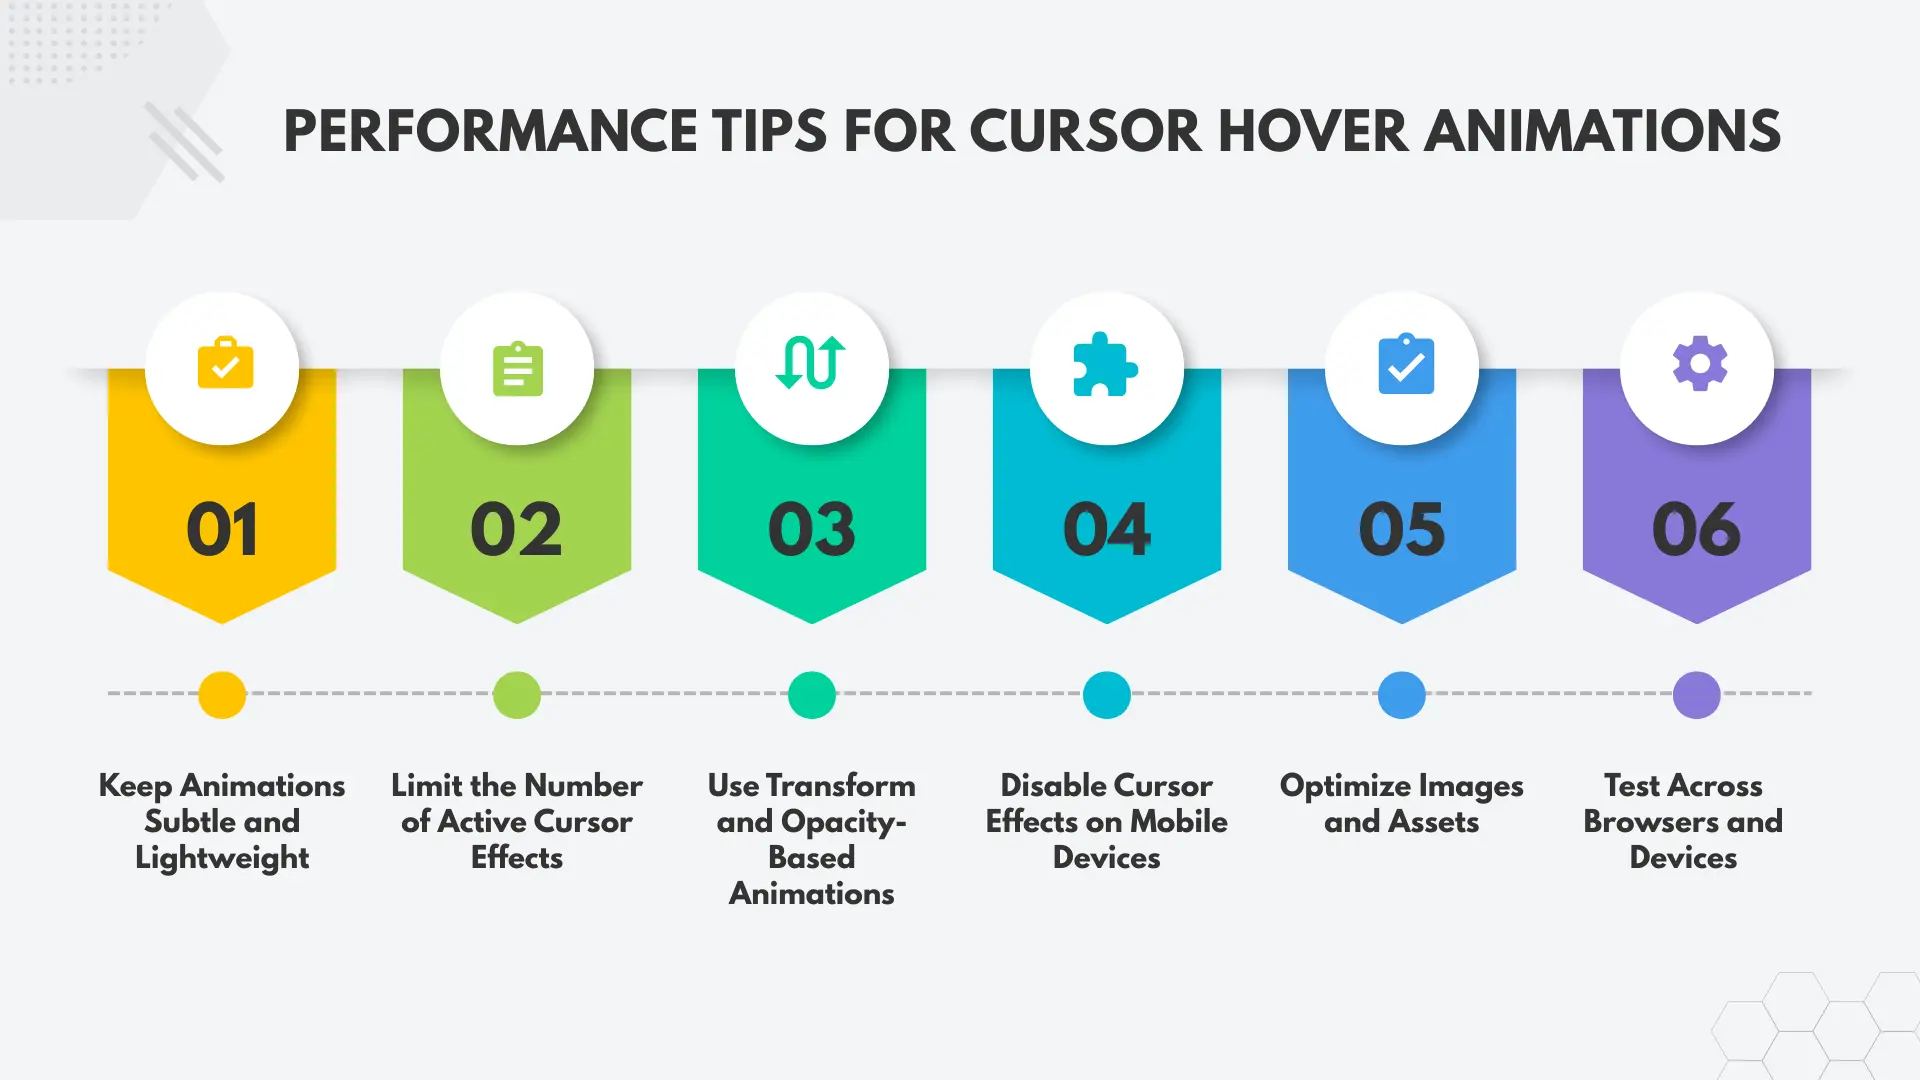
Keep Animations Subtle and Lightweight
Avoid heavy movements or complex animation chains. Small, smooth transitions are easier for the browser to render and feel more natural to users. Cursor hover effects work best when they enhance interaction quietly rather than demanding attention.
Limit the Number of Active Cursor Effects
Applying cursor hover animations to too many elements can significantly impact performance. Focus on key areas such as hero sections, featured images, or primary call-to-action buttons. Reducing the number of animated elements helps maintain a stable frame rate.
Use Transform and Opacity-Based Animations
Whenever possible, rely on animations that use transform (translate, scale, rotate) and opacity instead of properties like width, height, or box-shadow. Transform-based animations are GPU-accelerated and much more performance-friendly.
Disable Cursor Effects on Mobile Devices
Cursor hover animations are designed for mouse-based interaction and offer little value on touch devices. Disabling these effects on mobile and tablet devices reduces unnecessary processing and improves battery life and page load speed.
Optimize Images and Assets
If your cursor hover effect includes images or background graphics, ensure they are properly optimized and compressed. Large or unoptimized images can slow down animation rendering and negatively affect overall performance.
Test Across Browsers and Devices
Performance can vary between browsers and hardware. Always test your cursor hover animations on different browsers and screen sizes to ensure consistent behavior. Look out for stuttering or delayed responses and adjust animation settings accordingly.
Final Thoughts
Cursor hover effects are a powerful way to add interactivity, visual depth, and a modern touch to your website. When used thoughtfully, they improve user engagement, guide attention, and make interactions feel more intuitive and responsive.
By avoiding common mistakes and following best practices, cursor hover animations can elevate your design without overwhelming users, helping you create a polished, engaging, and memorable website experience.
FAQs
What is the Cursor Hover Effect Extension used for?
The Cursor Hover Effect Extension enables users to add interactive hover animations to any element within Elementor. When a user moves the cursor over an element, styled text appears dynamically with customizable colors, borders, and design effects. This enhances the website’s responsiveness and visual engagement.
Can I create cursor hover effects in Elementor without coding?
Yes. Elementor provides built-in hover and motion effects that allow you to create basic cursor hover interactions without writing any code.
Do cursor hover effects work on mobile devices?
Most cursor hover effects are designed for desktop use. Since mobile devices don’t use cursors, it’s best to disable or limit these effects on tablets and smartphones.
Will cursor hover animations affect website performance?
When used correctly, they have minimal impact. Performance issues usually arise from overusing animations or using heavy assets. Keeping effects subtle ensures smooth performance.
When should I use advanced cursor hover effects instead of basic ones?
Advanced cursor hover effects are ideal for creative websites, landing pages, and portfolios where visual interaction plays a key role in user engagement.
Leave a Reply