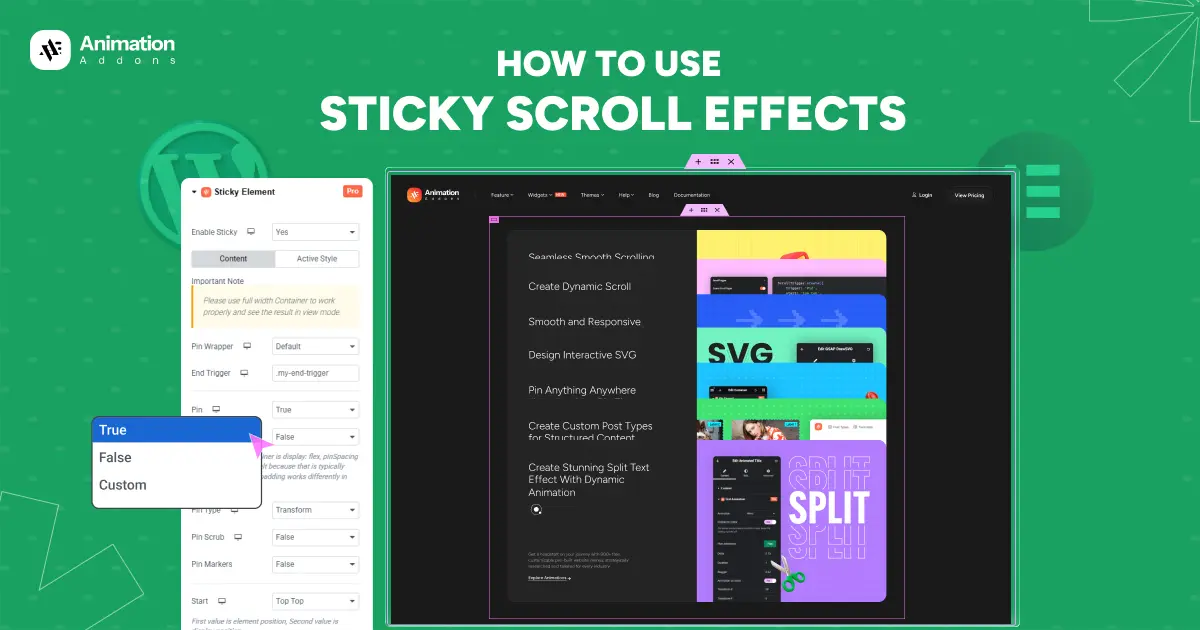
A sticky element is something on a webpage that stays in place when you scroll. Imagine you are reading a long article and the top menu or a button stays visible even as you move down the page; that’s a sticky element.
It’s like when you’re reading a book and you keep your finger on an important line so you don’t lose your spot. The sticky part of a website stays in place, so you can always see or use it.
People often use this for things like menus, headers, or “contact us” buttons, so visitors don’t have to scroll all the way back up to find them.
Different Ways to Add Sticky Scroll Effects in WordPress
There are a few ways to create sticky scroll effects on your WordPress website. You can do it using:
- WordPress plugins
- Custom JS
- GSAP Library
Each method helps you design smooth, eye-catching scroll experiences that keep key elements visible as users move through your page. Let’s start with the easiest and most beginner-friendly method using a plugin.
Using a WordPress Plugin
In WordPress, you’ll find many plugins that make it easy to add sticky effects without touching any code. For this guide, we’ll focus on Animation Addons and Elementor Pro , two powerful tools that work perfectly together to help you build modern, interactive layouts.
With these, you can create sticky headers, sidebars, or animated scroll sections in just a few clicks.
Animation Addons
If you want to add smooth, eye-catching sticky scroll effects to your WordPress site without writing code, Animation Addons is the easiest way to do it.
It’s an all-in-one animation plugin for Elementor that supercharges your design toolkit. With 100+ widgets, 25+ extensions, and a massive library of 200+ website templates, 2,000+ ready pages, and 10,000+ prebuilt sections, it gives you everything you need to build dynamic and interactive web pages effortlessly.
Plus, it includes a custom animation builder, so you can design unique scroll effects that match your brand and style.
Before you start, make sure you have:
- Elementor
- Animation Addons
Ensure both are installed and activated on your WordPress site before you begin. This will allow you to access all the sticky and animation features directly inside Elementor.
How to Enable Sticky Scroll Effect in Animation Addons
Follow these simple steps to turn on the Sticky Scroll Effect feature:
Step 1 : Activate Sticky Elements
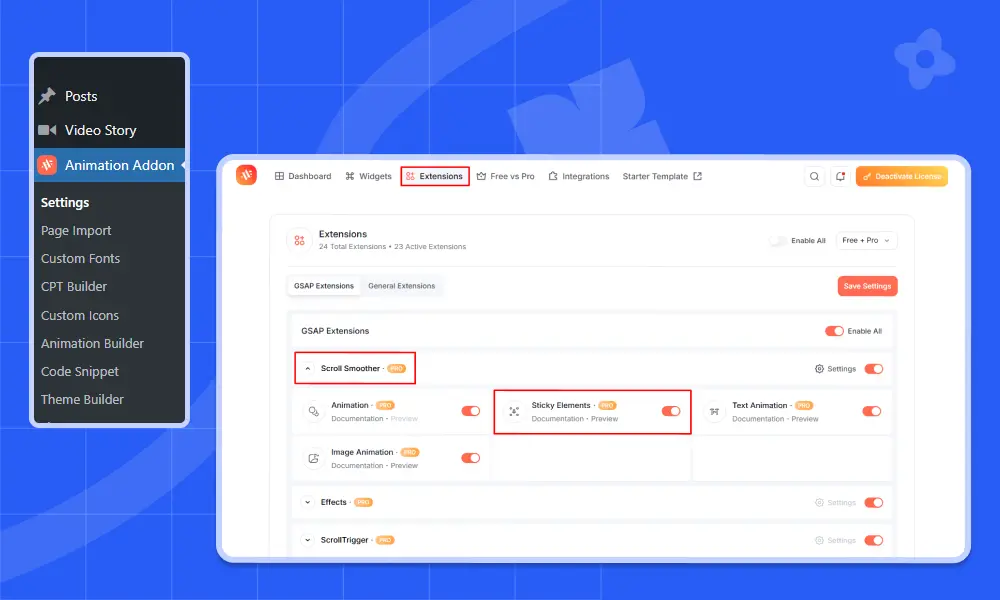
- Log in to your WordPress Dashboard and select Animation Addons from the sidebar. Open the Extensions tab, scroll to the ScrollSmoother section, and find Sticky Scroll. Toggle it ON to activate the feature.
Once enabled, you’ll see the Sticky Scroll Effect options available inside your Elementor Page Builder. From there, you can easily apply sticky effects to any section, image animation, or widget and adjust how it behaves as users scroll.
Step 2 : Select a Container
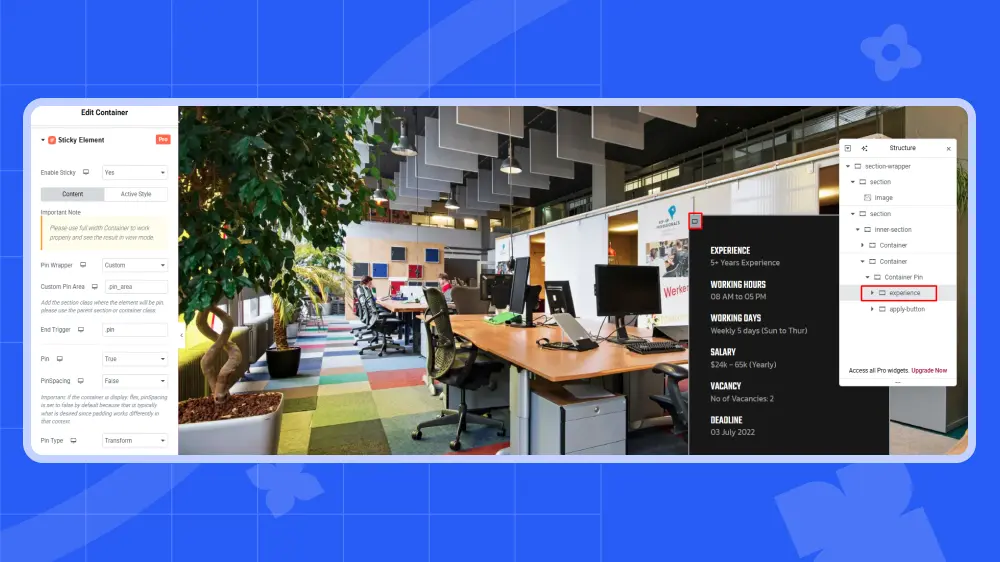
Make sure you select a container, because the sticky scroll effect can only be applied to containers.
Step 3: Enable Sticky Element

After selecting the container, go to the top right corner of the left sidebar panel in the Elementor editor. Click on the Advanced tab to access more settings. Then, scroll down until you find the Sticky Element extension. Click on it to expand the options, and you’ll see an “Enable Sticky” toggle. Simply switch it to “Yes” to activate the sticky scroll effect for that container.
Step 4 : Select the Properties of Sticky Element
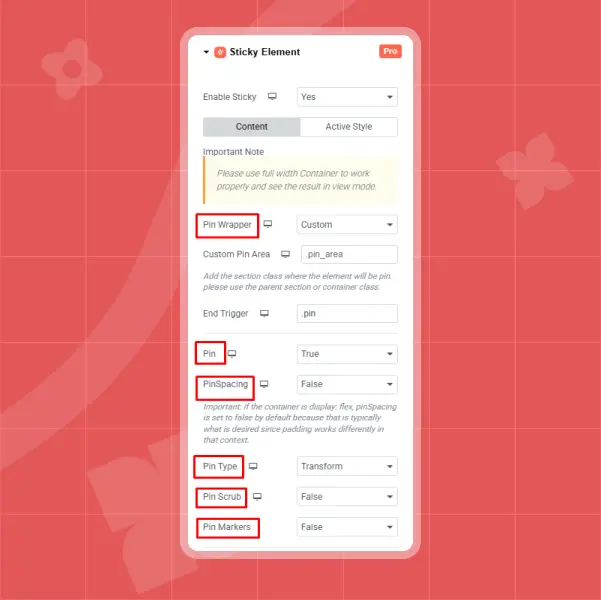
Now, keep the following options as it is, don’t need to change. If you want to change the properties, the sticky element will work accordingly.
Pin Wrapper – Custom
Pin – True
Pin Spacing – False
Pin Type – Transform
Pin Scrub – False
Pin Markers – False
Step 5: Set the Start and End Position of Sticky Element
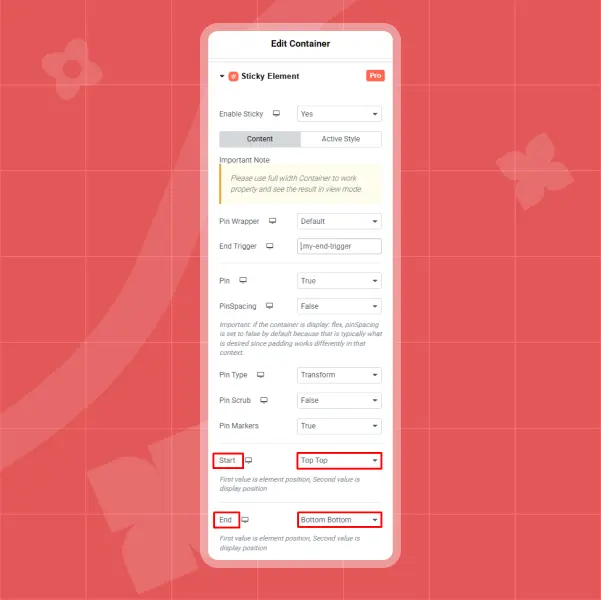
To control when your sticky element starts and stops sticking during scroll, you’ll need to set its Start and End positions. These options let you define exactly where the sticky effect begins and ends based on the element’s position on the screen.
When you open the Sticky Element settings, you’ll see a list of position combinations to choose from. Here’s what each one means:
- Top Top: The effect starts when the top of the element aligns with the top of the screen.
- Top Center: Begins when the top of the element reaches the center of the screen.
- Top Bottom: Triggers earlier means when the top of the element touches the bottom of the screen.
- Center Top: Starts when the element’s center aligns with the top of the screen.
- Center Center: Activates when the element’s center reaches the screen’s center.
- Bottom Top: Starts when the bottom of the element hits the top of the screen.
- Bottom Center: Begins when the bottom reaches the center of the screen.
- Bottom Bottom: Triggers when the bottom of the element aligns with the bottom of the screen.
- Custom: Allows you to set your own scroll values for more control (for example, setting the top to 150%).
Out of these options, I chose Start: Top Top and End: Bottom Bottom, but feel free to experiment and pick the combination that best fits your design and scrolling flow.
Step 6: Set the End Trigger of Sticky Element
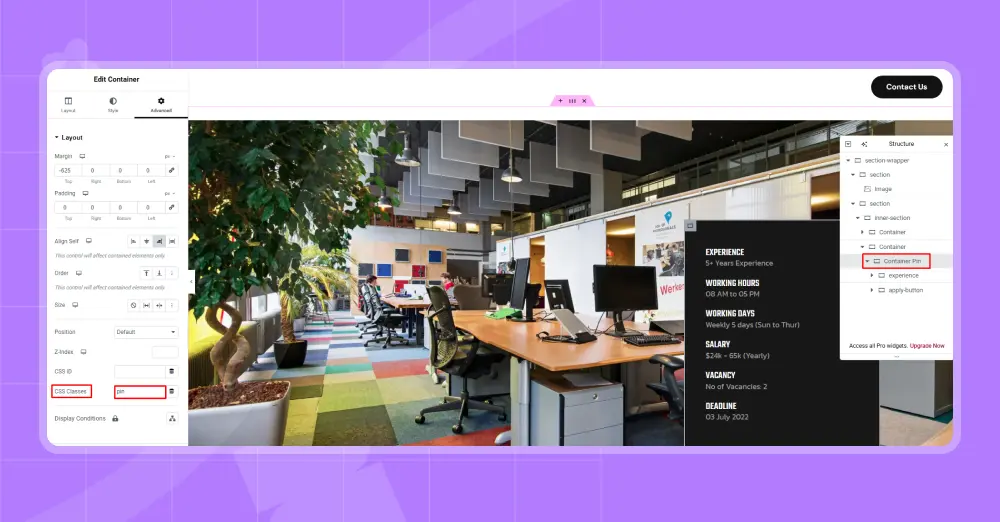
Next, select the container where you want the sticky effect to stop. Then, click on the Layout option in the Elementor panel. When this section expands, you’ll see a field called CSS Classes.
Here, you need to add a class name; this will help define where the sticky effect ends. Here, name the class as .pin for the element. Make sure to write the class name without a dot (.).
This class will be used to identify the container that marks the endpoint of your sticky scroll effect.
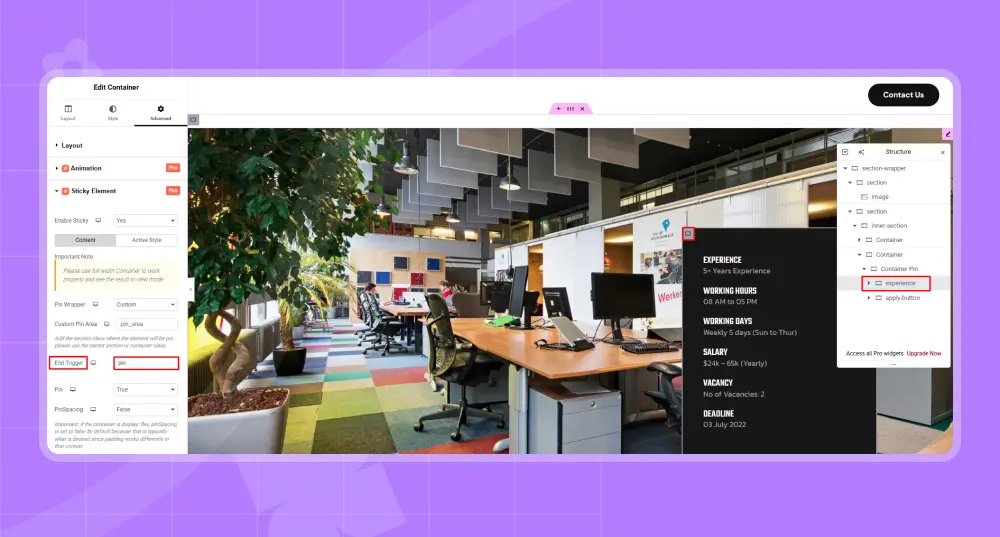
To set the End Trigger, go back to the container you selected earlier as your sticky element. With it selected, open the Advanced tab in the Elementor panel and scroll down to the Sticky Element extension. There, you’ll find the End Trigger field, this is where you tell the sticky element when to stop sticking.
In this field, enter the class name of the container you set as the stopping point, but this time add a dot (.) before the class name. For example, if your stop container’s class is pin, you’ll write it as .pin.
Step 7 : Save and Preview the Sticky Scroll Element
Once done, click Publish to save your changes. Now, as you scroll through the page, the element will stick until it reaches that section and then smoothly unstick at the right spot.
Custom JS
You can also create a sticky scroll effect using Custom JavaScript (JS) to fine-tune exactly how your elements stick and behave as users scroll. Follow the steps below to set it up easily.
Step 1: Locate or Create Your JS File
- Go to your WordPress theme folder:
wp-content → themes → your-theme-name - Inside your theme, locate the assets → js folder. If these folders don’t exist, create them.
- Open (or create) a file named script.js. This is where your custom code will live.
Step 2: Enqueue Your JS File in WordPress
For WordPress to load your script, you need to enqueue it in your theme.
- Open your theme’s functions.php file. Then, add the following code at the bottom:
					function custom_theme_scripts() {
    wp_enqueue_script('custom-script', get_template_directory_uri() . '/assets/js/script.js', array('jquery'), null, true);
}
add_action('wp_enqueue_scripts', 'custom_theme_scripts');
This tells WordPress to load your JS file properly on every page
Step 3: Add the Sticky Scroll Code
Open your script.js file and paste the following code:
					window.addEventListener('scroll', function() {

  const stickyElement = document.querySelector('.sticky-section');

  const stopSection = document.querySelector('.stop-section');

  const stickyStart = stickyElement.offsetTop;

  const stickyEnd = stopSection.offsetTop - stickyElement.offsetHeight;

  if (window.scrollY > stickyStart && window.scrollY < stickyEnd) {

    stickyElement.style.position = 'fixed';

    stickyElement.style.top = '0';

  } else {

    stickyElement.style.position = 'static';

  }

});
Tip:
- Replace .sticky-section with the class of the element you want to stick.
- Replace .stop-section with the class of the section where you want the sticky effect to end.
Step 4: Add Optional Smooth Transitions
To make your sticky element move smoothly, you can add some CSS:
					.sticky-section {

  transition: all 0.3s ease;

}
This ensures the sticky element doesn’t jump abruptly and feels polished to your visitors.
GSAP Library
Step 1: Enqueue GSAP and ScrollTrigger
First, you need to load GSAP and ScrollTrigger on your site. Add the following code to your theme’s functions.php file or your custom plugin file:
					add_action( 'wp_enqueue_scripts', function() {

    wp_enqueue_script( 'gsap', 'https://cdnjs.cloudflare.com/ajax/libs/gsap/3.12.5/gsap.min.js', [], null, true );

    wp_enqueue_script( 'gsap-scrolltrigger', 'https://cdnjs.cloudflare.com/ajax/libs/gsap/3.12.5/ScrollTrigger.min.js', [ 'gsap' ], null, true );

    wp_enqueue_script(

        'custom-sticky-header',

        plugin_dir_url( __FILE__ ) . 'assets/js/sticky-header.js',

        [ 'gsap', 'gsap-scrolltrigger' ],

        '1.0.0',

        true

    );

});
This ensures GSAP and ScrollTrigger are loaded, along with your custom sticky header script.
Step 2: Add a Class to Your Header
Next, assign a class to the header you want to make sticky:
- Open your Elementor Header Template.
- Go to Advanced → CSS Classes.
- Add the class:
css
Page-header
html
<header class=”page-header”> … </header>
Step 3: Add the GSAP Sticky Code
Create a new file: assets/js/sticky-header.js and add the following JavaScript:
					gsap.registerPlugin(ScrollTrigger);

const header = document.querySelector(".page-header");

if (header) {

  ScrollTrigger.create({

    start: "top -150",     // sticky starts when scroll passes 150px

    onEnter: () => header.classList.add("is-sticky"),

    onLeaveBack: () => header.classList.remove("is-sticky"),

  });

}
Tip: Adjust the start value to change when the header becomes sticky.
Step 4: Add CSS for Sticky State
Finally, style the sticky header to make it look polished:
					.page-header {

  position: relative;

  transition: all 0.3s ease;

}

.page-header.is-sticky {

  position: fixed;

  top: 0;

  left: 0;

  width: 100%;

  background: #fff;

  box-shadow: 0 4px 10px rgba(0, 0, 0, 0.1);

  z-index: 999;

}
This CSS makes the header stick to the top smoothly and adds a subtle shadow for a professional look. With these steps, your Elementor header will now stick smoothly as you scroll, creating a modern and interactive user experience.
Final Thoughts
Adding sticky elements to your website is a total game-changer for keeping visitors engaged and making your content easier to browse.
It transforms what used to be a complex programming task into a simple, visual experience, allowing you to create high-end scroll effects with just a few clicks. While tech-savvy creators might prefer the precision of Custom JS or using the GSAP library, most people find that a dedicated no-code tool provides the perfect balance of power and ease.
Ultimately, mastering sticky effects is about more than just “cool” visuals; it’s about creating a smooth, professional journey that keeps your users focused on exactly what matters most.
FAQs
Do I need Elementor Pro to use sticky scroll effects?
No, sticky scroll effects can be created using lightweight addons or built-in features, even without Elementor Pro, depending on the setup.
Which elements work best with sticky scroll?
Headings, images, feature lists, call-to-action buttons, and sidebars work best, as they benefit from staying visible during scrolling.
Will sticky scroll effects work on mobile devices?
Yes, but they should be tested carefully on mobile and tablets to ensure proper spacing, smooth scrolling, and a comfortable user experience.
Does sticky scroll affect website performance?
When implemented properly with optimized settings and minimal scripts, sticky scroll effects have little impact on performance and remain Core Web Vitals–friendly.

Leave a Reply