We visit many websites every day, but not all of them leave a lasting impression or capture our attention. Sometimes, a website engages us so well that it even leads us to purchase a product or service. The secret sauce is animation.
Animation plays an important role in improving user engagement and increasing conversion rates. Reveal animation is one such technique. It helps control visual flow, guide user attention, and make content easier to follow.
This guide shows how to create reveal animations in WordPress and Elementor using three practical approaches, from beginner-friendly plugins to fully custom setups. It helps you choose the right method with confidence, whether you want quick results or full creative control.
Type of Reveal Animation
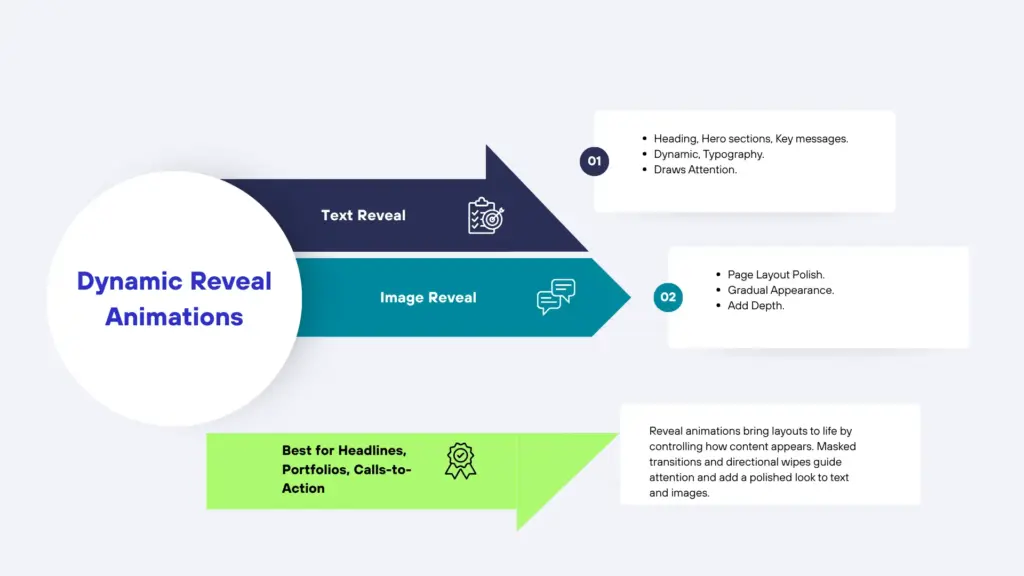
Reveal animations help control how content appears on the screen. It manages movement, timing, and visual flow as elements come into view, making transitions feel smooth and intentional.
Depending on what you’re showing, different reveal types can be used for text, images, or entire sections.
Text Reveal Animation
You’ll often see text reveal animations used for heading section, hero sections, and important messages. It makes typography feel more alive and helps guide the reader’s attention.
Common styles include slide-up or slide-down effects, as well as line-by-line or word-by-word reveals. You can also use masked text animations with containers or combine fade animation effects with motion for a more refined look.
These styles work best for headlines, section titles, and call-to-action text, where timing and clarity really matter.
Image Reveal Animation
Image reveal animations add an extra layer of polish to your layouts. Instead of showing images instantly, they appear gradually as users scroll. You can use horizontal or vertical wipe effects, scale-in animations, mask-based transitions, or overlay-style reveals using containers.
These animations are especially effective for portfolios, landing pages, case studies, and storytelling-focused designs.
Various ways to Add Reveal Animation In WordPress
There are multiple approaches to adding reveal animations in WordPress. The best method depends on your technical comfort level, performance needs, and design flexibility.
Available options include:
- WordPress Plugin
- Animation Builder
- GSAP Library
1. WordPress Plugin
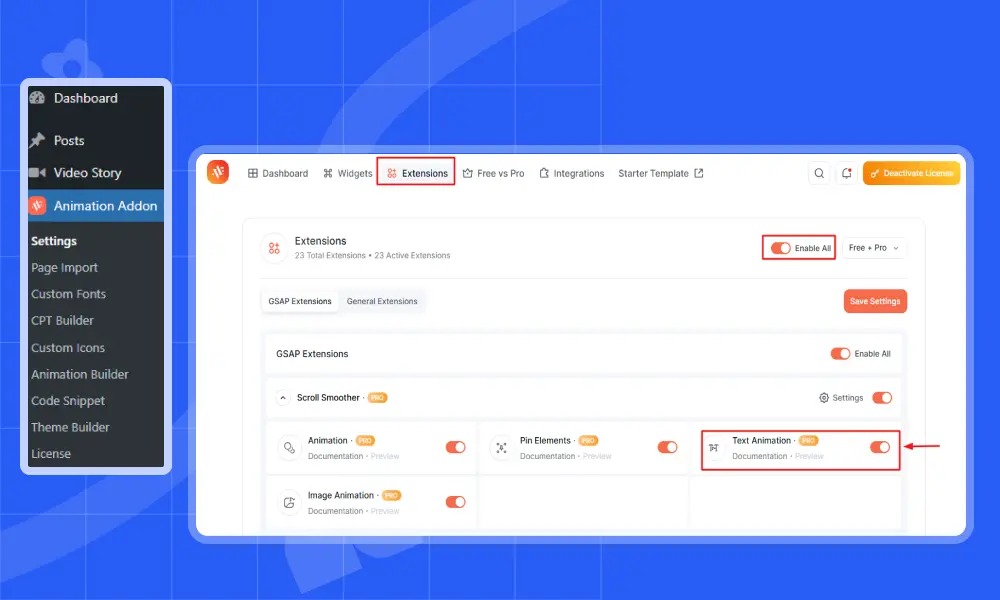
While there are many plugins available for reveal animations, Animation Addons stands out as one of the most powerful and flexible options for WordPress.
Animation Addons
Animation Addons gives you everything you need to add animations to your WordPress website. It comes with lots of ready-made widgets, extra features, and a huge collection of templates you can use right away.
You can also create your own animations using the built-in animation builder. With all these tools in one place, building animated websites becomes faster, easier, and more fun.
Let’s walk through the steps to create a Reveal Animation using Animation Addons.
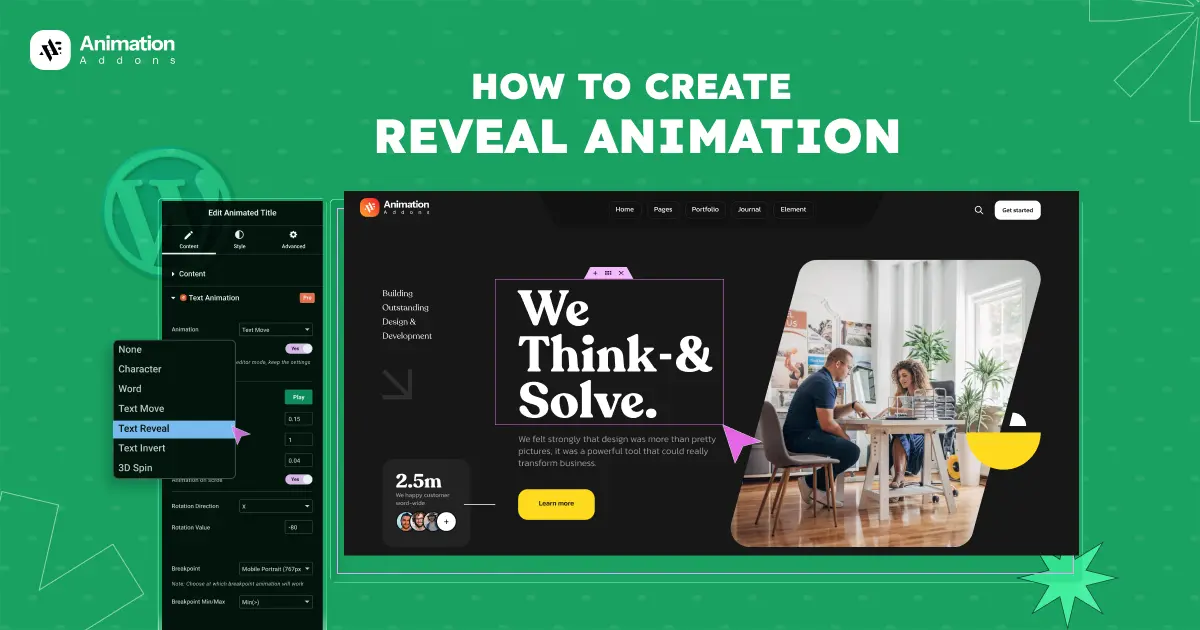
Text Reveal
Adding a text reveal with Animation Addons is very easy. You only need to adjust a few options, as most values are already set by default. This means you don’t have to do much work to get started.
First, select the text element where you want to apply the ‘Text Reveal’ animation. After that, the Text Animation extension will appear in the left editor panel. Keep the rest of the settings unchanged and adjust only a few values.
Animation: Set the Animation option to Text Reveal, which is also the default value.
Trigger: Keep the value set to On Scroll.
Text Wrapper: Leave the Text Wrapper set to Default.
Delay: Set the delay value to 0.15s.
Duration: Set the duration value to 2s.
Stagger: Set the stagger value to 0.02s.
Lastly, click Publish and then Preview to see the result.
You can also c
Image Reveal
Simply click on an image to apply the reveal animation. Default settings are already in place, and you can adjust them as needed.
Animation: Reveal is preselected as the default animation option.
Animation To: Set the value to Left.
Animation Start: Keep the value set to Top Center.
Data Ease: Keep the value set to Power2.out.
Finally, click Publish and then Preview to see the result.
2. Animation Builder
You may already be familiar with adding simple animations in WordPress. The Animation Builder offers greater flexibility and control, allowing you to create animations that match your layout more precisely.
It gives you control over how an animation starts, how it moves, how long it runs, and what triggers it, such as scrolling, hovering, or clicking.
Let’s take a look at how to create an Image Reveal animation using the Animation Builder.
Step 1: Set Up a Custom Animation and Column
To get started, go to Animation Builder and enable the specific animations you want to use. You can also enable all animations to explore everything available.
Then go to ‘Pages’ and click on ‘Build Animation’.
- After that, click on ‘Add new animation → Custom Animation
- Once you click on Custom Animation, the custom editor panel will appear.
- Now set the title based on your preference. However, you will find a default title already applied in the title field.
In this example, the title is set to Image Revel Animation. However, you can set any title based on your preference.
Afterward, return to the Gutenberg editor panel and select the image you want to apply the reveal animation to. Then set the Column and image class names.
Click on Column→ Advanced → Additional CSS Class
Step 2: Add and Configure Timeline Animations
Now, add a timeline and create three animations one by one.
Animation 1
Note: Only adjust the values mentioned below.
Title: By default, the title is set to Animation_1. However, you can pick any title based on your style needs.
Timeline: Choose Timeline_1 that you have created.
Method: Select the Method value to ‘Set’.
Applies On Class: Add the class you assigned to the Column. In this example, the column class is parent-container, so .parent-container is used here.
Add Properties
Opacity: Set Opacity value to 1
Overflow: Set Overflow value to Hidden
Animation 2
Note: Only adjust the values mentioned below.
Title: You will find the title set to Animation_2 by default. You can set any title based on your style needs.
Timeline: Choose Timeline_1 that you have created.
Method: Select the method value to ‘From’.
Applies On Class: Add the class you assigned to the column. Use the same class you applied in Animation 01, which is .parent-container.
Add Properties
Ease: Set Ease value to power2.out
XPercent: Add XPercent value to -100
Duration: Set duration value to 1.5
Animation 3
Note: Only adjust the values mentioned below.
Title: For example, the title is set to Animation 03.
Timeline: Select Timeline_1 in the same manner that you have created.
Method: Select method option ‘From’
Applies On Class: Add the class you assigned to the image. In this example, the image class is test-image, so .test-image is used here.
Add Properties
Ease: Set the Ease value to power2.out
Delay: Set the Delay value to -1.5
Scale: Set Scale value to 1.5
Xpercent: Set the XPercent value to 100
Duration: Set the Duration value to 1.5
Transformorigin: Set the Transformorigin value to Left
Step 3: Configure ScrollTrigger Settings
Lastly, enable the ScrollTrigger option for the selected timeline.
Timeline: Select Timeline_1 again that you have created.
Trigger: Set the Trigger that you have assigned in Column class, which is .parent-container
Start: Select ‘Top Center’ in ‘Start’ option.
End: Select ‘Bottom Center’ in ‘End’ option.
Scrub: Set the Scrub value to True so the animation plays with the scroll.
Finally, click on ‘Play Button.’
3. GSAP Library
Using GSAP, you can create smooth and precise reveal animations for text animation and image animation. You also get full control over timing, direction, and scroll behavior. Here is an example showing how to add a text reveal animation using the GSAP library.
Text Reveal Animation (GSAP)
HTML
<h2 class="text-reveal">Build smooth animations with GSAP</h2>CSS
					.text-reveal {

opacity: 0;

transform: translateY(40px);

}
JavaScript (GSAP)
					gsap.registerPlugin(ScrollTrigger);

gsap.to(".text-reveal", {

opacity: 1,

y: 0,

duration: 1,

ease: "power3.out",

scrollTrigger: {

 trigger: ".text-reveal",

 start: "top 80%",

 toggleActions: "play none none none"

}

});
Best Practices and Common Mistakes to Avoid
Reveal animations work best when they feel natural and consistent. Proper timing, direction, and spacing keep animations smooth. This also prevents the layout from feeling busy or distracting.
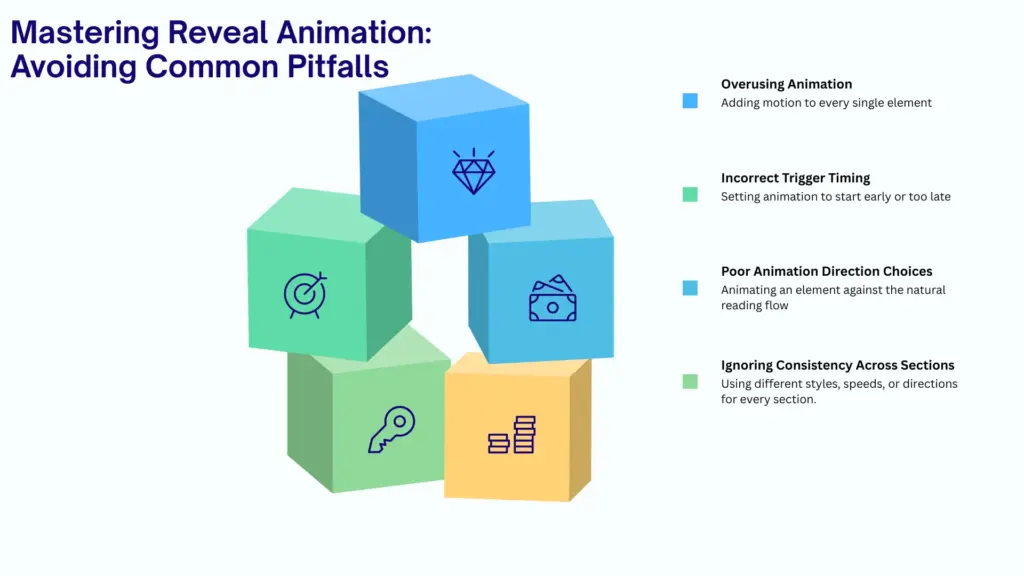
Overusing Reveal Animations
Reveal animations are meant to support your content, not steal the spotlight. Adding motion to every element can quickly make a page feel busy and distracting, pulling attention away from what users actually came to read or see.
Too much animation can also affect performance, especially on slower devices, which often leads to frustration instead of engagement.
Incorrect Trigger Timing
Timing plays a huge role in how natural a reveal animation feels. Animations that start too early may play before the element is even visible, while delayed triggers can make content appear out of sync with scrolling.
Smooth, well-timed reveals feel connected to user movement and create a more comfortable browsing experience.
Poor Animation Direction Choices
The direction of an animation affects how easily content can be consumed. Movements that go against natural reading flow can feel awkward and distracting, particularly for text-heavy sections.
Choosing directions that align with how people naturally scan a page helps animations feel intuitive rather than forced.
Ignoring Consistency Across Sections
Consistency keeps a design feeling clean and intentional. Using different reveal styles, speeds, or directions in every section can make a layout feel scattered and unpolished.
Repeating a small set of reveal patterns across the page creates familiarity, improves usability, and makes the overall design feel more professional.
Final Words
Reveal animations are more than visual effects. These animations help structure content, improve readability, and make scrolling feel natural instead of overwhelming.
If speed and simplicity matter, a plugin-based solution works well. For precise control over motion and timing, GSAP offers greater flexibility. For full creative freedom without writing complex code, the Animation Builder bridges the gap between design and control.
No matter which method you choose, intention matters most. Reveal animations should support content rather than distract from it. With the right balance of timing, direction, and consistency, a WordPress site can feel smooth, polished, and thoughtfully designed.
FAQs
What is a reveal animation?
A reveal animation controls how content appears as users scroll. Instead of showing instantly, elements enter the screen gradually using movement, opacity, or masking effects.
Are reveal animations bad for performance?
Not when used properly. Problems usually happen when too many animations run at once or when timing is poorly configured. Using lightweight effects and consistent triggers keeps performance stable.
Can I create reveal animations without coding?
Yes. Plugins and animation builders allow you to create reveal animations visually without writing JavaScript or CSS.
When should I use text reveal animations?
Text reveals work best for headings, hero sections, and key messages. They help guide attention and make important content feel more engaging.
Leave a Reply