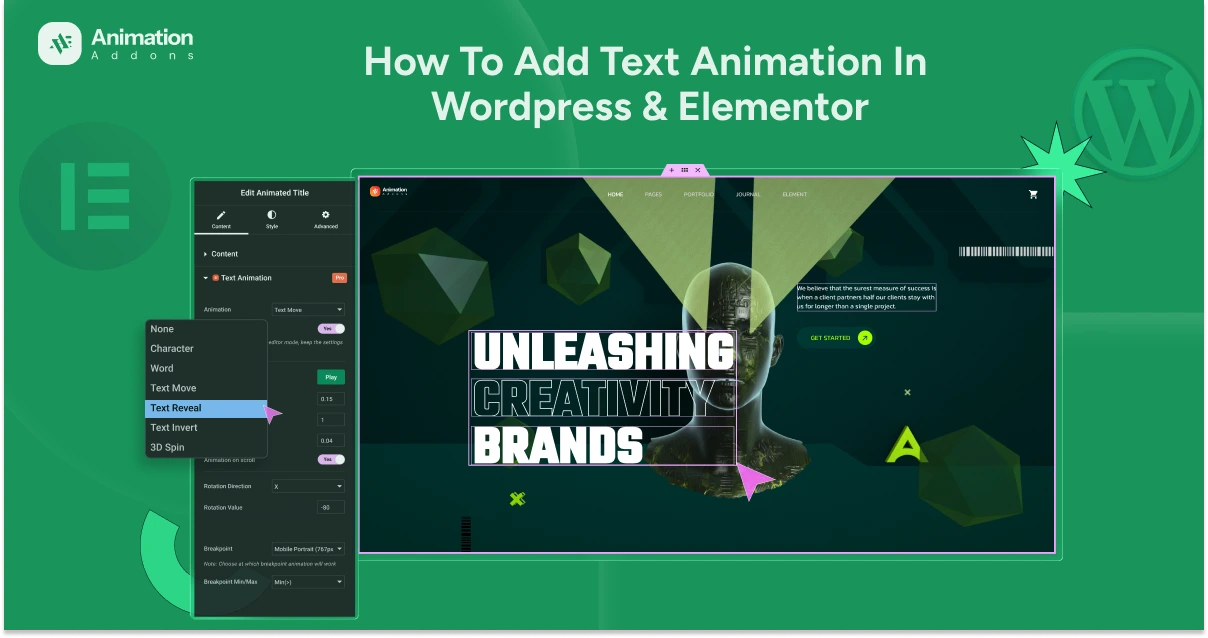
Boring, static text? Throw it out. It’s time your headlines slide, fade, type, or even spin in 3D. With text animations, your website does more than look nice. It gets people to pay attention.
From smooth fades to typing animation WordPress effects, WordPress and Elementor give you the tools to make your words alive, bold, and impossible to ignore.
In this guide, you will discover all types of text animation in WordPress. You will see the easiest ways to add them. You will also get tips to make them smooth and fast, so your visitors cannot look away.
Types of Text Animations
There are several styles of WordPress text animation you can use, depending on your design goals:
Fade in/out
Fade animations make text slowly appear or disappear. This effect is simple but looks smooth and nice. It works well for headings, buttons, or short messages.
You can also change the speed to make the text show up slowly or quickly, depending on the effect you want.
Use Case: A welcome message or announcement that gently appears on page load.
Slide / Zoom
Slide or zoom effects make text move onto the screen from different directions or grow bigger and smaller. These effects are great for titles, banners, or special messages.
Sliding from the left, right, top, or bottom helps catch the reader’s eye. Zooming in can make important words stand out more.
Use Case: Highlighting a new product or feature on a landing page.
Highlight / Color change animation
This animation changes the text color, background, or gradient over time. It is good for highlighting important words, special deals, or content that should catch attention. You can also use it with other effects, like fade or slide, to make it look more interesting.
Use Case: 50% OFF” labels or call-to-action buttons in blog posts or product pages.
Typing effect
The typing text animation WordPress effect makes text appear as if it’s being typed on the screen. This effect works well for slogans, titles, or telling a story. You can also repeat it with different phrases to make the text more lively.
Use Case: A homebase banner that types different benefits of your services one after another.
Split text (word/letter-based)
Split text animations break a sentence into single words or letters and move each part separately. This makes the text look cool and professional. It is great for eye-catching titles or interactive sections. Many text animation plugins WordPress support this effect.
Use Case: Animated headlines in landing pages or product showcases.
Rotating text
Rotating text cycles through multiple phrases or keywords in a single text space. This is a space-saving way to present several features, services, or offers without overwhelming the user. You can combine it with fade or slide effects for a more polished look.
Use Case: Displaying multiple services in a hero section.
Now that you know the different types of text animations, let’s look at some ways that you can use to create animated text in WordPress.
3 Ways to Add Text Animation in WordPress
There are several ways to add animated text to WordPress plugin effects. Let’s break them down.
- 1. WordPress Plugin.
- 2. Custom CSS
- 3. GSAP Library
1. WordPress Plugin
In WordPress, you will have tons of plugins to animate your website. But here we will discuss only two WordPress plugins: Animation Addons and Elementor Pro. Animation Addons and Elementor Pro are both great plugins that can help you add text animation in WordPress.
However, the best part is that if you use Animation Addons, you don’t need Elementor Pro anymore.
Animation Addons
Animation Addons is an all-in-one WordPress plugin that, for the first time, brings a full set of animation features to Elementor. It includes 100+ widgets, 25+ extensions, starter templates with 200+ prebuilt websites, 2000+ prebuilt pages, and 10,000+ prebuilt sections.
You also get a custom animation builder to create your own effects. With so many tools and ready-made templates, you can design animated websites quickly and easily.
For example, let’s look at a step-by-step guide to adding text animation in WordPress using Animation Addons.

Step 1: First and foremost, make sure you have installed Animation Addons plugin in your WordPress website.
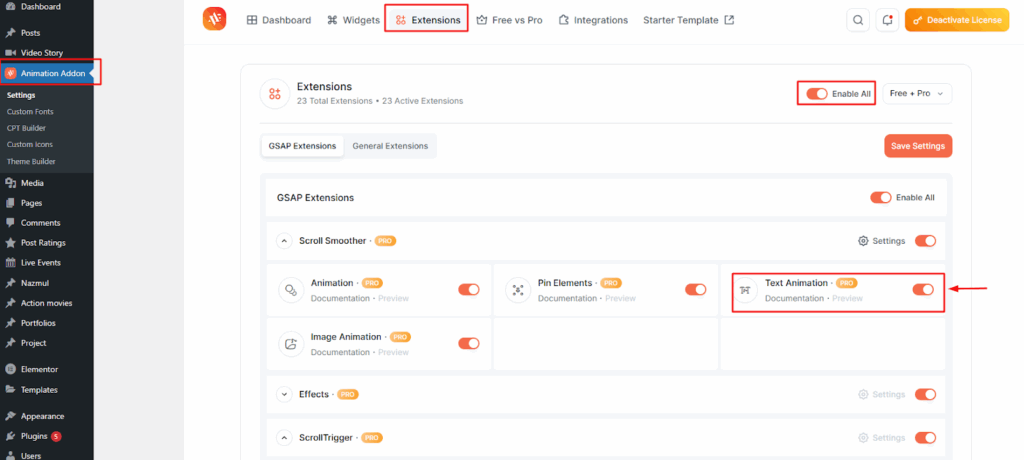
Step 2: After that, go to the Animation Addons plugin, click on Extensions, and under Scroll Smoother, turn on ‘Text Animation’. Text Animation is now enabled. You’ll find the option available in the page builder.
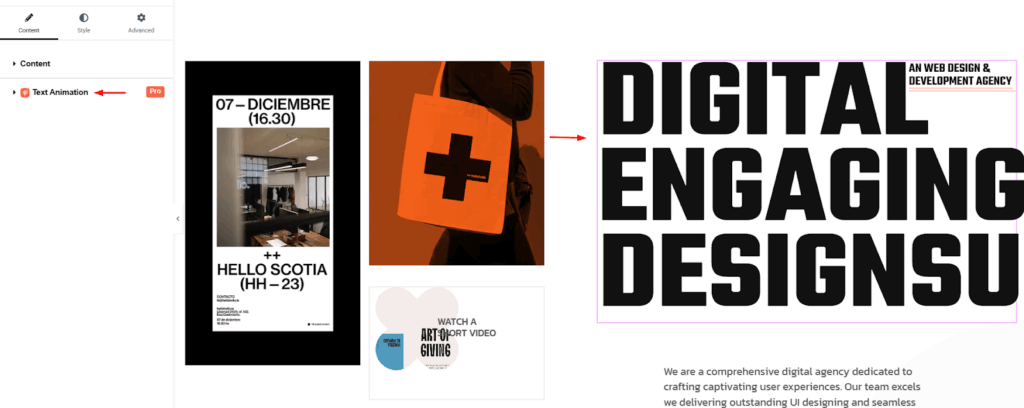
Step 3: Choose the text element you want to animate, and then click on ‘Text Animation.
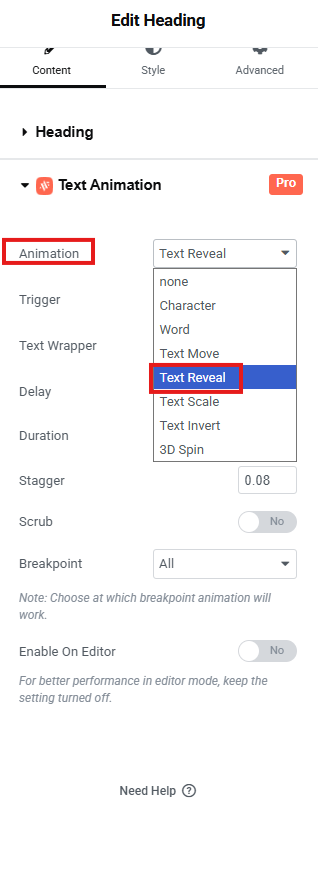
Step 4: Once you click on ‘Text Animation’ you will find various effects to explore. Such as None, Character, Word, Text Move, Text Reveal, Text Scale, Text Invert, and 3D Spin.
For example, here ‘Text Reveal’ is selected, but you can choose any effect you like.
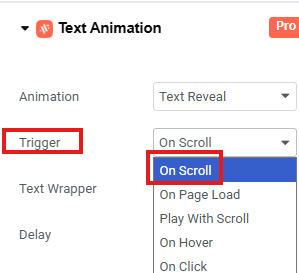
Step 5: The Trigger option lets you decide when the text animation should start. You will see options like On Scroll, On Page Load, Play with Scroll, On Hover, and On Click.
For example, here it is set to On Scroll, but you can choose any option you prefer.
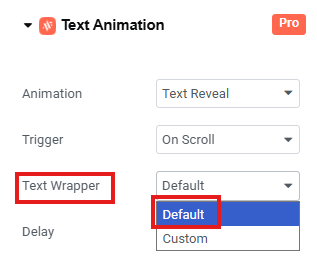
Step 6: Next, the Text Wrapper ‘Default’ option uses the plugin’s automatic method to wrap your text for animation. On the other hand, custom lets you ‘Manually’ define how the text should be wrapped.
For example, the default option is selected here, but you can pick any option you like.
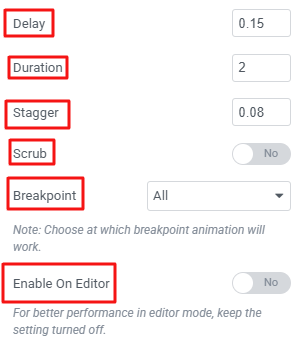
Step 7: Customize the rest of the function based on your choice. In this example, delay is set to 0.15, Duration 2, Stagger 0.08 and then leave other settings as they are.
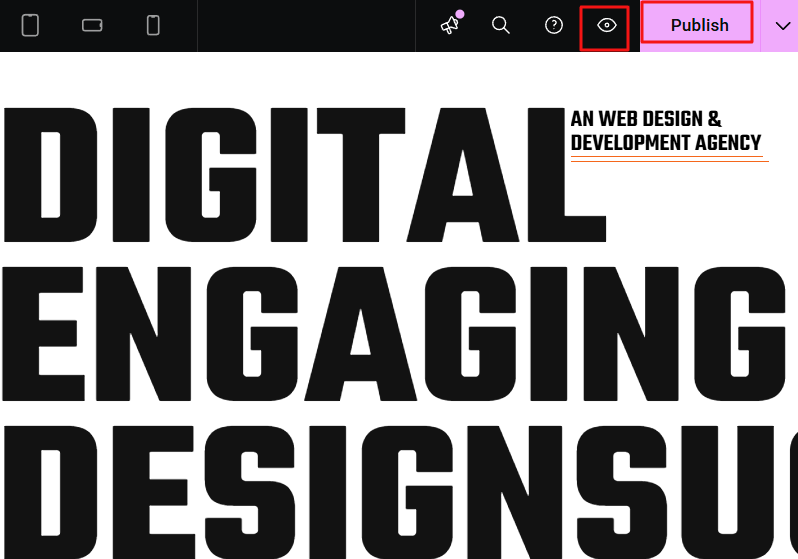
Step 8: Finally, hit ‘Publish’ and then click ‘Preview’ to check your Text Animation effect.
With Animation Builder
So far, you have learned some simple ways to add animations in WordPress and Elementor. Now, if you want more control, you can use the Animation Builder. This tool lets you make your own animations.
You can choose when the animation starts, how long it lasts, how fast it goes, and how it moves. You can also set what makes it start, like scrolling, hovering, or clicking.
Let’s go through a simple guide on how to use the Animation Builder for your layout:
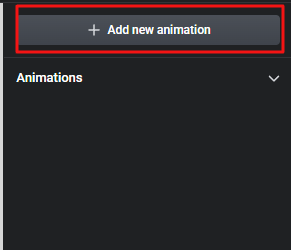
Step 1: Navigate to your pages, select ‘Build Animation’ (Ensure Animation Addons is installed before starting).

Step 2: Next, click on ‘Add New Animation’ button.
You will find two choices: Preset Animation and Custom Animation. Use Preset Animation for a fast setup without adjusting any settings. Select Custom Animation if you want to design your own style with full control. For this example, we’ll go with Custom Animation.

Step 3: Start by typing a title you want. Here, the title is Trigger Animation. Then click the ‘+’ icon to create a timeline and add your animation just like before.
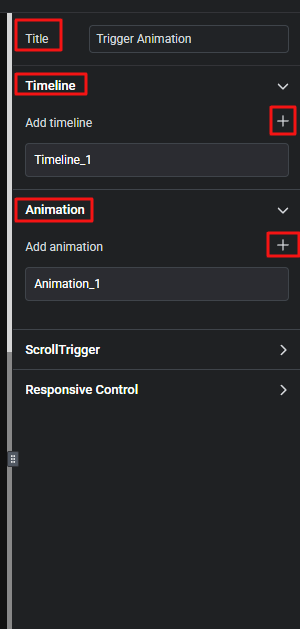
Step 4: Select any element, like an image or text, where you want to add animation.
For example, we picked ‘Text’ here. Then, click on ‘Animation_1’ to open the animation settings. Add the timeline you created.
Since we made ‘timeline_1’, we’ll add it to the property box. Next, you’ll see the method options: To, From, and Set. Choose the one that matches your style.
For example, we chose ‘From’ here.
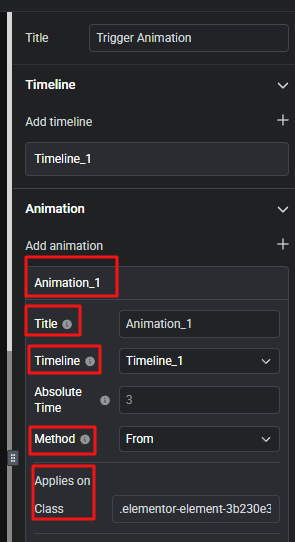
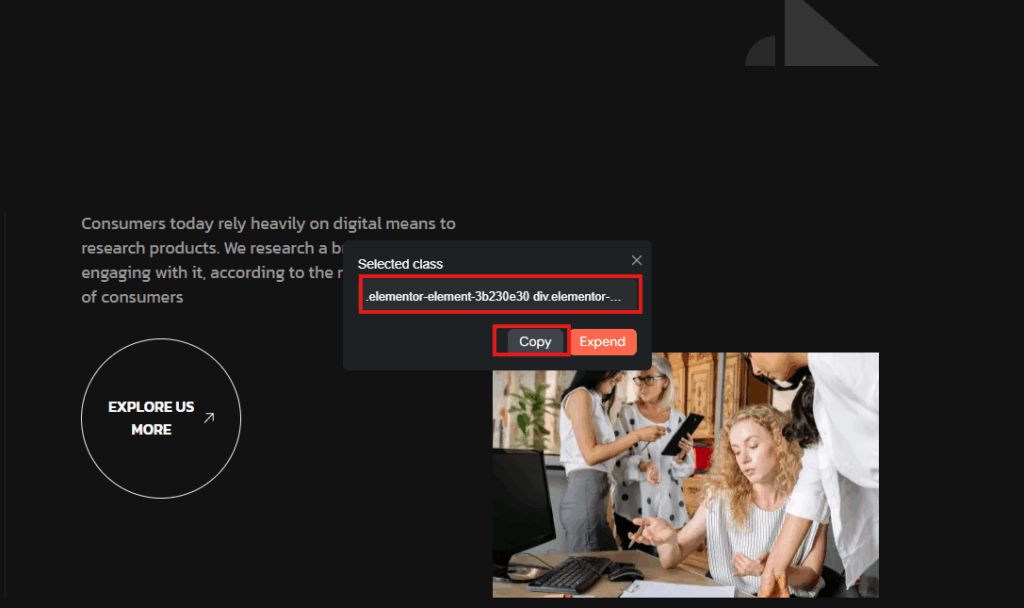
Go to the element you want to animate and click the left button on your mouse. A box with the class name will pop up. Copy the class name and paste it into the Class box.
Step 5: Now enable SplitText. Next, under Type, select Lines (you can also choose Characters or Words if you want).
Then, click Add New. Add effects such as Y, Opacity, and Stagger, and set their values like this:
- Y: -50
- Opacity: 0
- Stagger: 0.2

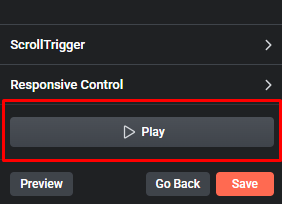
Step 6: Finally, hit the “Save” button, then click “Play” to preview the animation.
Elementor Pro
Elementor Pro is the premium upgrade of the Elementor page builder for WordPress. It gives you complete control over your website’s design and functionality. It includes advanced features such as a theme builder, WooCommerce integration, dynamic content support, professional-grade widgets, motion effects, and built-in marketing tools.
These features make it easy to create fully customized, responsive, and high-performing websites without writing a single line of code. Plus, Elementor Pro offers Elementor animated text features built in.
Here is a step-by-step guide to adding text animation in WordPress using Elementor Pro.
Step 1: To get started, click on any specific text element that you want to add text animation. After that, go to the ‘Advanced’ tab.
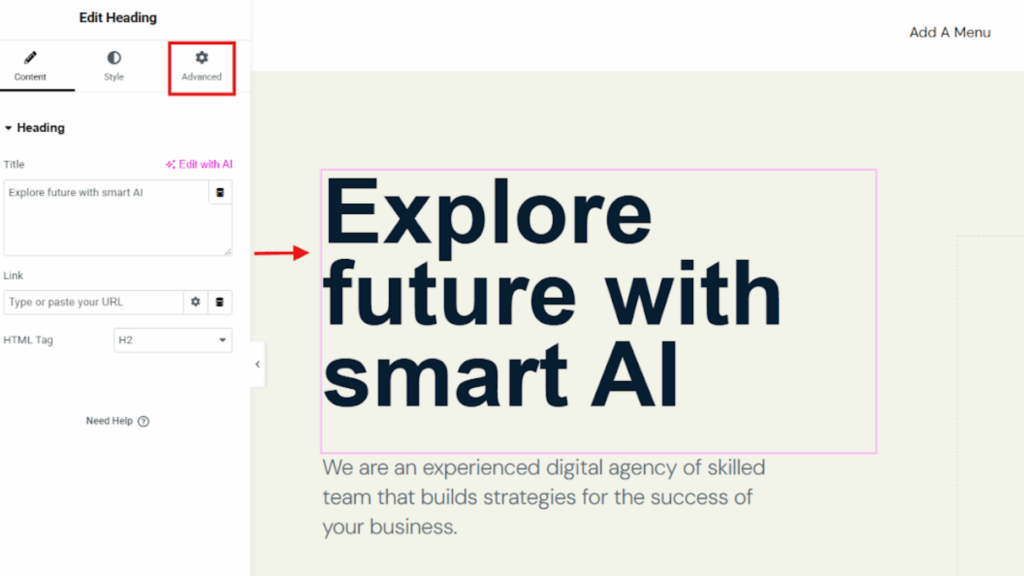
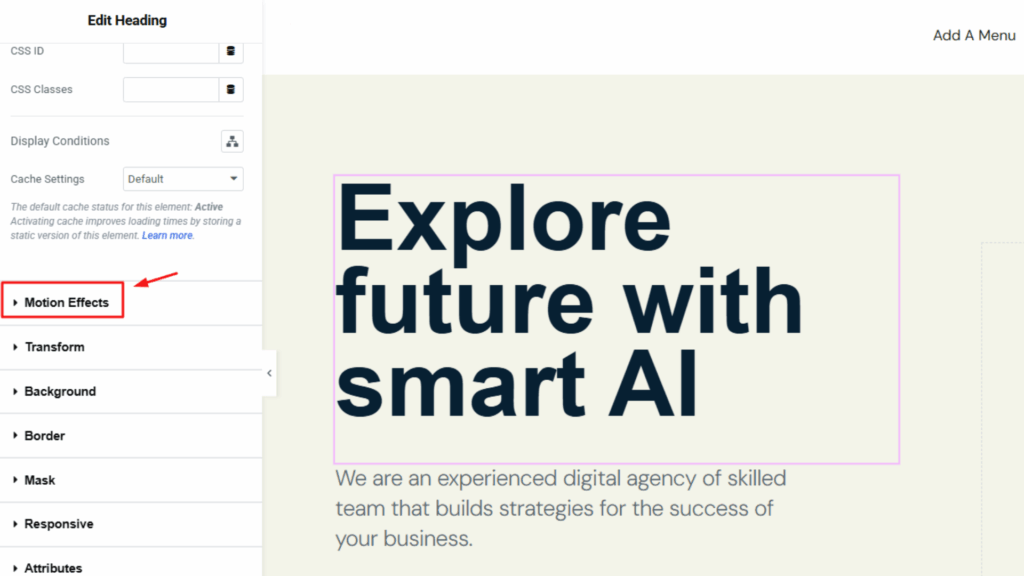
Now search for Motion Effect and click on it.
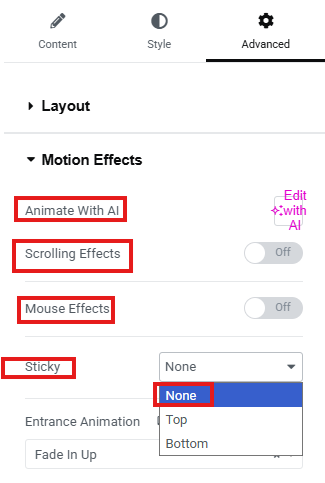
Step 2: Once you click on ‘Motion Effects’, you can customize each option as you like. For example, you could use Animate with AI to add text animation, but in this case, it’s not applied.
The ‘Scrolling Effects’, ‘Mouse Effects’, and ‘Sticky’ options are also kept disabled here. However, if you want to use them, you can easily enable them by toggling the switch.
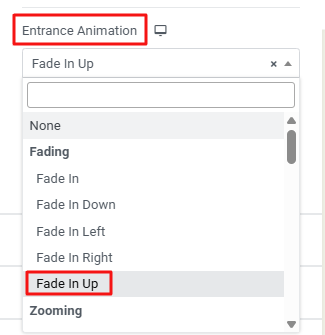
Step 3: Next, under ‘Entrance Animation’, you’ll find various effects that control where the animation begins. Options include Fade In, Fade In Down, Fade In Left, Fade In Right, Fade In Up, zoom, and so much more.
For example, in this case, ‘Fade In Up’ is selected, but you can choose any effect you prefer.
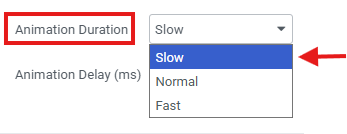
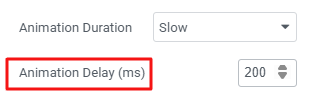
Step 4: Then, set the animation duration, which determines how long the animation takes to complete. You can choose Slow, Normal, or Fast.
For example, it’s set to ‘Slow’ here, but you can select any option you prefer.
Next, set the animation delay, which determines the waiting time before the animation starts. For example, it’s set to 200 here, but you can choose any value you like.
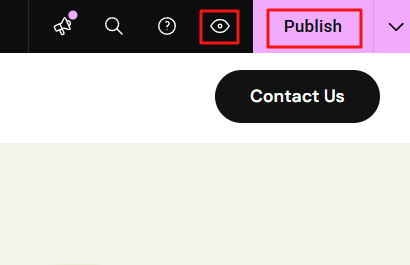
Step 5: Finally, click Publish and Preview to see your text animation Elementor in action.
2. Custom CSS
If you are comfortable with CSS, using custom code gives you more flexibility. You can create unique and advanced text animations that plugins or built-in effects can’t. This method lets you fully control the timing, style, and movement of your text.
Overall, it helps give your website a professional and personalized look.
Here’s a simple example of a custom animation:
					.animated-text {

  animation: fadeSlide 2s ease-in-out infinite;

}

@keyframes fadeSlide {

  0% { opacity: 0; transform: translateY(-10px); }

  50% { opacity: 1; transform: translateY(0); }

  100% { opacity: 0; transform: translateY(10px); }

}
How it works:
- The .animated-text class applies the animation to any text element you assign it to.
- The fadeSlide keyframes define the animation sequence: the text fades in while sliding up, then fades out while sliding down.
- 2s is the duration of the animation, ease-in-out controls the speed curve, and infinite makes it loop continuously.
To use this, simply add the CSS to your WordPress site via Appearance → Customize → Additional CSS, or include it in your child theme’s stylesheet. Then, apply the animated-text class to any text element you want to animate.
3. GSAP Library
To use GSAP in WordPress, first add the library to your theme or plugin.
					function enqueue_gsap() {

  wp_enqueue_script( 'gsap', 'https://cdnjs.cloudflare.com/ajax/libs/gsap/3.12.2/gsap.min.js', array(), null, true );

}

add_action( 'wp_enqueue_scripts', 'enqueue_gsap' );
Then, target a text element with a class, for example:
<h2 class="gsap-text">Animate Me with GSAP</h2>
Apply an animation using gsap.from() or gsap.to():
					gsap.from(".gsap-text", {

  duration: 2,

  opacity: 0,

  y: -50,

  ease: "power2.out"

});
This makes the text fade in while sliding down.
GSAP also supports advanced features like chained effects, timing control, staggered animations, and scroll-based triggers. For example, you can animate text word by word:
					gsap.from(".gsap-text span", {

  duration: 1,

  opacity: 0,

  y: 20,

  stagger: 0.1,

  ease: "back.out(1.7)"

});
Overall, it offers smooth performance, precise control, and professional-quality animations. It’s perfect for developers who want complex, customizable, and high-performance effects in WordPress.
Tips for Smooth Performance
Animated text can add a modern and engaging touch to your website, but it’s important to balance creativity with performance. Poorly optimized animations can make your site feel heavy, slow, or distracting. Here are some best practices to keep everything smooth and user-friendly:
Keep animations simple and useful
Animations work best when they help people notice something important, like a title, button, or message. If you animate too many things on one page, it can look messy and confuse visitors. Simple animations are easier to follow and feel nicer on the eyes. Use them to guide attention, not to decorate everything.
Test on all devices, even phones
An animation that looks smooth on a big computer screen may not look the same on a phone or tablet. Small screens can make animations feel slow or hard to read if they are too heavy. Always check how your animations look and move on different devices. This makes sure everyone has a good experience, no matter what they use.
Don’t stack too many effects
Adding many effects, like fade, zoom, slide, and spin to one word, often looks messy instead of cool. Too many effects can also slow down the website and make it hard to read. One or two clean effects are usually enough to look professional. This way, the animation feels smooth and simple for your visitors.
Use caching and a CDN
Animations need scripts and files to load before they can play. If your site reloads these files every time, it may feel slow. A caching plugin saves those files so they load faster, and a content delivery network (CDN) sends them from a server close to the visitor. These tools work together to make your animations quick and smooth everywhere.
Conclusion
Now that you know how to make text move, fade, type, or spin, you have the tools to make your website feel alive. Using WordPress and Elementor, along with plugins, custom CSS, or GSAP, you can turn ordinary text into something eye-catching and engaging.
By applying the right effects thoughtfully and keeping performance in mind, your content can grab attention without slowing down your site. It is time to experiment, play with different animations, and create a website that your visitors will actually notice and remember.
FAQs
Can I add text animation without Elementor Pro?
Yes, you can! Elementor Pro gives you more advanced features, but it’s not the only way to animate text. Freemium plugins like Animation Addons provide plenty of ready-to-use animation effects.
Can I animate existing text on my site?
Yes, absolutely! You don’t have to create new content just to add animations. Plugins like Animation Addons make it possible to apply animations to any text that’s already on your WordPress site.
If you prefer coding, you can also add custom CSS or GSAP scripts to animate existing headings, paragraphs, or buttons. This gives you full flexibility to bring your current site to life.
Which plugin is best for beginners?
For beginners, Animation Addons is one of the easiest choices. It comes with pre-built text animation effects that you can apply with just a few clicks—no coding required. The interface is simple, so even non-technical users can animate text easily.
Other plugins may offer more advanced features, but Animation Addons is a great starting point for new users.
Do text animations affect site speed?
Simple, lightweight animations usually don’t affect speed much. However, if you add too many animations or use complex effects, your site may start to feel slower. The key is to use animations in moderation and test them on different devices.
Optimizing your site with caching and a CDN also helps keep animations smooth. In short, animations are fine as long as they’re not overdone.
Leave a Reply